
About
The Mel Script Mega Pack is a collection of scripts and tools for Autodesk Maya.
I created the Mega Pack to make Maya faster and easier to use, and it's fun to automate tasks that would otherwise be time consuming and tedious inside of Maya.
All the tools are written in MEL script which means they work on newly released versions of Maya without needing to be updated.
If you're new to the Mega Pack take a look at the Quick Start Guide to get an overview of what each script does.
Follow me for updates on new tools, features, and bug fixes.
Youtube www.youtube.com/malcolm341
Gumroad www.gumroad.com/malcolm341
Artstation www.artstation.com/malcolm341
LinkedIn www.linkedin.com/in/malcolm-andrieshyn-10135959/recent-activity/all
End User License Agreement
By downloading any of the Malcolm341 script packs you agree to the End User License Agreement below
If you are employed by a studio and working on site or remote please adhere to the Studio/Commercial License Agreement:
Studio/Commercial License - 1 Seat Required Per User
Use the scripts on as many commercial projects as you like, but do not share the scripts between users, each person needs to buy a license for the scripts they use and that license should not be transferred to another person unless the current license holder is no longer employed by that studio.
If you are a student, academic institution, hobbyist, or freelancer meaning you are working a temporary contract less than one year please adhere to the Freelance/Academic License Agreement:
Freelance/Academic License - 1 Seat Required Per User
Use the scripts on as many freelance projects as you like, but do not share the scripts between users, each person needs to buy a license for the scripts they use and that license should not be transferred to another person.
Redistributing, selling, or sharing any part of the Malcolm341 script packs is not permitted.
Copyright © 2017 Malcolm Andrieshyn
Installation
Compatability:
-Works on the newest version of Maya and old versions of Maya back to 2019
-Works on Maya 2018 update 6
-Works on Maya 2017 update 5
-Works on Maya Student
-Works on PC and Mac
-Checker Map Toolbox doesn't work on Maya LT
-Change Default Material Toolbox doesn't work on Maya LT
How to Install the Scripts:
Close Maya.
Download the .zip file you purchased to your desktop.
Open the .zip file and copy the shelf file contained in it to your desktop.
Open Maya.
Click the gear icon in the top left corner of Maya and choose load shelf.
Browse to the shelf file you just copied to your desktop and load it.
You should now see a new shelf in Maya with the same name as the file on your desktop, it contains the scripts you purchased.
If you don't see any shelf names click the gear icon and turn on shelf tabs.
If you want to copy my scripts to a different shelf, hold Ctrl + Shift and Middle Mouse Drag any of my shelf buttons to any other shelf. Make sure to keep holding Ctrl + Shift when you release the middle mouse button or the scripts will be moved rather than copied.
How to Update the Scripts to the Latest Version:
If you previously purchased a script pack you can update to the latest version at any time for free.
Updates include bug fixes, new features, and even new scripts if you purchased the Mega Pack, Modeling Pack, or UV Pack.
Delete the existing shelf you want to update in Maya first.
Close Maya.
Download the .zip file you purchased to your desktop. Use the original e-mail link you received, or look for the file in your Gumroad or Artstation Library and download it from there.
Open the .zip and copy the shelf file contained in it to your desktop.
Open Maya.
Click the gear icon in the top left corner of Maya and choose load shelf.
Browse to the shelf file you just copied to your desktop and load it.
You should now see a new shelf in Maya with the same name as the file on your desktop, it contains the latest versions of the scripts you purchased.
If you don't see any shelf names click the gear icon and turn on shelf tabs.
Be aware that any scripts that you've moved or copied to other shelves are not updated. Unfortunately you'll have to delete those buttons manually and copy my scripts back to your shelves again each time you want to update. Alternatively, if you only have a couple buttons you want to update you can right click and choose edit on any of the buttons on my shelf and copy paste the updated code directly into your shelf buttons.
Quick Start Guide

Help Button
Takes you to the online help page.

Marmoset Export Toolbox
Speeds up exporting meshes for baking in Marmoset Toolbag or Substance Painter with name matching, material ids, bevel shader width, normal editing, and export settings all in one place.

Easy Normals
Automatically sets normals for baking, softens all normals then hardens UV border edges correctly based on a tolerence angle.

Normal Map Viewport Mode
Applies normal map shading to selected objects, from there you can render or screen capture the top viewport to generate normal map stamps and textures.

Obj Import Export Toolbox
Speeds up exporting meshes as .obj for use with applications like Zbrush. Export each mesh as a separate file, triangulate, import multiple, custom file location, and more.

Fbx Import Export Toolbox
Speeds up exporting meshes as .fbx for use with applications like Unreal and Unity. Export each mesh as a separate file, move to origin, freeze transform, folder from scene name, combine meshes, and more.

One Click Export to C:\drive
Exports selection to a temp.ma, temp.obj, or temp.fbx file on your hard drive. This is helpful for moving objects between scenes or saving a temp file without any file browsing.

One Click Import from C:\drive
Imports the temp.ma, temp.obj, or temp.fbx file the export tool creates without any file browsing.

Xray Selected Objects
Toggles Xray mode on/off for selected objects. If nothing's selected Xray mode toggles all objects in the scene on/off.

Wireframe Selected Objects
Toggles wireframe mode on/off for selected objects. Handy for looking through selected objects without changing any viewport settings.

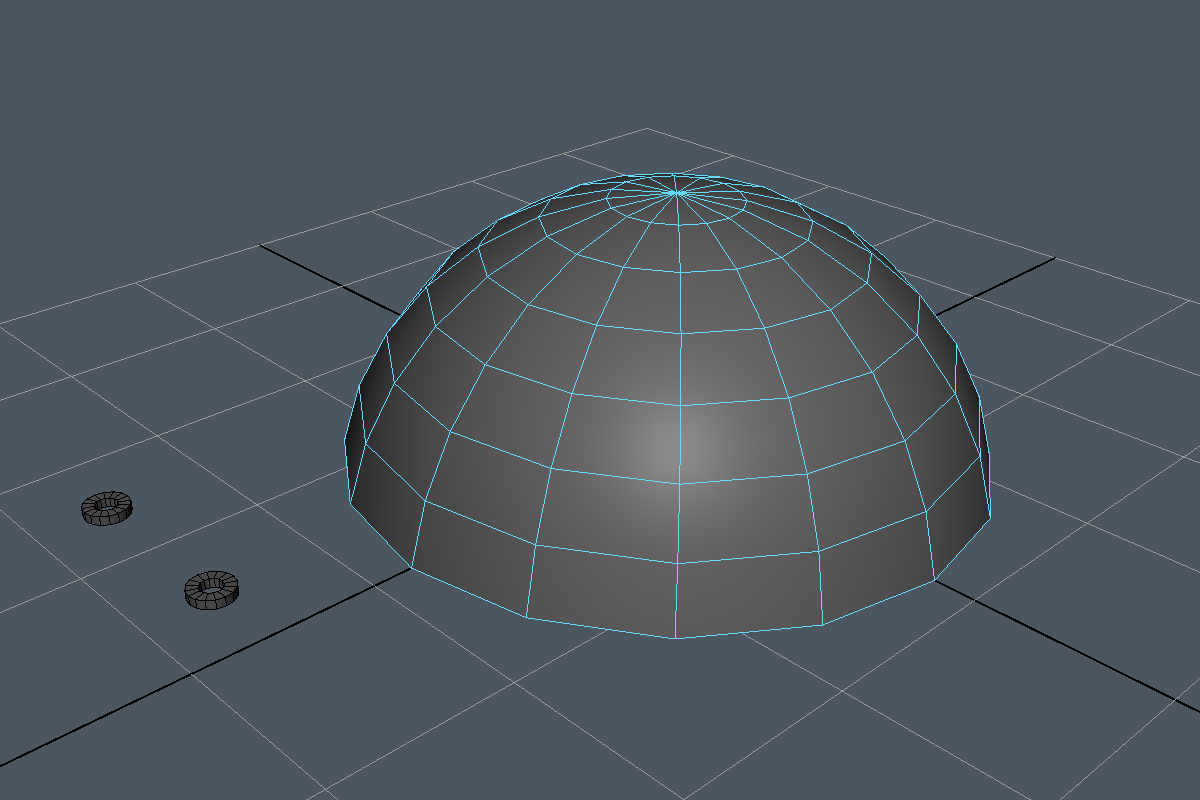
Reference Planes Toolbox
Creates multiple mesh reference planes each with a different image at the correct aspect ratio in one click. Great for rotoscoping if you prefer physical reference planes in the scene instead of image planes.

Delete Empty Groups
Deletes empty groups, transforms, and ghost nodes that are often left behind even after running Maya’s optimize scene size and delete history.

Fast Open Maya
A quick way to disable the plugins that significantly slow down Maya when it's opening.

Fast Close Maya
Closing Maya prior to Maya 2022 was extremely slow. The fast close tool closes Maya instantly for Maya 2019, 2018, 2017.

Advanced Save Preferences
Saves contents of script editor, MTK custom shelf, recent file history, tool settings, and other preferences that aren’t included in Maya's default save preferences command.

Increase Shelf Height Toolbox
Increases or decreases shelf height to fit height of current shelf. Custom shelf height is retained after Maya restart unlike other tools I've seen online.

Extra HUD Toolbox
New HUD elements for working units, grid size, scene time warp on/off, up axis, selection counter, assigned materials, current UV set, preserve UVs on/off, project location, time since last save, time since last auto save, tool axis, camera distance, and camera based selection on/off.

Dynamic Measuring Toolbox
Creates a measurement node between two or more vertices with a single click. Measurements update automatically if you move the meshes or verts around after creation.

Move Pivot to Selection Center
Moves pivot to selection center in one click, works on components or objects.

Rebuild Rotation Axis from Component
Rebuilds rotation axis along selected component, works even if the transform is frozen. Fixes channel box values unlike the Maya default align to component tool.

Rotate Mesh to Face Y Axis
Rotates the whole mesh so the selected component faces Y up, even if the transform is frozen. This is helpful for un-rotating a mesh so you can work on it aligned with the world axis.

Snap Objects to Surface Normal
Snaps multiple objects to the selected surface aligned to the normal, similar to the snap together tool, but works on multiple objects and is faster to use.

Duplicate Object to Components
Duplicates your object to each selected component and aligns to normal, also works with instances.

Vert Snapping Toolbox
Snaps selected verts to closest verts on another mesh. Saves a lot of time if you’re working with two separate meshes that need to be seamless.

Weld Selected to Closest
Welds selected components to closest vertices without collapsing to a single point. Handy for quickly optimizing a mesh or a whole edge loop.

Weld Selected to Target
Welds selected components to target vertex. Easier and faster to use than the Maya default target weld because you don’t have to drag select the target.

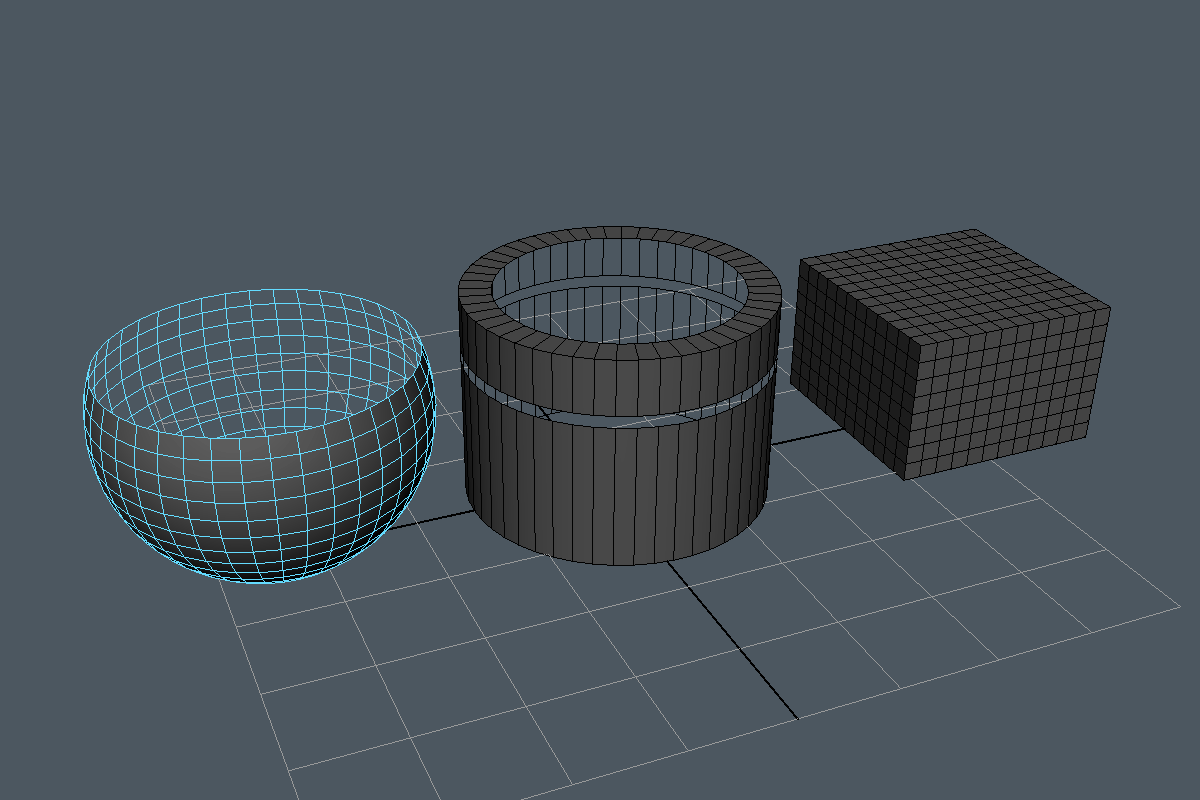
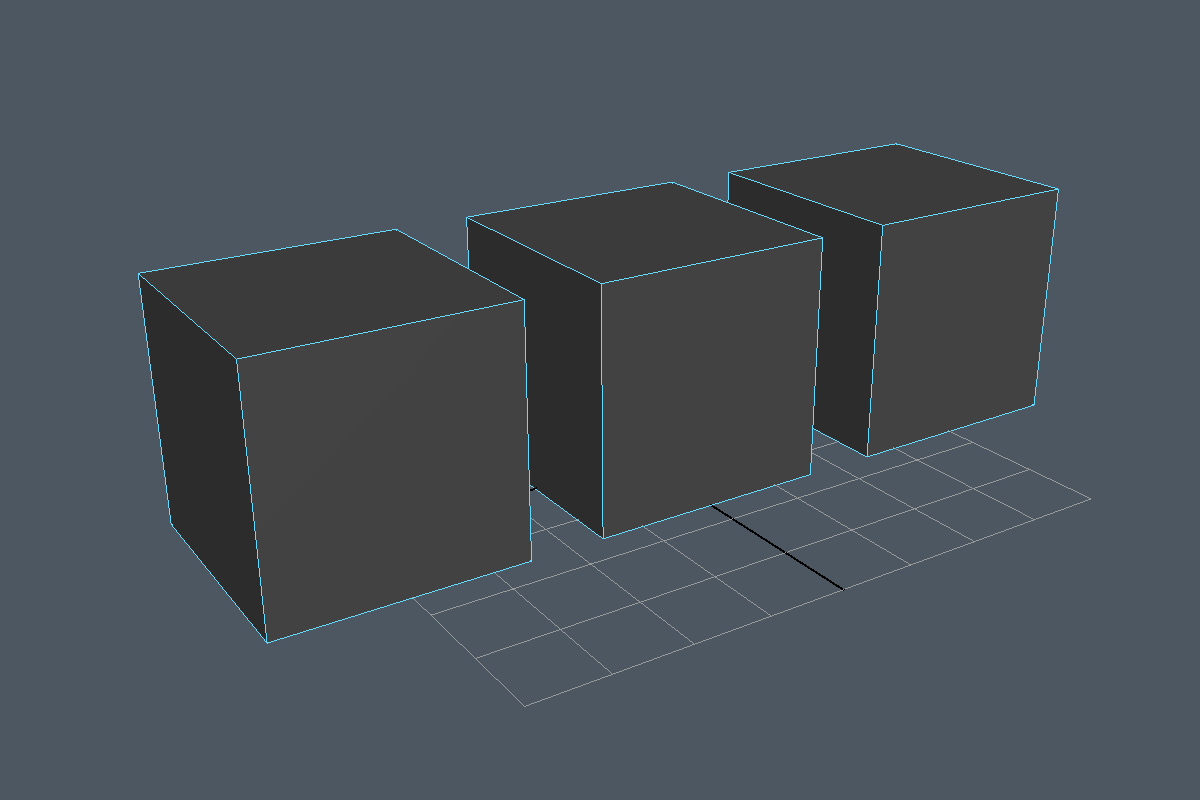
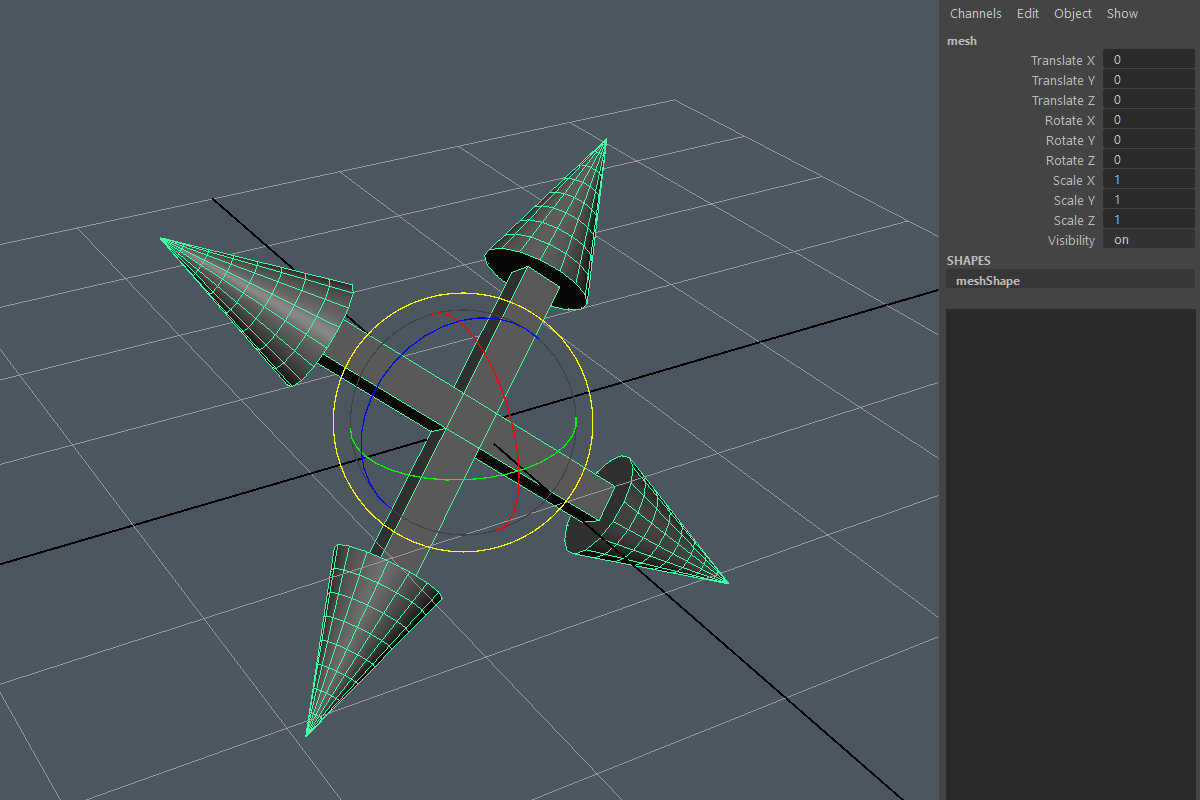
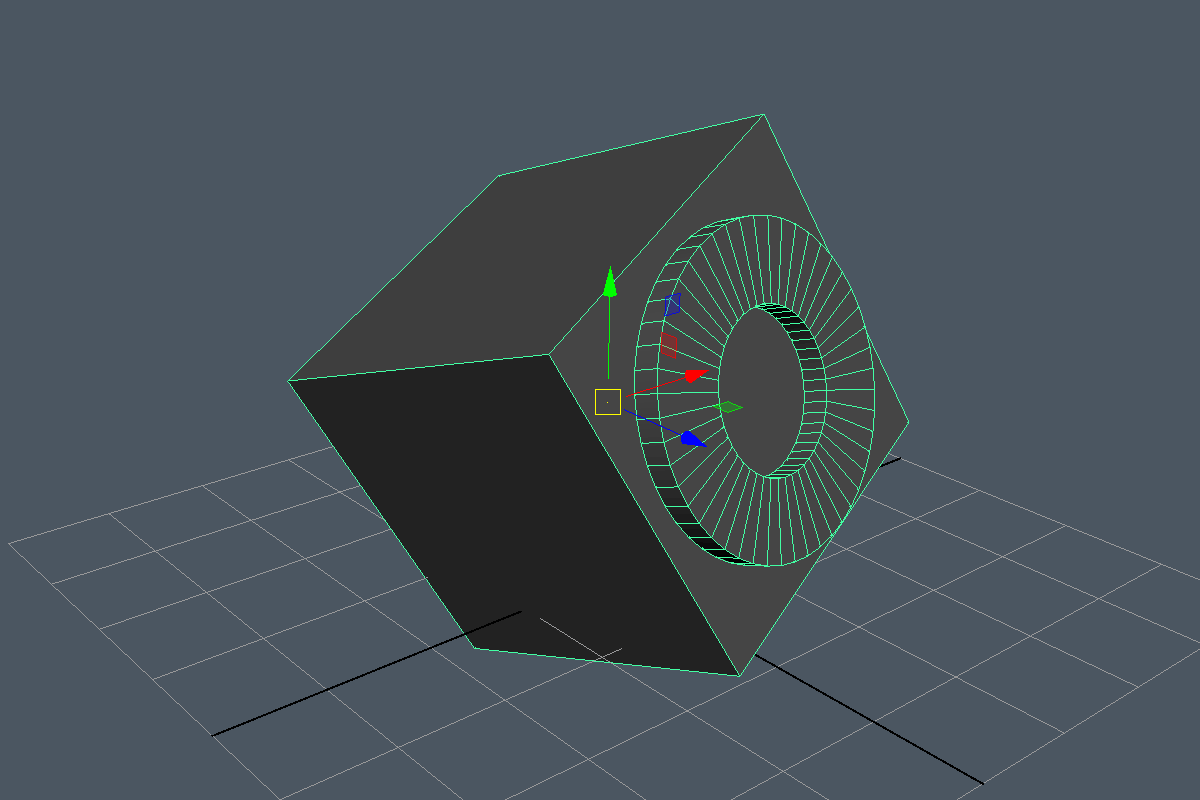
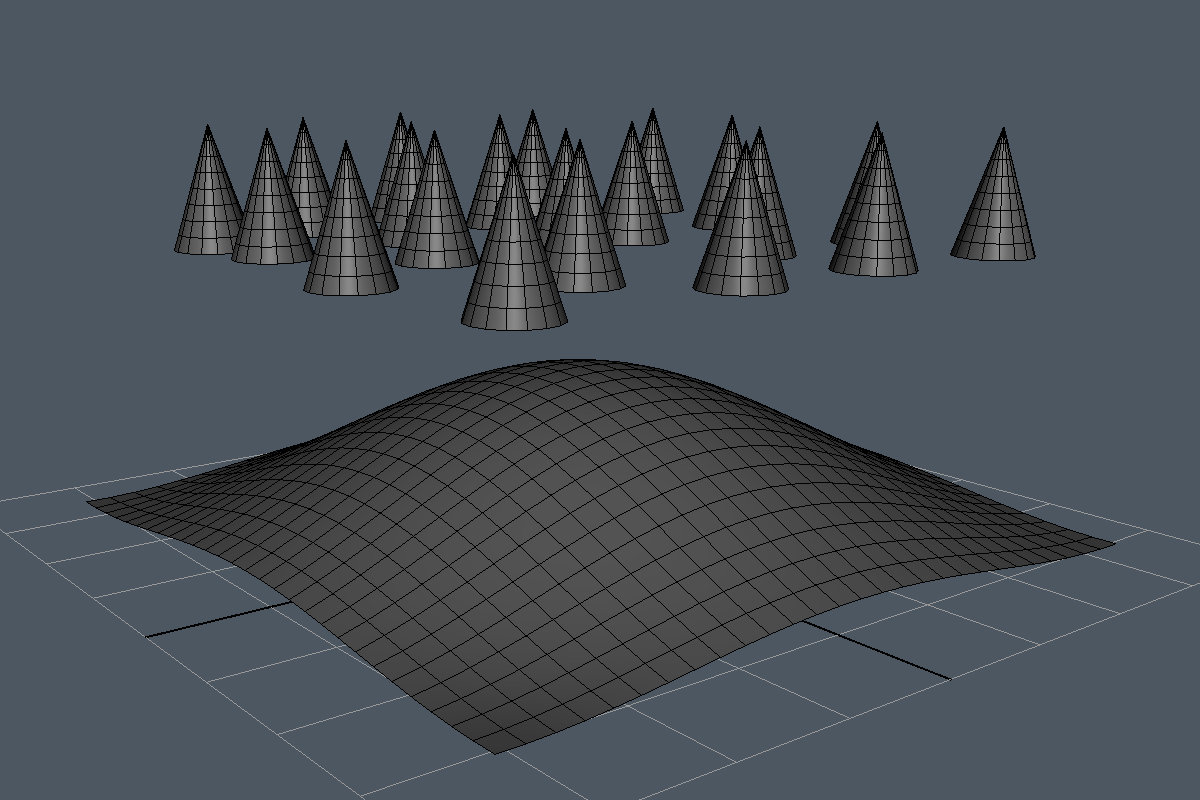
Create Primitive at Selection Toolbox
Creates primitives at selected mesh components aligned to normal. Choose pivot location and scale. Handy for creating primitives aligned to face normals.

Axis Aligned Lattice Deformer
Creates a lattice deformer aligned to the selected face. Works on object or components, works even if the transform is frozen.

Mirror and Instance Toolbox
Mirrors and instances objects faster than the Maya default way plus extra modeling tools related to mirroring.

Clean Combine
Combines meshes without creating a bunch of temp nodes in the outliner. Keeps your scene clean, preserves object name, pivot location, and scene hierarchy.

Clean Extract and Separate
Extracts selected faces without creating a bunch of temp nodes in the outliner. In object mode this tool separates polygon elements into separate meshes.

Clean Duplicate Faces
Duplicates selected faces without creating a bunch of temp nodes in the outliner.

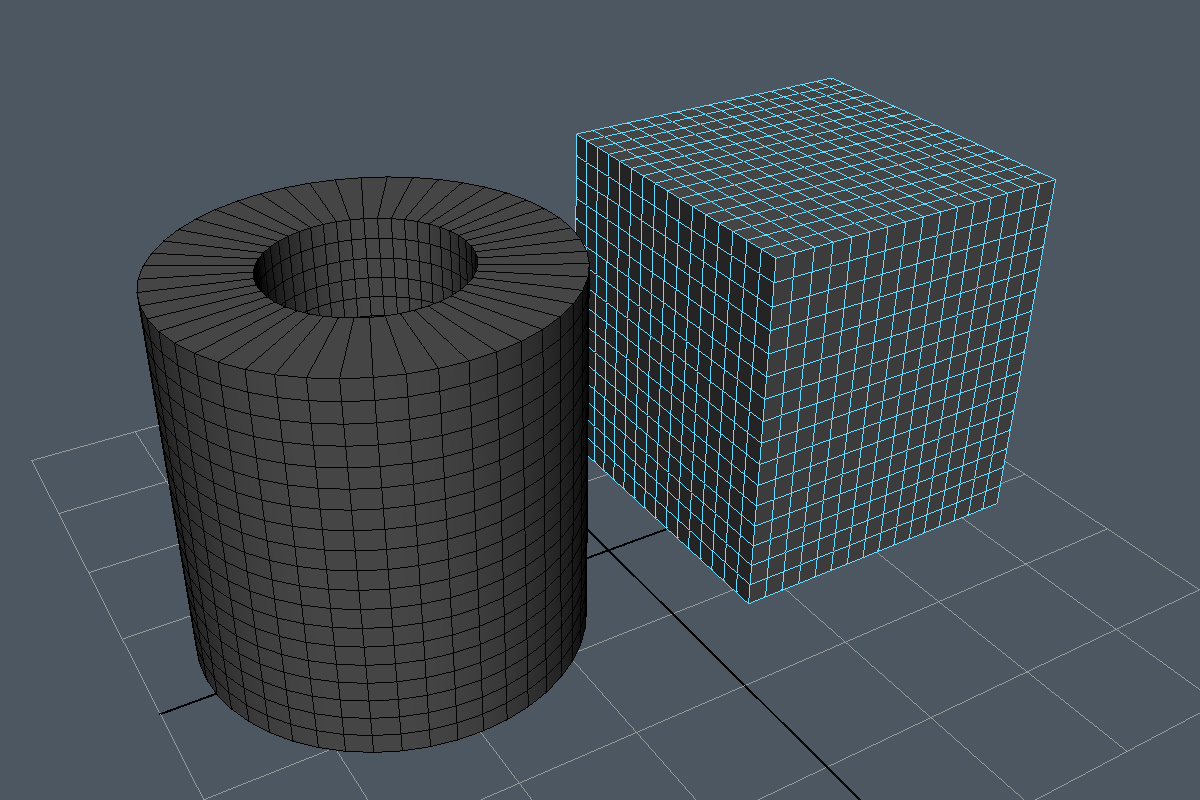
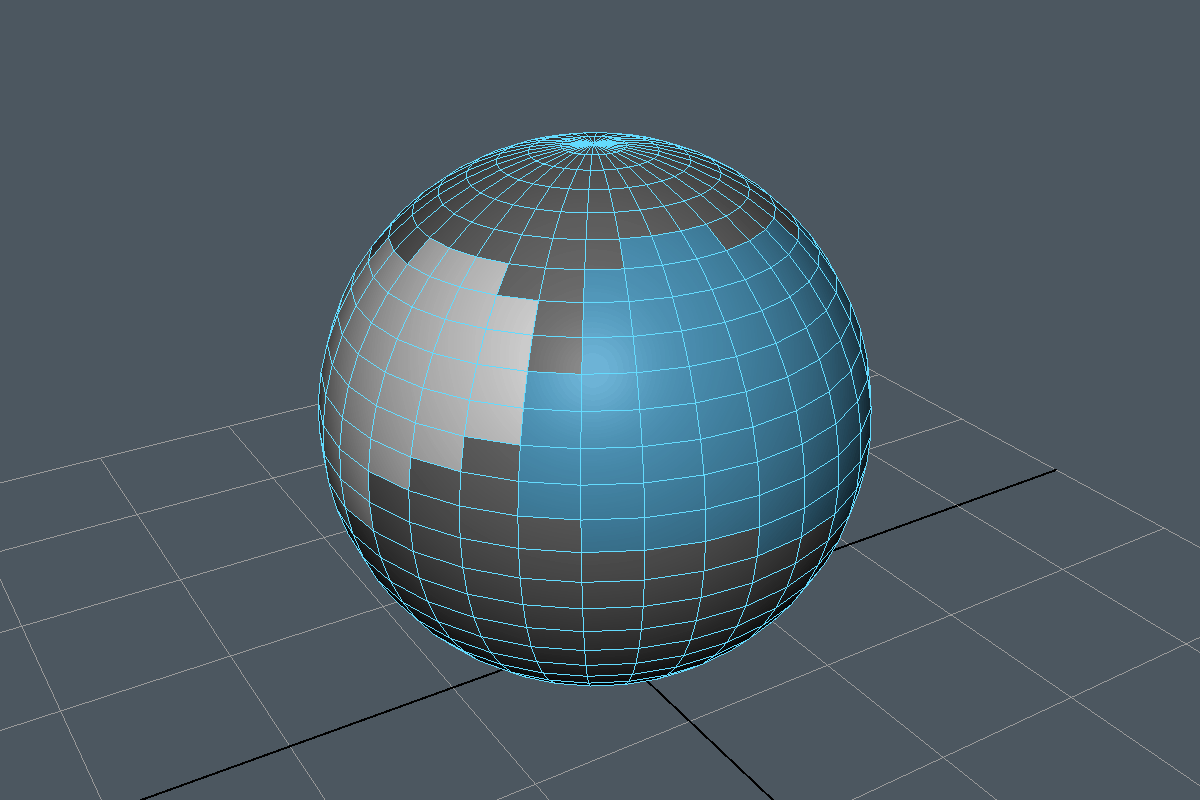
Select Every Other Edge Vert Face Toolbox
Selects alternating patterns of components, for example 1 on 1 off, or 3 on 3 off, or 4 on 4 off. Selects loops or rings.

Select Half Your Mesh from Edge Loop
Converts any continuous edge loop selection to half of your mesh in face mode.

Show Geometry Border Edges
Selects geometry border edges. Identify unwelded verts, failed mirroring operations, and other problem areas on your mesh. Easier to use than the built in show border edges display setting.

Naming Toolbox
A bunch of custom tools to make renaming objects easier than Maya’s built in naming tool. Name matching for baking, removing or replacing part of a name, incrementing names with a letter instead of a number, aphabetically sort the outliner, and more.

Copy Material to Clipboard
Copy a material from one face to the clipboard, allows for copy/pasting materials in the viewport without opening the hypershade.

Paste Material from Clipboard
Paste a material from the clipboard to faces or objects. Save time by applying materials in the viewport without opening the hypershade.

Replace Material id from Clipboard
Replace a material id on a whole object from the clipboard. Save time by replacing material ids in the viewport without opening the hypershade.

Change Default Material Toolbox
Toggles a custom default material on/off for the scene without losing existing material assignments. Choose from six built in default materials, or use your own custom material.

Select Faces by Material id
Selects all faces that have the same mat id on a single mesh and ignores other meshes in the scene that have the same mat id so you don't get duplicate selections.

Graph Materials from Selected Faces
Graphs materials in the Hypershade from selected faces only, unlike Maya's built in graph command which graphs all materials assigned to the mesh.

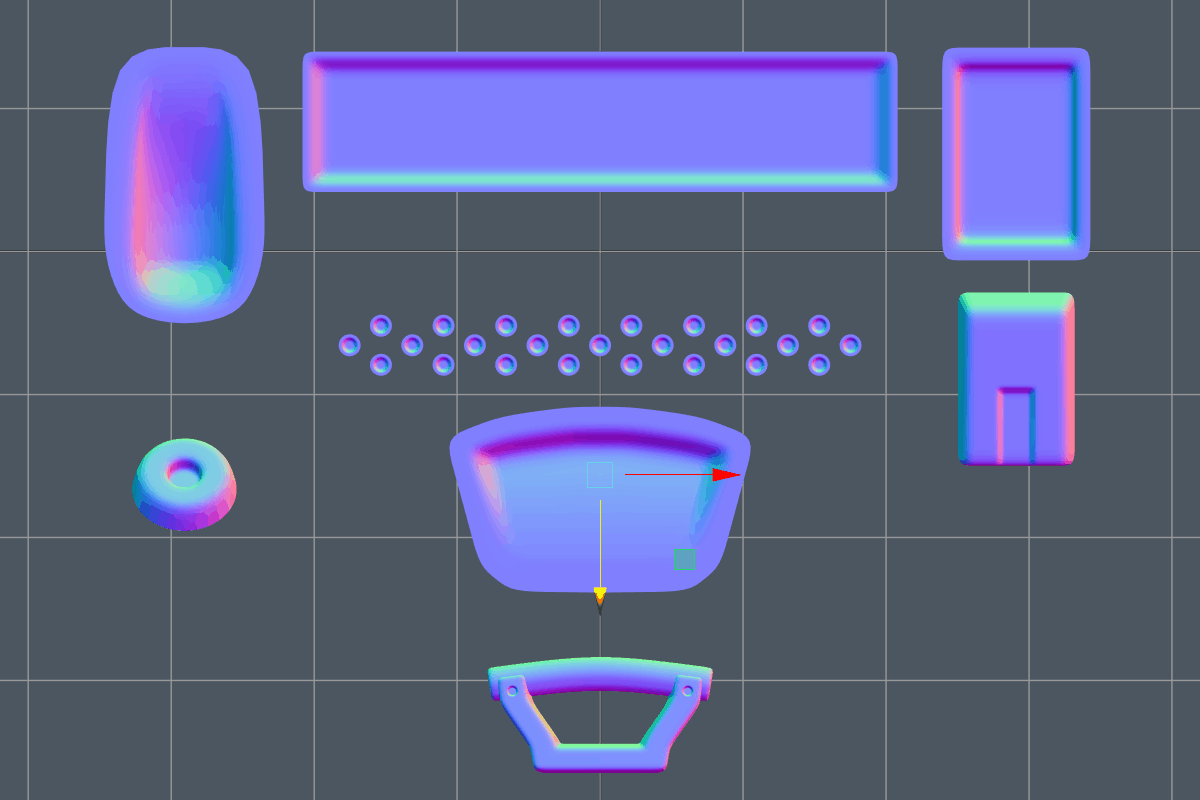
Checker Map Toolbox
Toggles a custom checker map texture on/off for the scene without losing existing material assignments. Choose from four built in checker maps and one built in directional map, or use your own custom textures.

UV Grabber Toolbox
Takes UV snapshots with one click and opens them in Photoshop or the image viewer of your choice. Saves a lot of time exporting wireframes and works with UDIM tiles.

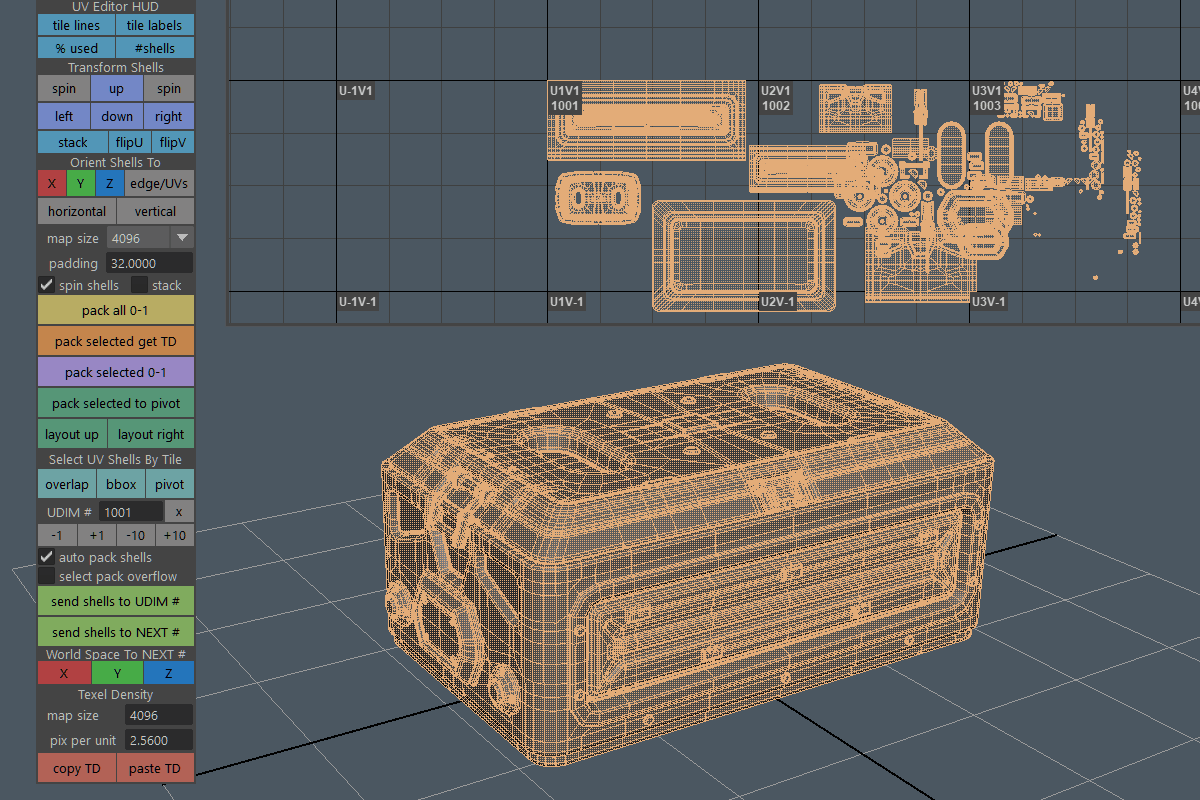
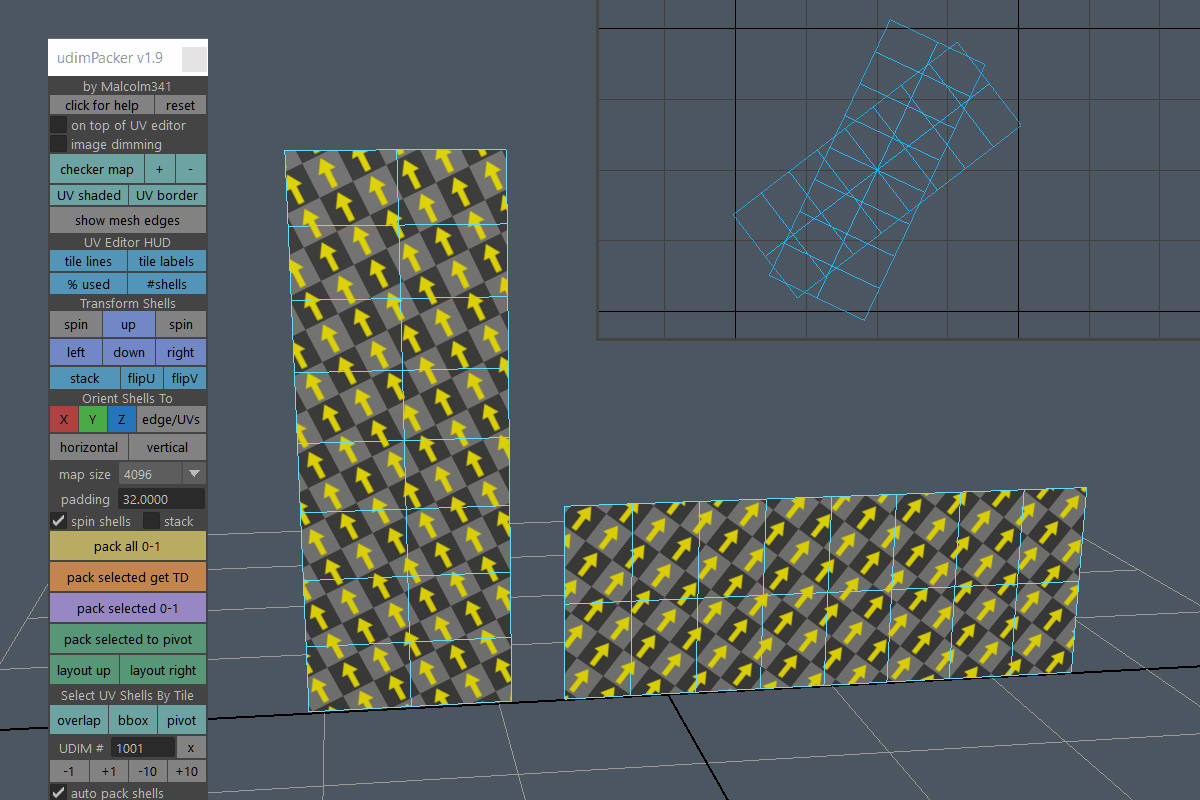
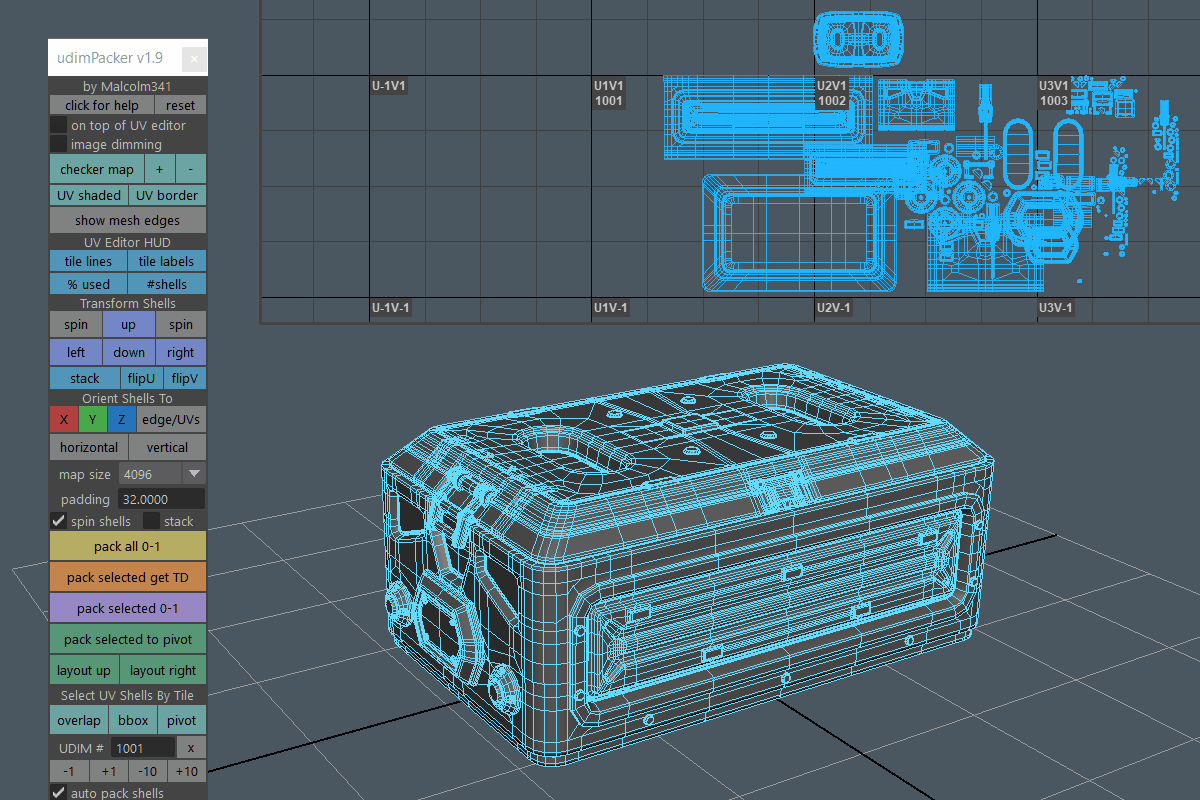
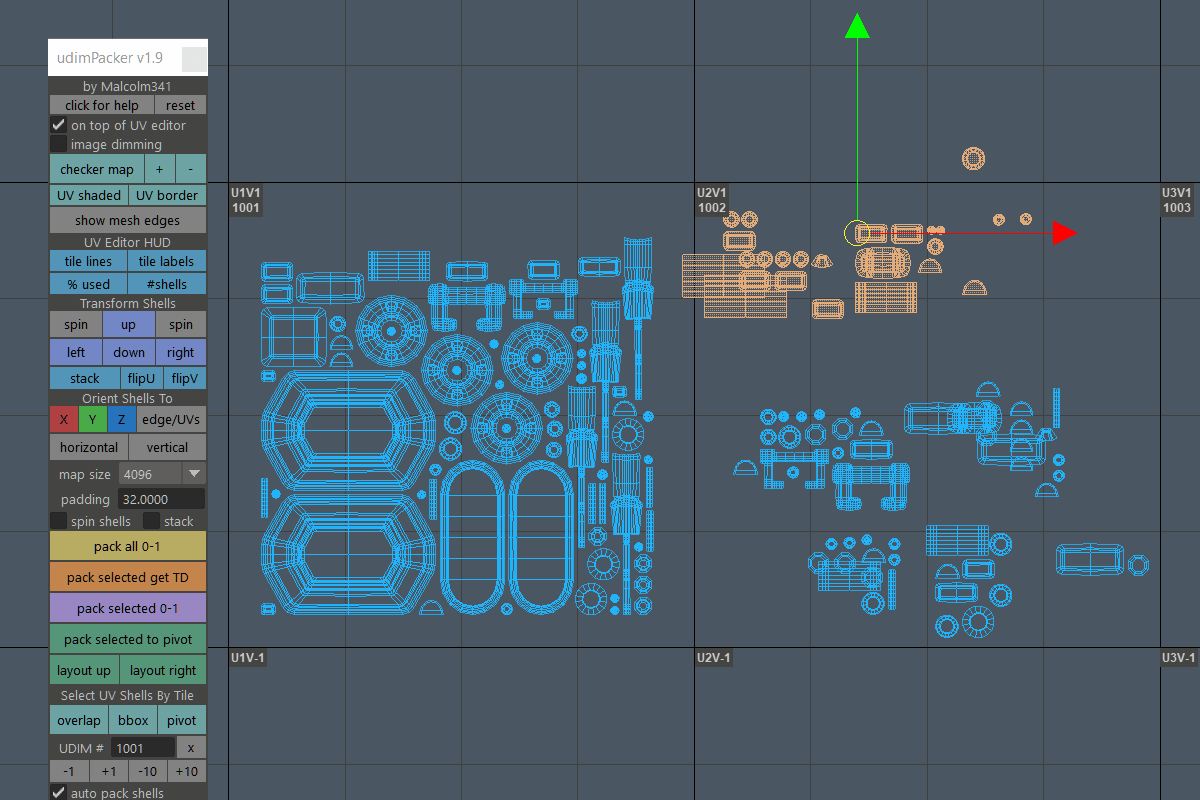
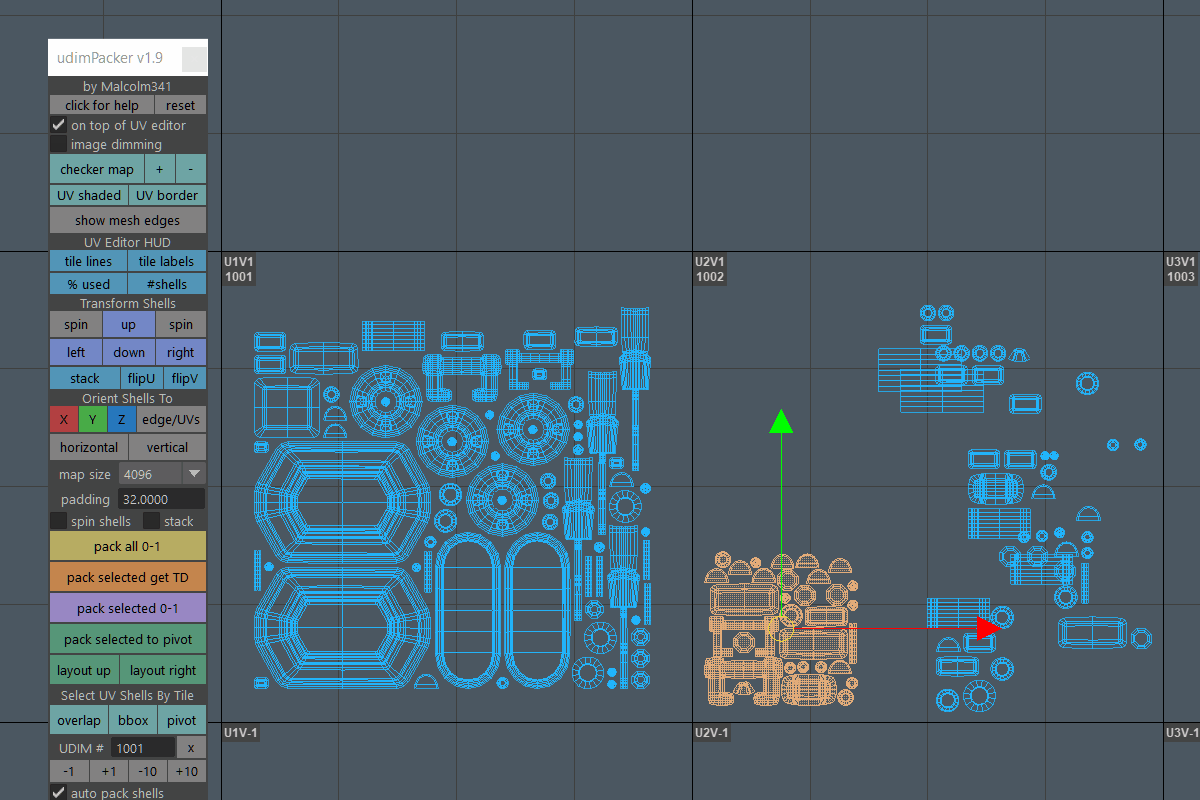
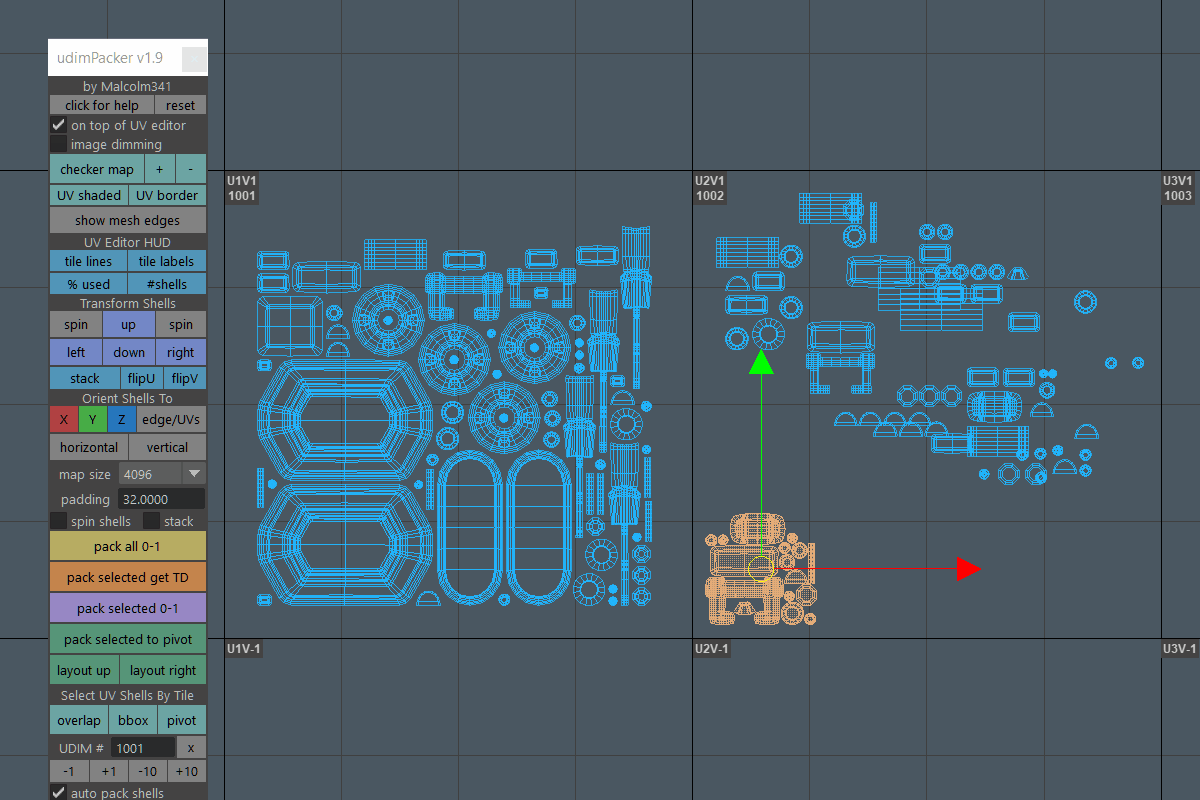
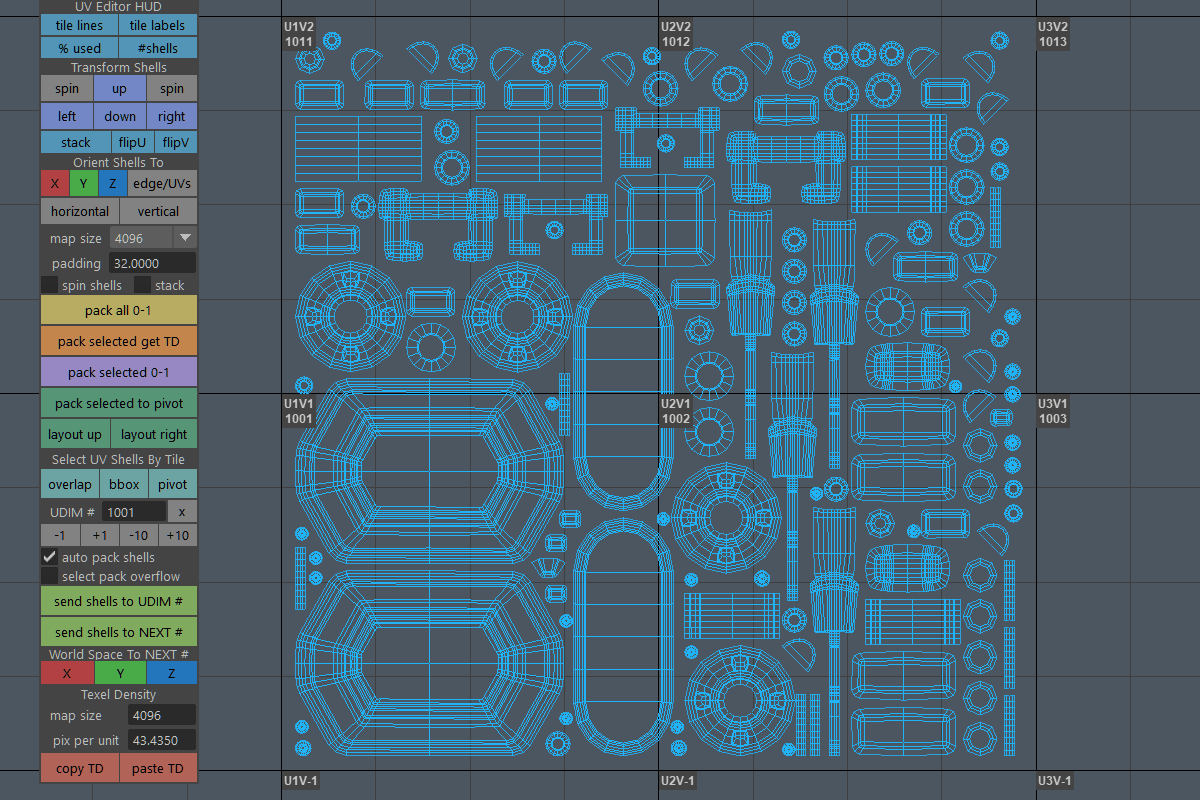
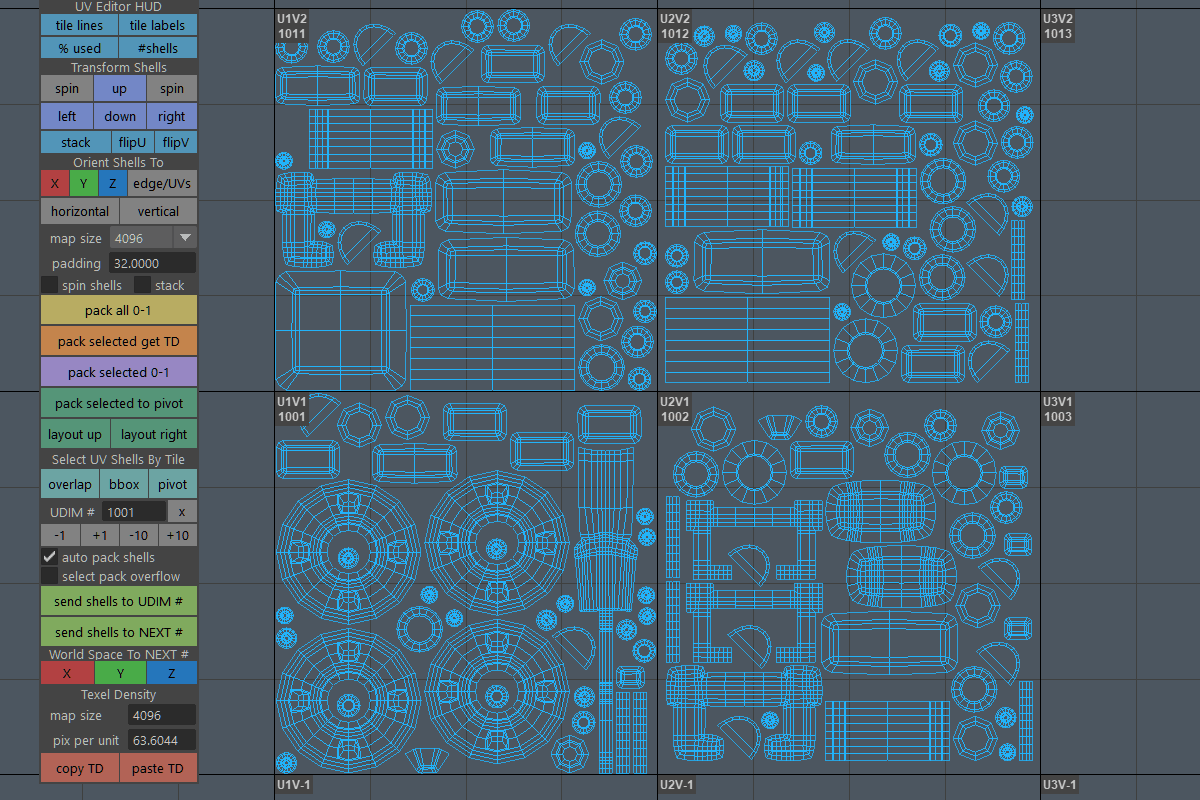
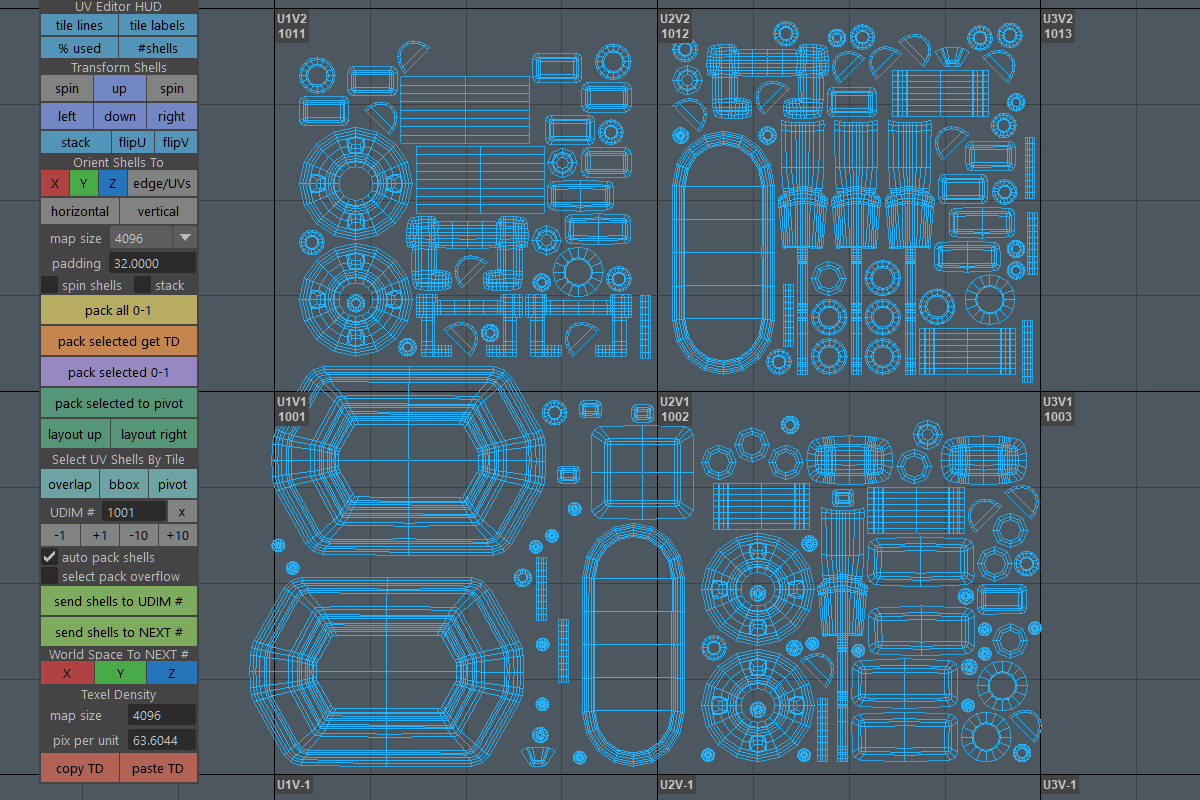
Udim Packing Toolbox
Packs UDIM tiles. Significantly easier to use than Maya’s Layout UV window for packing UDIM tiles and comes with a bunch of custom tools to make working with UDIMs faster.

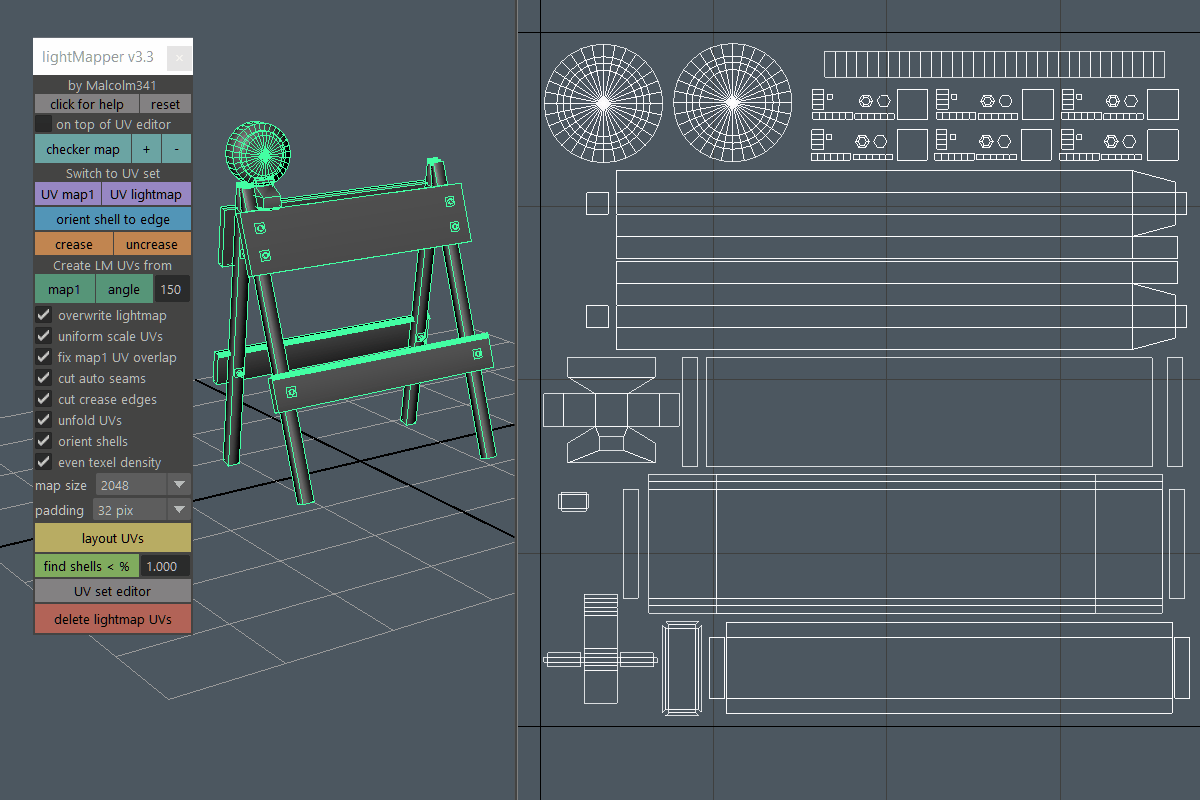
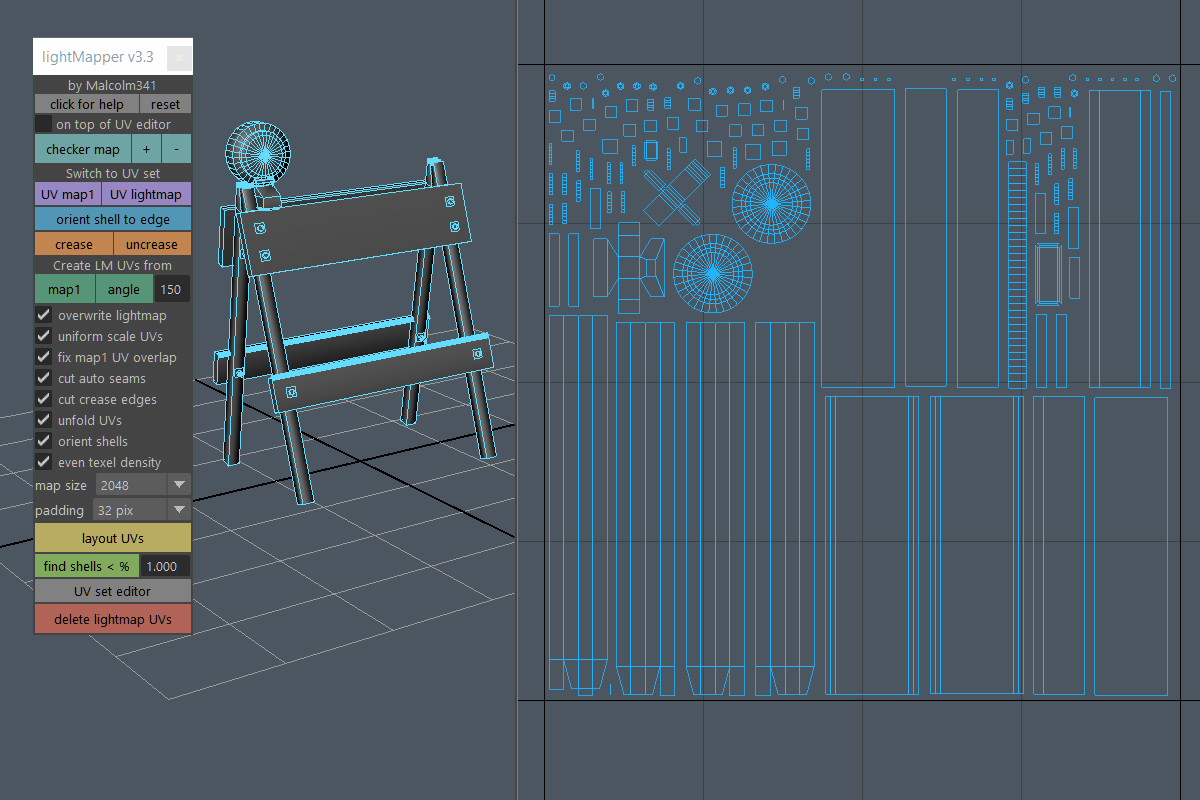
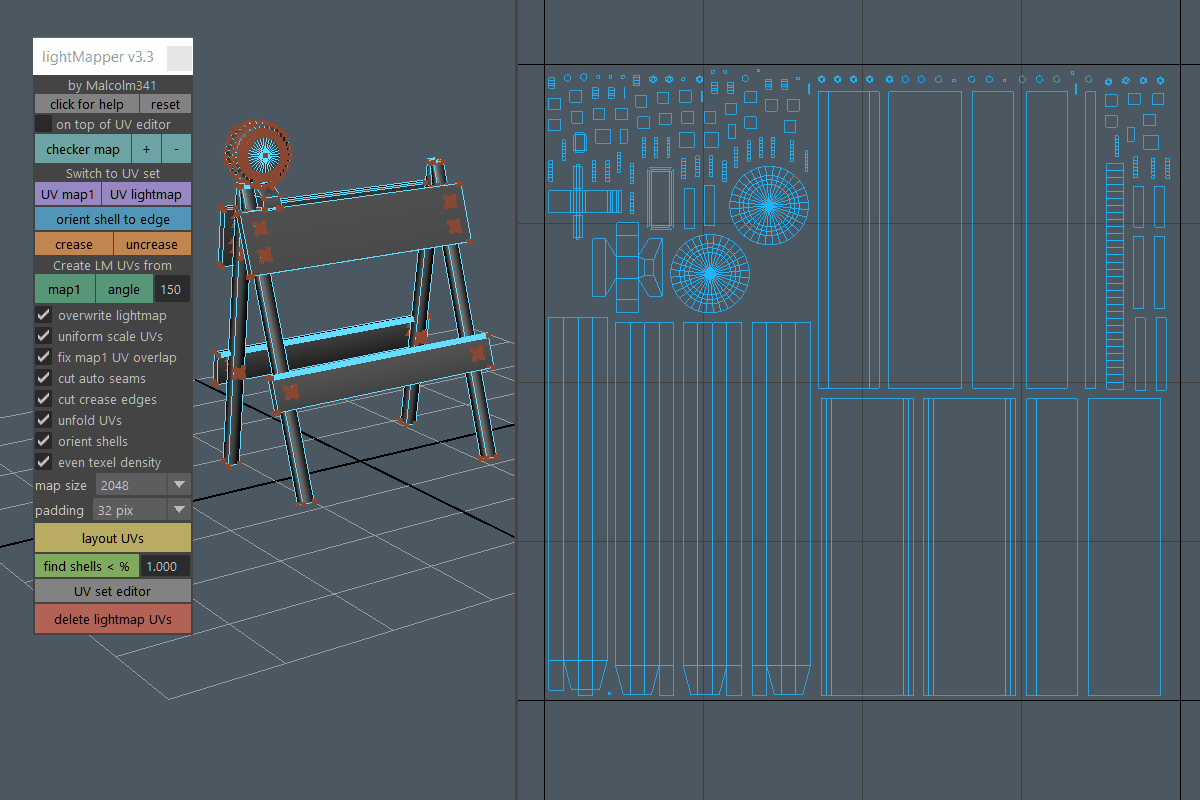
Light Mapping Toolbox
Creates lightmap UVs in one click. Use the angle method for minimal seams, or start from map1 and automatically fix areas that aren't mapped properly for baking.

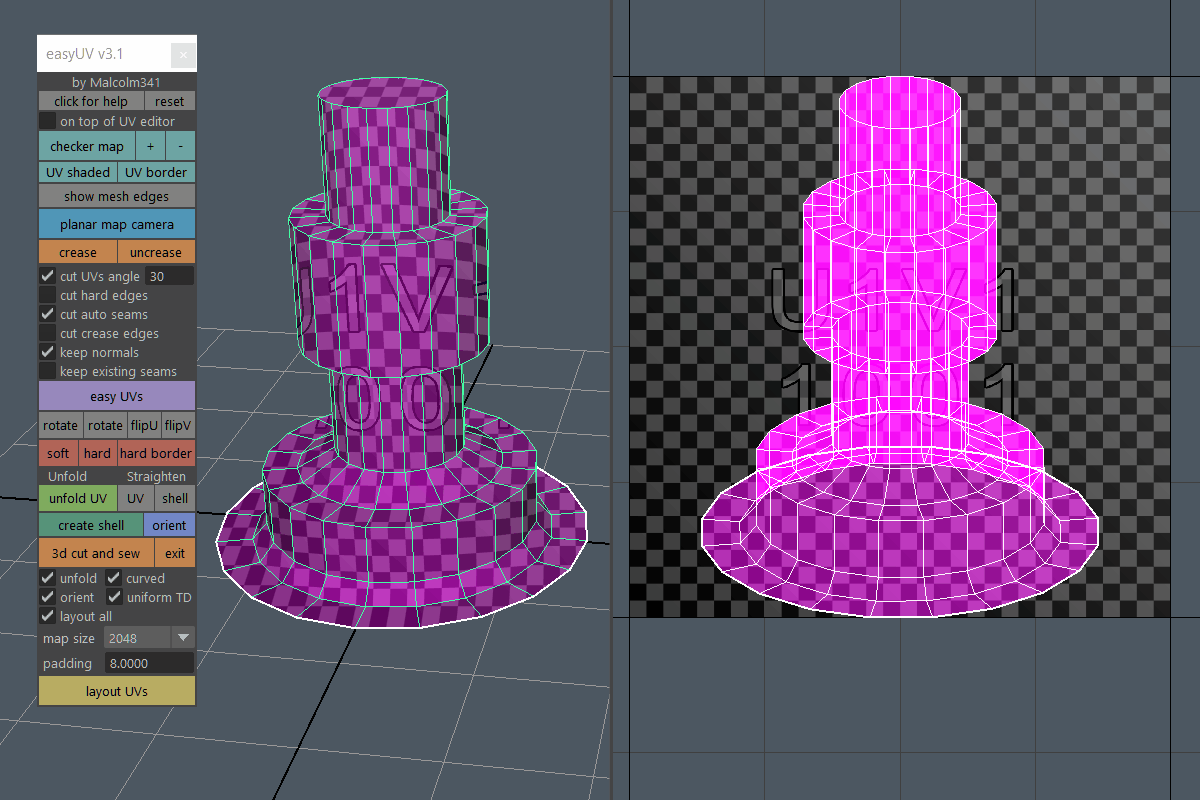
Easy UVs Toolbox
Automatically creates UVs for your mesh. Cut and sew interactively to make adjustments. Use the other built in tools to finalize and layout your UVs without needing to leave the toolbox. Useful for organic shaped meshes or if you prefer faster UV creation with a bit less control.

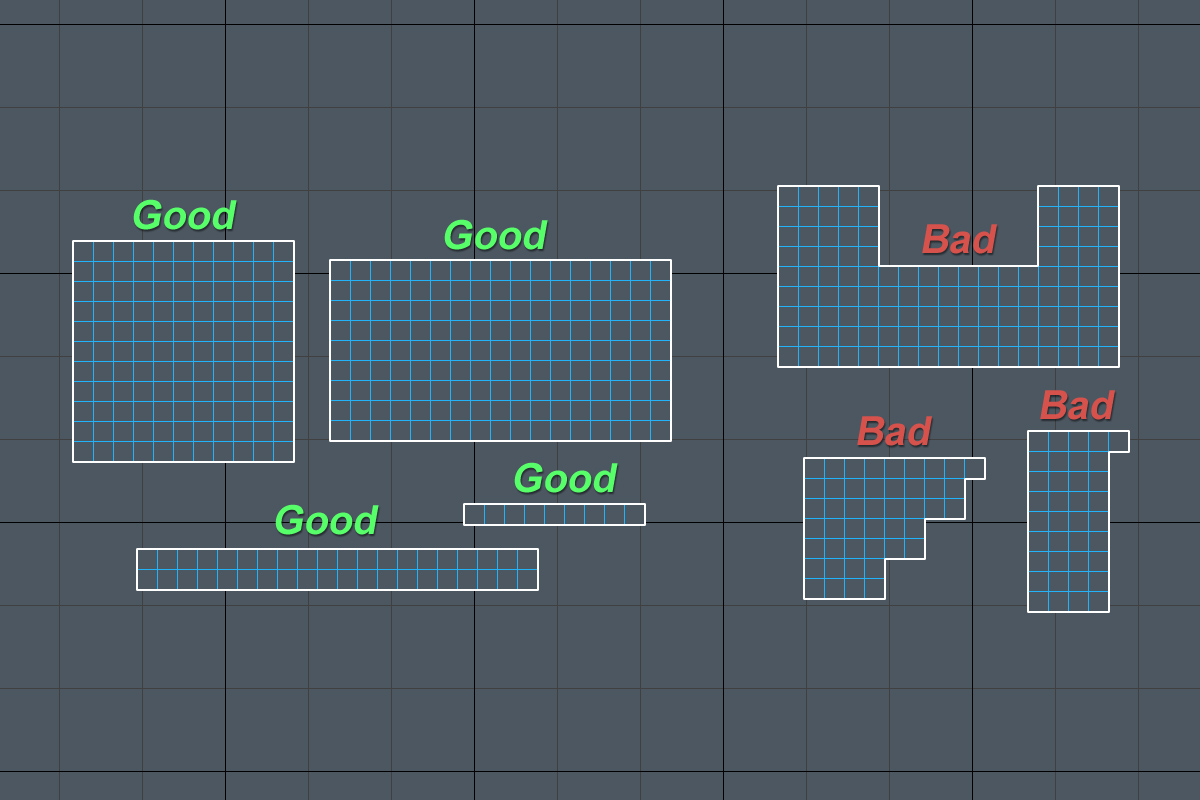
Gridify UVs
UV maps selected faces into a uniform grid of UVs. Existing UVs are not required for this tool to work, so you can gridify UVs on unmapped faces if you want.

Rectangularize UVs
UV maps selected faces into a non-uniform grid of UVs with correct aspect ratio. Better and faster results than Maya's straighten UVs tool because faces are UV mapped instead of trying to straighten existing UVs which is slow and error prone. Existing UVs are not required for this tool to work.

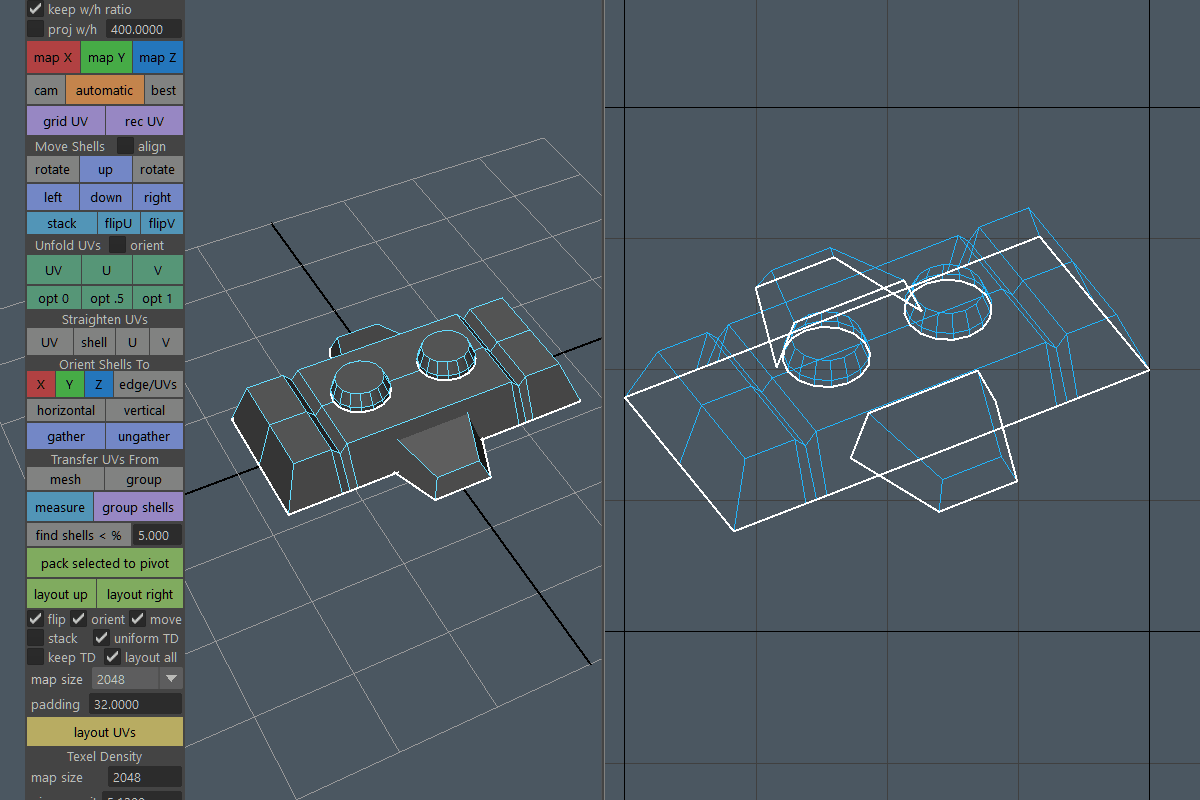
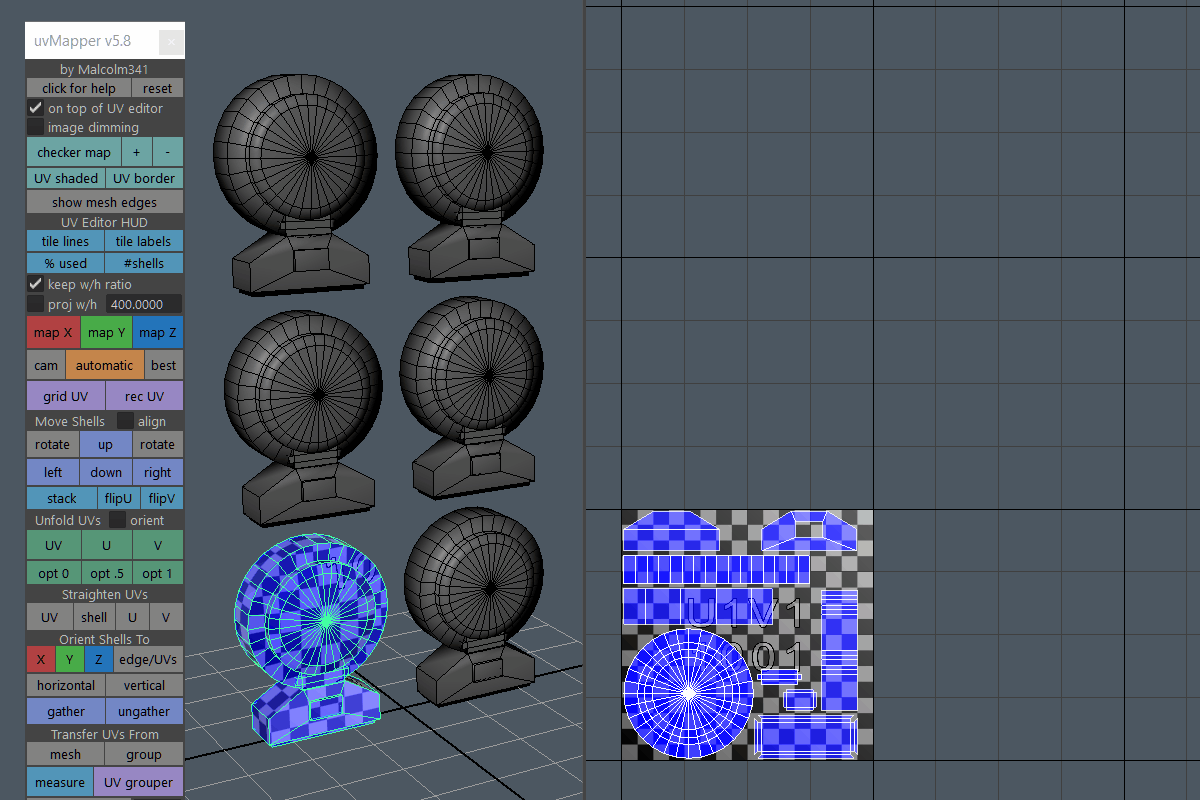
UV Mapping Toolbox
Creates UVs faster than Maya's UV Toolkit. The best UV mapping commands and the best UV Toolkit commands all in one place, plus a bunch of custom tools to make working with UVs even faster. All the buttons are visable all the time, so you don't have to expand menus or apply settings to create UVs.
Xray Selected Objects

YouTube Video
Wireframe Selected Objects

Increase Shelf Height Toolbox
Increases or decreases shelf height. Custom shelf height is retained after Maya restart unlike other tools I've seen online.
Toggles shelf tabs on/off.
Fits the vertical height of the shelf to the number of rows of icons in it.
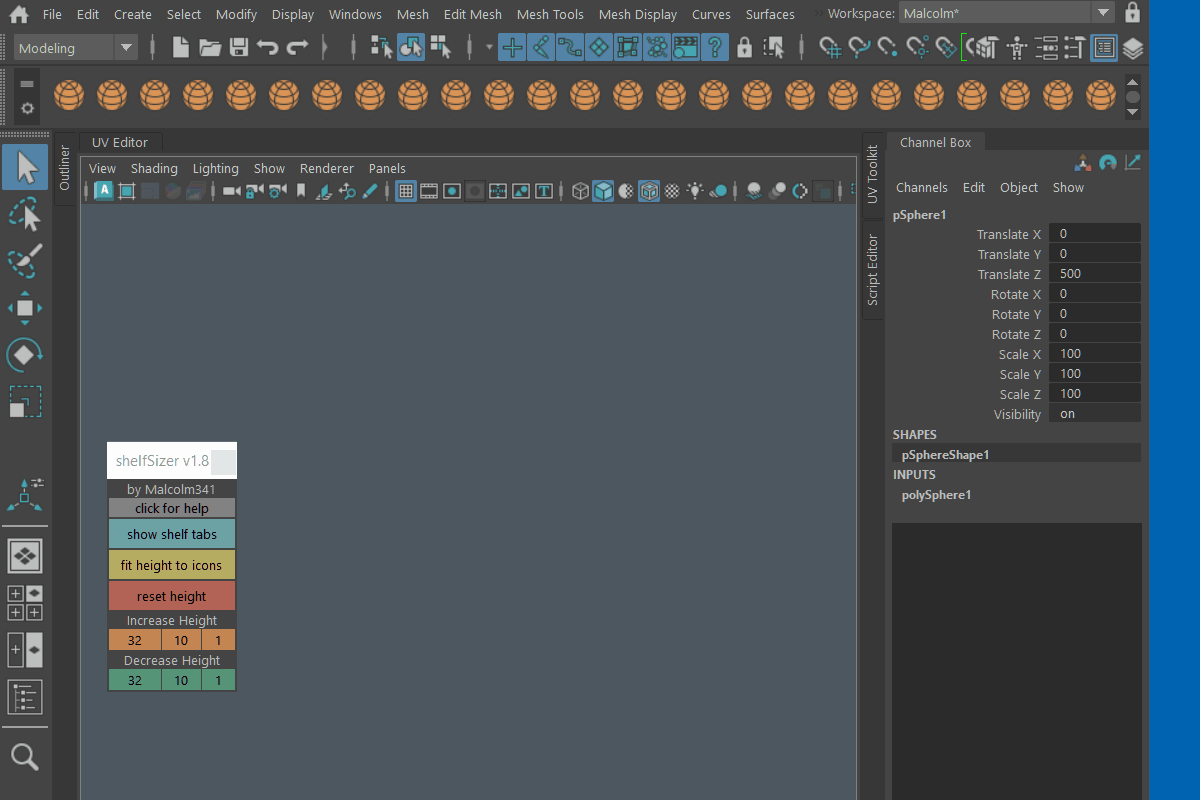
Resets shelf height to default.
Increases shelf height by 32, 10, or 1.
Decreases shelf height by 32, 10, or 1.
YouTube Video from 2022
Extra HUD Toolbox
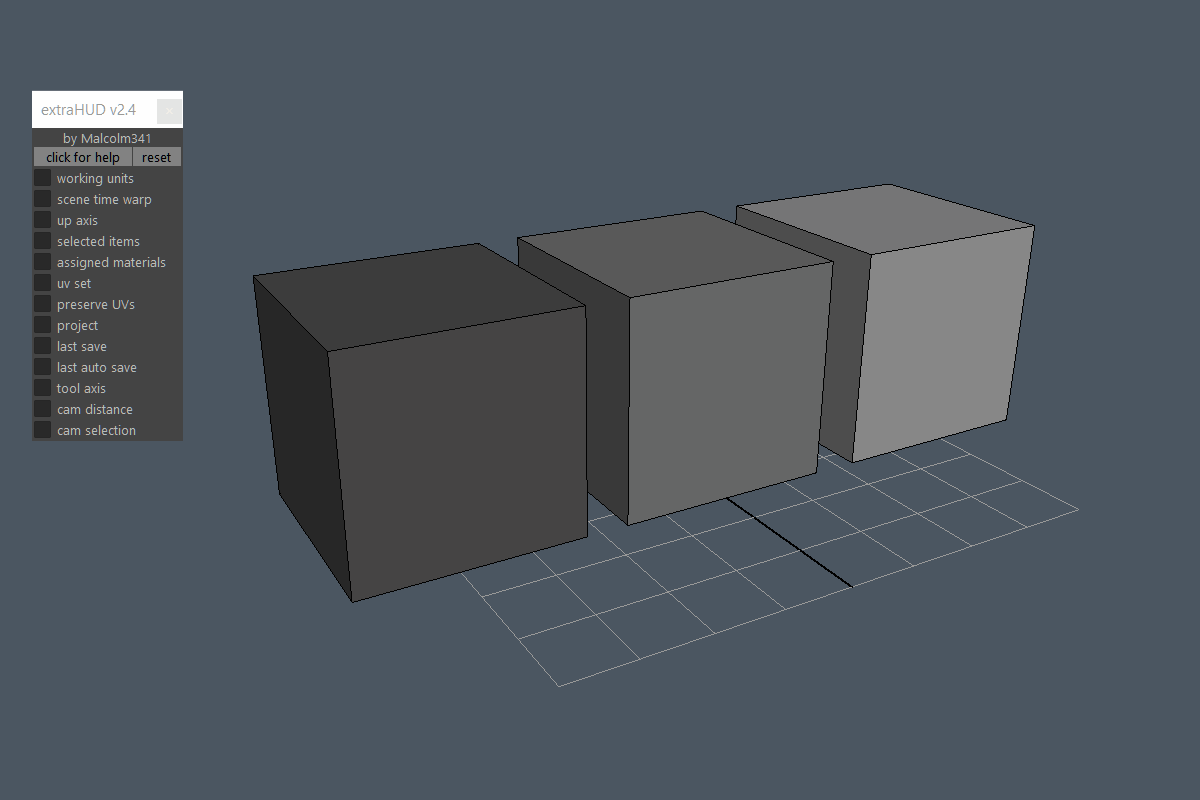
Resets the toolbox back to default settings. If Maya crashes and some of the checkboxes become inverted, use the reset button to fix this issue.
Turn on if you want to see the current working units Maya is set to. For example, meters, centimeters, feet, etc.
Turn on if you want to see the current grid size, number of grid lines, and number of grid divisions.
Turn on if you want to see if the enable scene time warp feature is on or off for the current scene.
Turn on if you want to see the current up axis Maya is set to. For example, y or z.
Turn on if you want to see the number of currently selected items, anything you select will be automatically counted and the number displayed.
Turn on if you want to see the names of the materials that are assigned to the currently selected objects or faces. The material names displayed will update as your selection changes.
Turn on if you want to see what UV set is currently active for the selected mesh.
Turn on if you want to see if the preserve UVs feature is on or off.
Turn on if you want to see the current project path Maya is set to.
Turn on if you want to see how long it's been since you last saved the scene. The timer will reset if you save, save as, or increment save.
Turn on if you want to see how long it's been since Maya last auto saved the scene. If auto save is disabled in preferences the timer will display auto save disabled. If you're using a Maya version older than Maya 2019 this feature won't work and the timer will display requires Maya 2019 or later.
Turn on if you want to see the axis orientation mode for the current tool. For example move tool world, object, component, etc.
Turn on if you want to see the distance the camera is from the currently selected object.
Turn on if you want to see if camera based selection is active. For example, on or off.
YouTube Video
Select Every Other Edge Vert Face Toolbox
-N-gons are not supported and will be ignored during pattern selection
-Triangles are not supported, if you have any triangles selected while using the tool the selection will come out wrong
-Non-symmetrical patterns are not supported, so 4/on 3/off style patterns are not possible in this tool
Inverts the last pattern that was selected by the tool.
Selects every other component on the current loop. The current loop is defined by selecting two adjacent components of the same type and running the tool.

Selects a user defined pattern of loops on the current mesh. The loop pattern is defined by selecting two or more adjacent components of the same type and running the tool. For example, selecting 4 adjacent faces will produce a 4/on 4/off pattern. Non-symmetrical patterns are not supported, so 4/on 3/off is not possible in this tool.
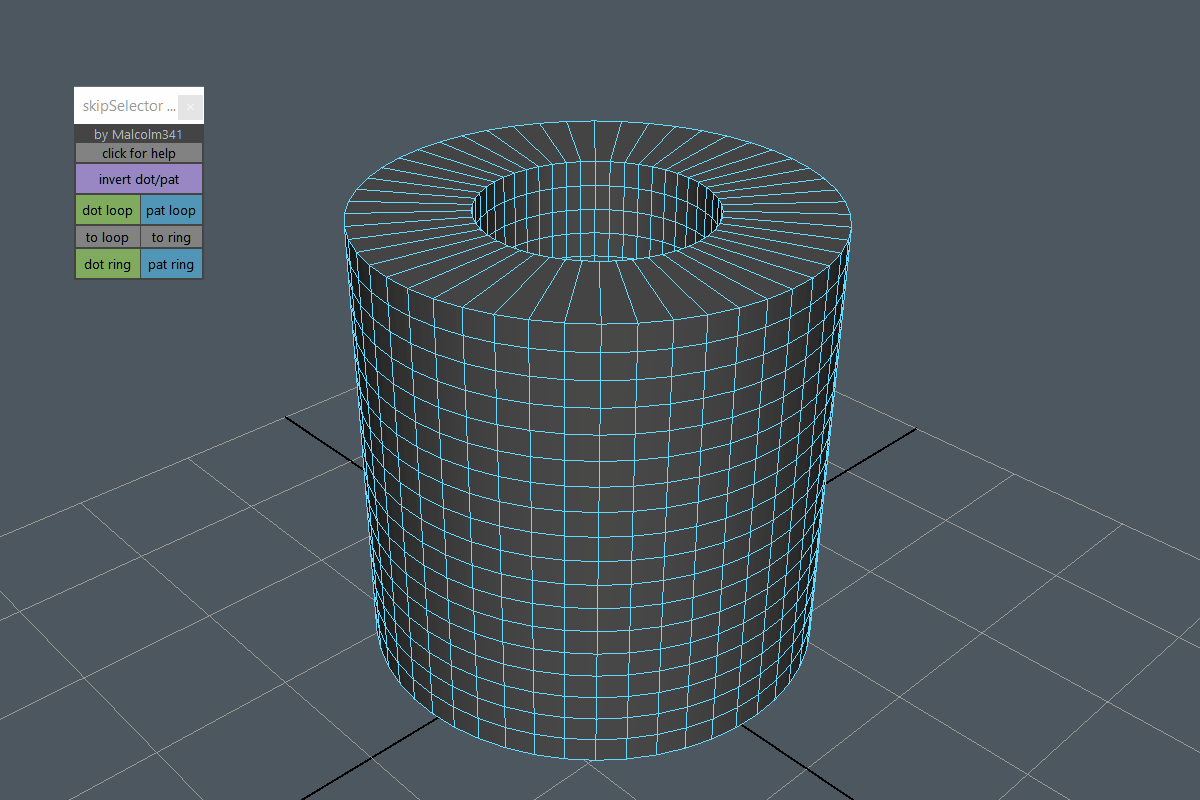
Converts the current selection to a component loop of that type, this can be helpful to convert Non-symmetrical or partial selection patterns into component loops.
Converts the current selection to a component ring of that type, this can be helpful to convert Non-symmetrical or partial selection patterns into component rings.
Selects every other component on the current ring. The current ring is defined by selecting two adjacent components of the same type and running the tool.

Selects a user defined pattern of rings on the current mesh. The ring pattern is defined by selecting two or more adjacent components of the same type and running the tool. For example, selecting 4 adjacent faces will produce a 4/on 4/off pattern. Non-symmetrical patterns are not supported, so 4/on 3/off is not possible in this tool.

YouTube Video
Select Half your Mesh from Edge Loop
YouTube Video
Show Geometry Border Edges
YouTube Video
Select Faces by Material id
YouTube Video
Graph Materials from Selected Faces
YouTube Video from 2020
Move Pivot to Selection Center
YouTube Video
Rebuild Rotation Axis from Component
YouTube Video
Rotate Mesh to Face Y Axis
YouTube Video
Snap Objects to Surface Normal
YouTube Video from 2020
Duplicate Object to Components
YouTube Video from 2021
Reference Planes Toolbox
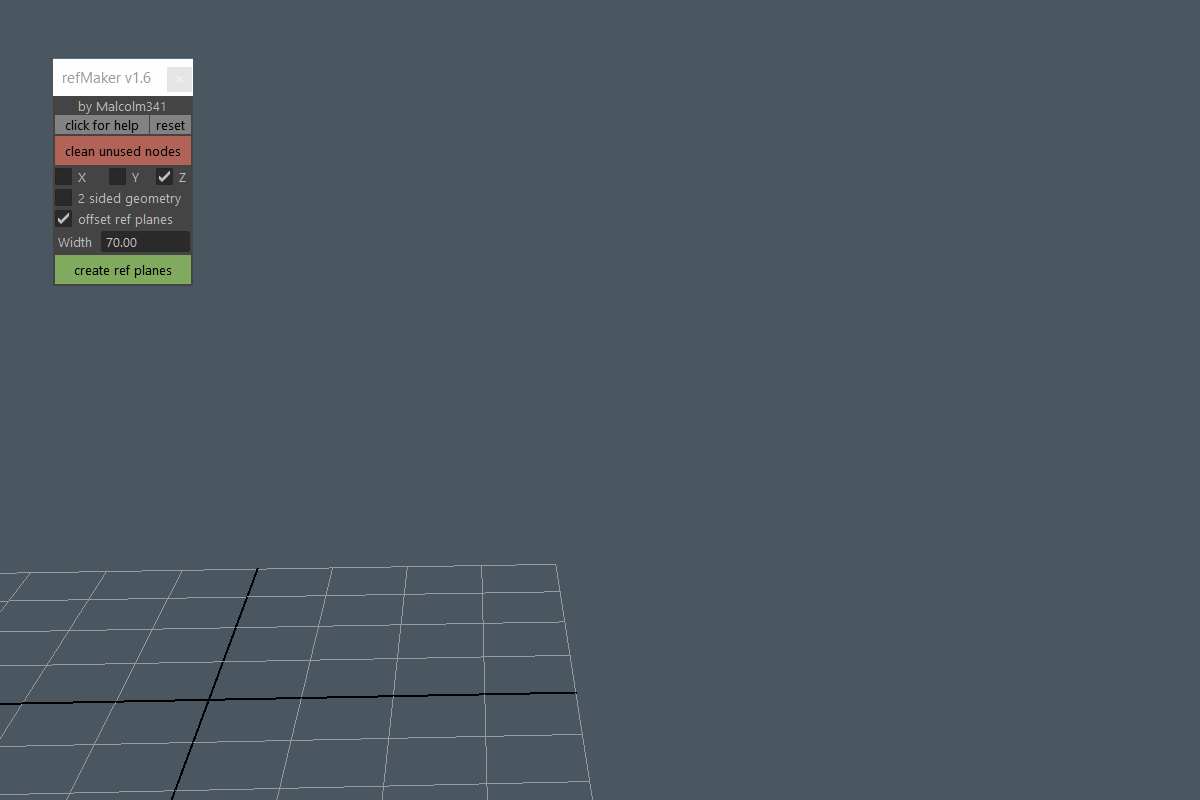
Resets the toolbox back to default settings.
Deletes all unused nodes in the Hypershade. This is helpful to keep the scene clean if you delete any of the reference planes the tool created.
Turn on to create reference planes on the X, Y, or Z axis. Turning on X, Z, and 2 sided geometry is a good way to create modeling reference to rotoscope around.
Turn on to create reference planes with front and back polygon faces.
Turn on to offset each reference plane so they aren't created on top of each other.
The horizontal width the reference planes will be created at in world space. Height will automatically be determined based on the width height ratio of the image file.
Opens a browse window where you can select one or more images that will be converted into reference planes using the options you've set in the toolbox.
YouTube Video
Vert Snapping Toolbox
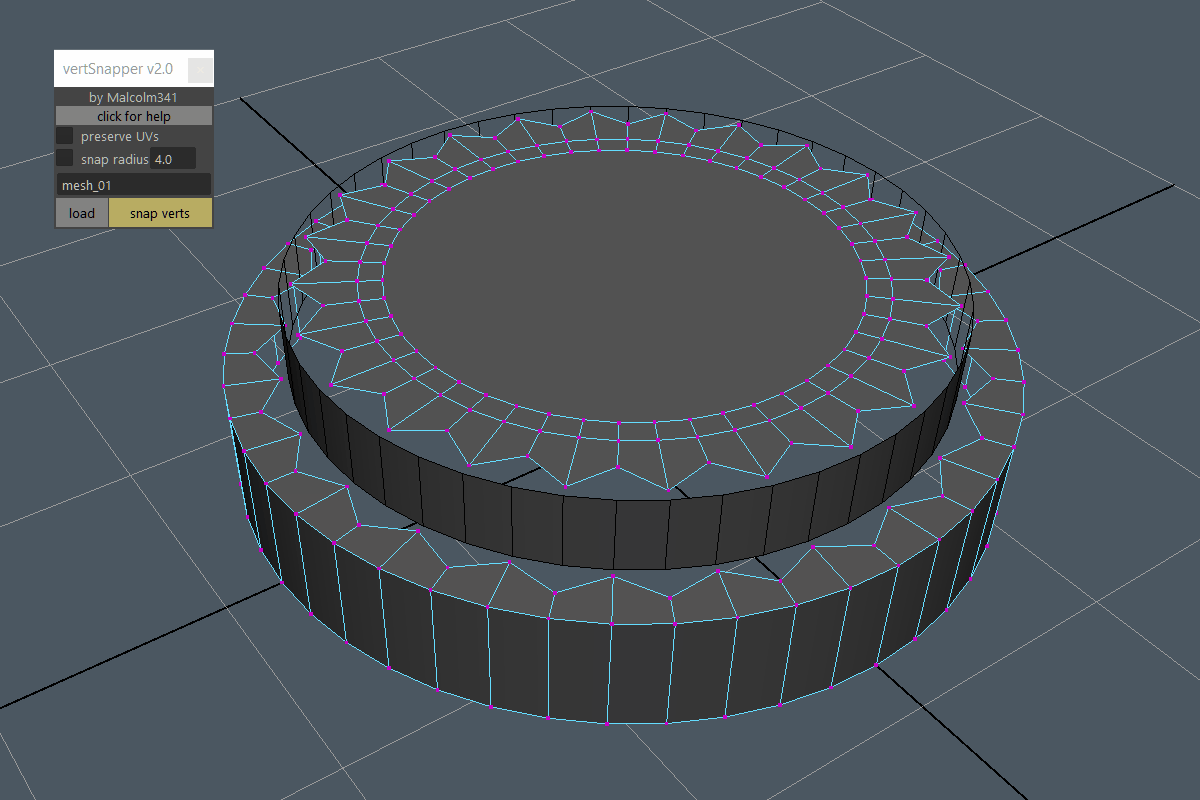
Turn on if you'd like to preserve UVs during the snapping process.
Turn on if you'd like to set a maximum snap radius, the number input controls how far to search for another vert to snap to. Turn off if you'd like to use an infiniate snap radius.
Loads the mesh you want to snap your selection to. The currently loaded mesh name is displayed in the text field.
Snaps selected verts to the closest verts found on the currently loaded mesh using the snap radius. In object mode all verts will be snapped to the closest verts found on the currently loaded mesh.
YouTube Video
Weld Selected to Closest

YouTube Video
Weld Selected to Target
YouTube Video
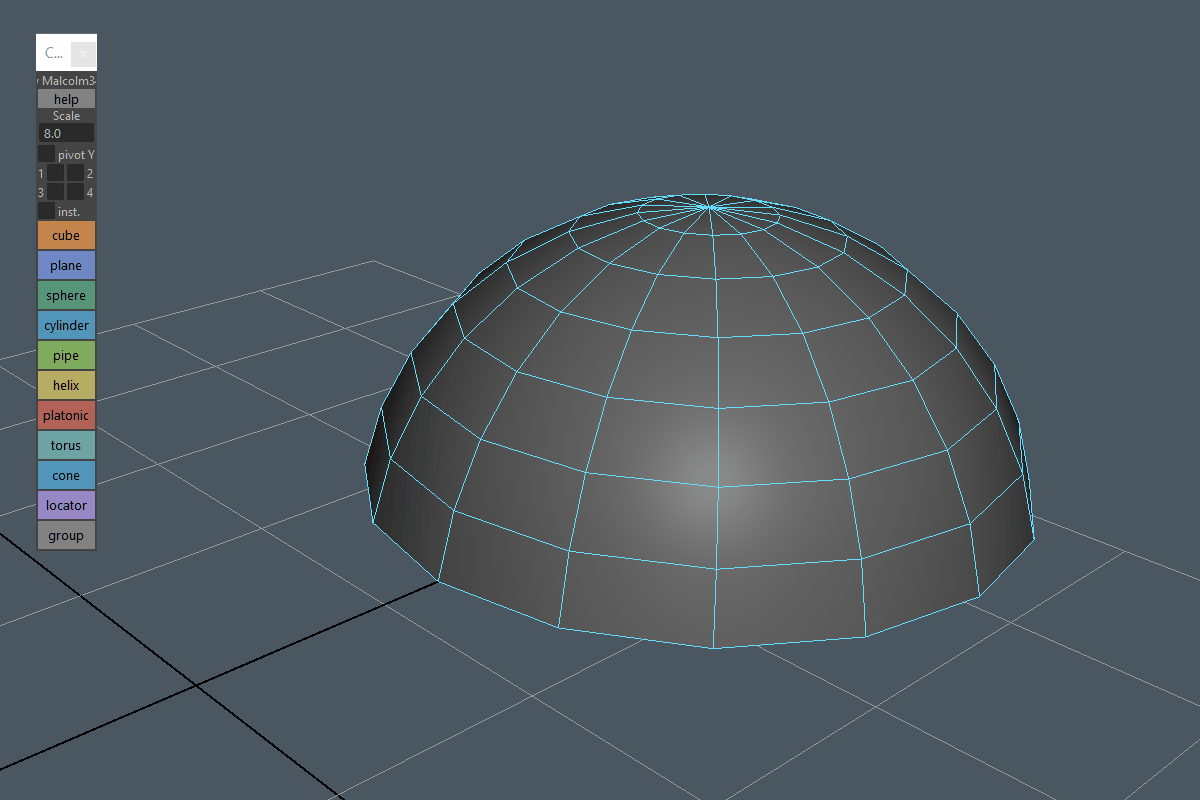
Create Primitive at Selection Toolbox
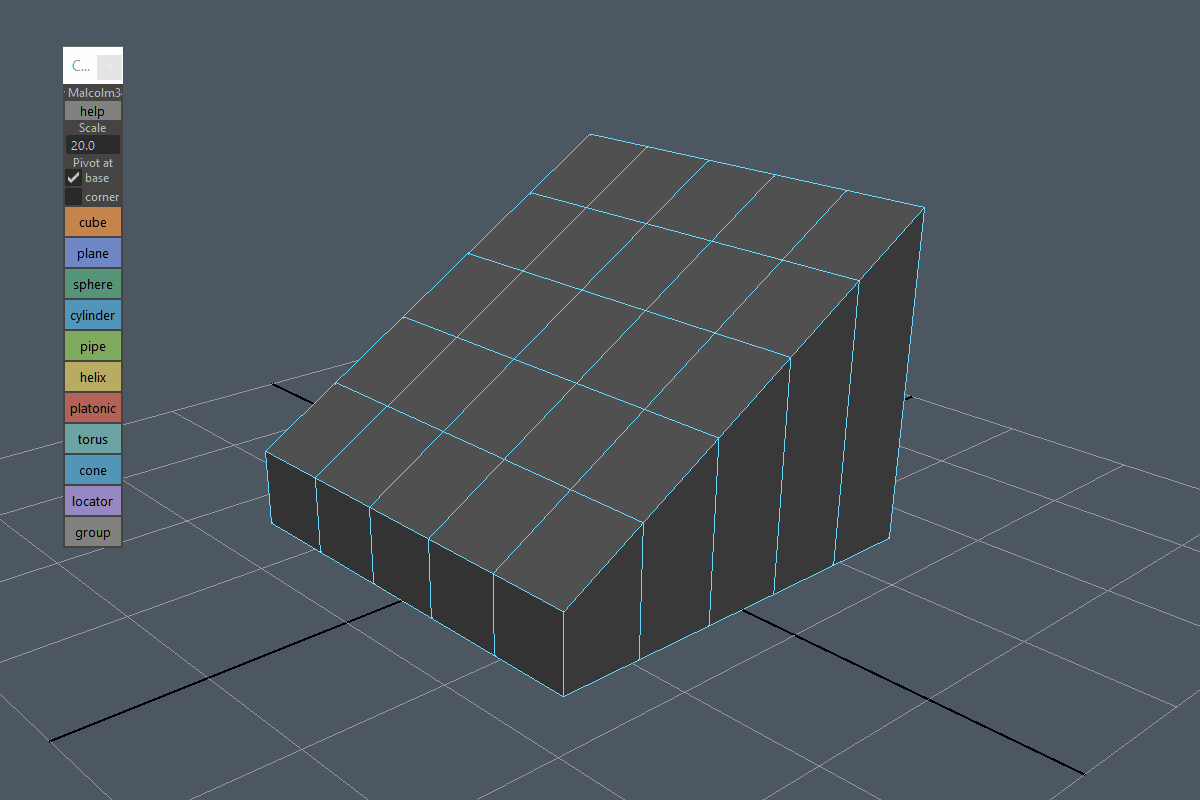
Sets the scale primitives will be created at.
Turn on if you want the primitive's pivot point to be at the base of the mesh.
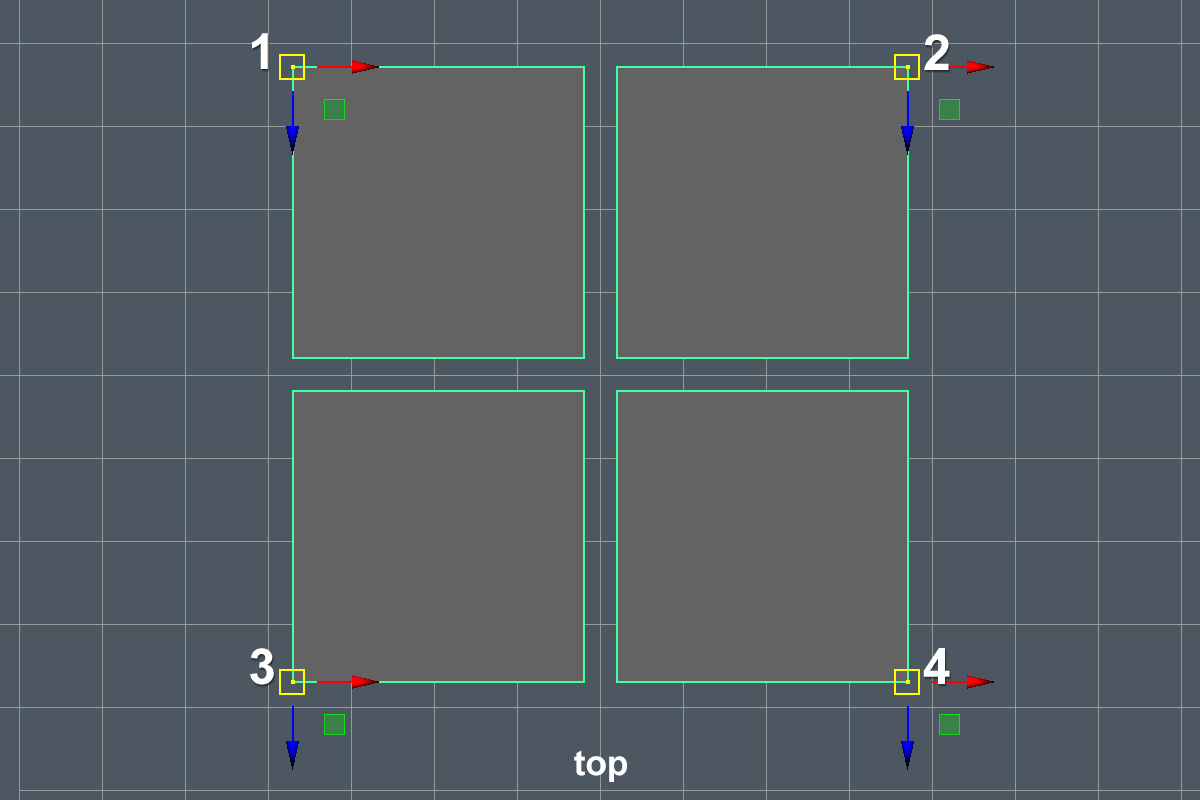
Turn on if you want the primitive's pivot point to be at one of the four corners of the mesh. The 1, 2, 3, 4 checkboxes correspond to the four corners of the mesh if you look at it from the top view in Y up.
Turn on if you want the primitive to be created as an instance. The first instance is created at the world origin and is automatically selected for convenience. This is helpful if you want to place a bunch of instances at selected components because you can then make modeling edits to the instance at the world origin that doesn't have any rotations applied. The inst. checkbox has no affect when creating locators, groups, or if you have nothing selected when you create a primitive. If you want to create an instance, select at least one object or one component first.
Creates a cube. Press t on the keyboard after creating a primitive to modify subdivisions and other properties.
Creates a plane. Press t on the keyboard after creating a primitive to modify subdivisions and other properties.
Creates a sphere. Press t on the keyboard after creating a primitive to modify subdivisions and other properties.
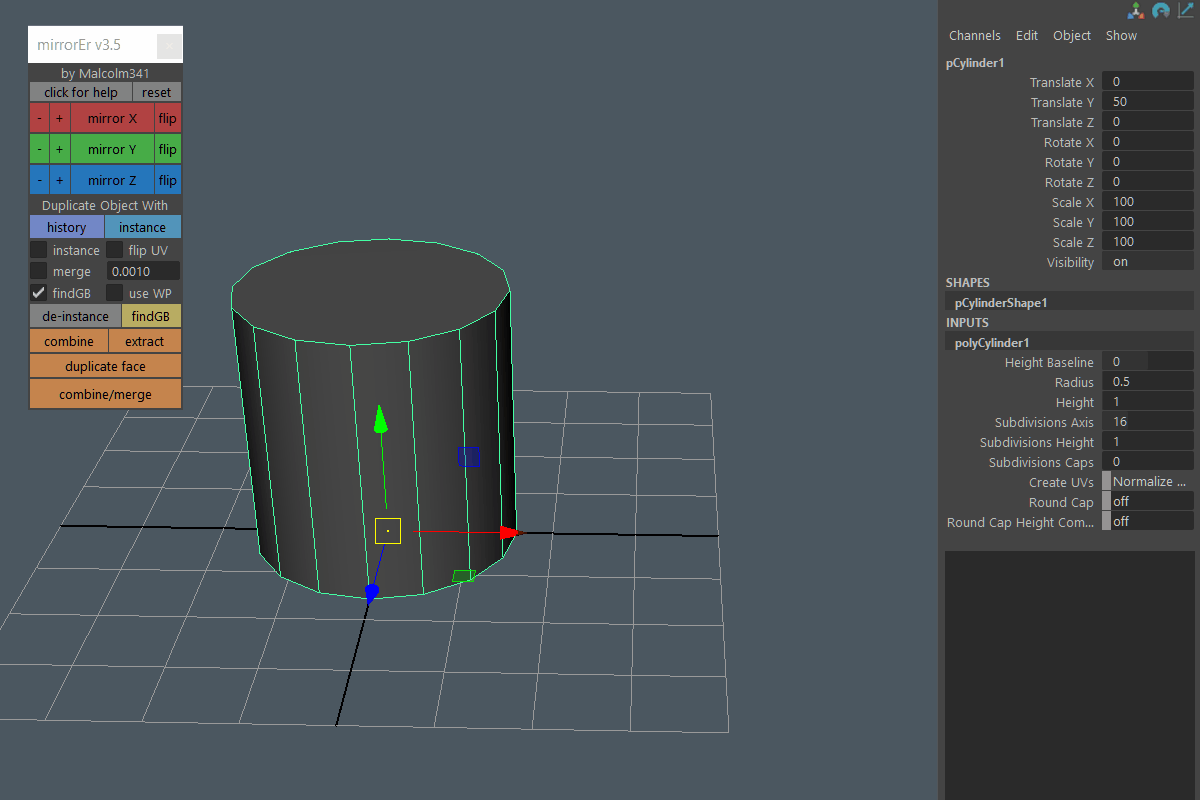
Creates a cylinder. Press t on the keyboard after creating a primitive to modify subdivisions and other properties.
Creates a pipe. Press t on the keyboard after creating a primitive to modify subdivisions and other properties.
Creates a helix. Press t on the keyboard after creating a primitive to modify subdivisions and other properties.
Creates a platonic multi-purpose primitive. The default shape is set to quad-sphere for convenience. Due to a limitation in Maya pressing t on the keyboard has no effect on this primitive type. If you'd like to modify subdivisions and other properties you need to use the chnnel box or the attribute editor.
Creates a torus. Press t on the keyboard after creating a primitive to modify subdivisions and other properties.
Creates a cone. Press t on the keyboard after creating a primitive to modify subdivisions and other properties.
Creates a locator. The pivot Y, 1, 2, 3, 4 and inst. checkboxes have no affect on this primitive type.
Creates a group. The scale setting, pivot Y, 1, 2, 3, 4, and inst. checkboxes have no affect on this primitive type.
YouTube Video from 2021
Axis Aligned Lattice Deformer
YouTube Video from 2021
Mirror and Instance Toolbox
Resets the toolbox back to default settings.
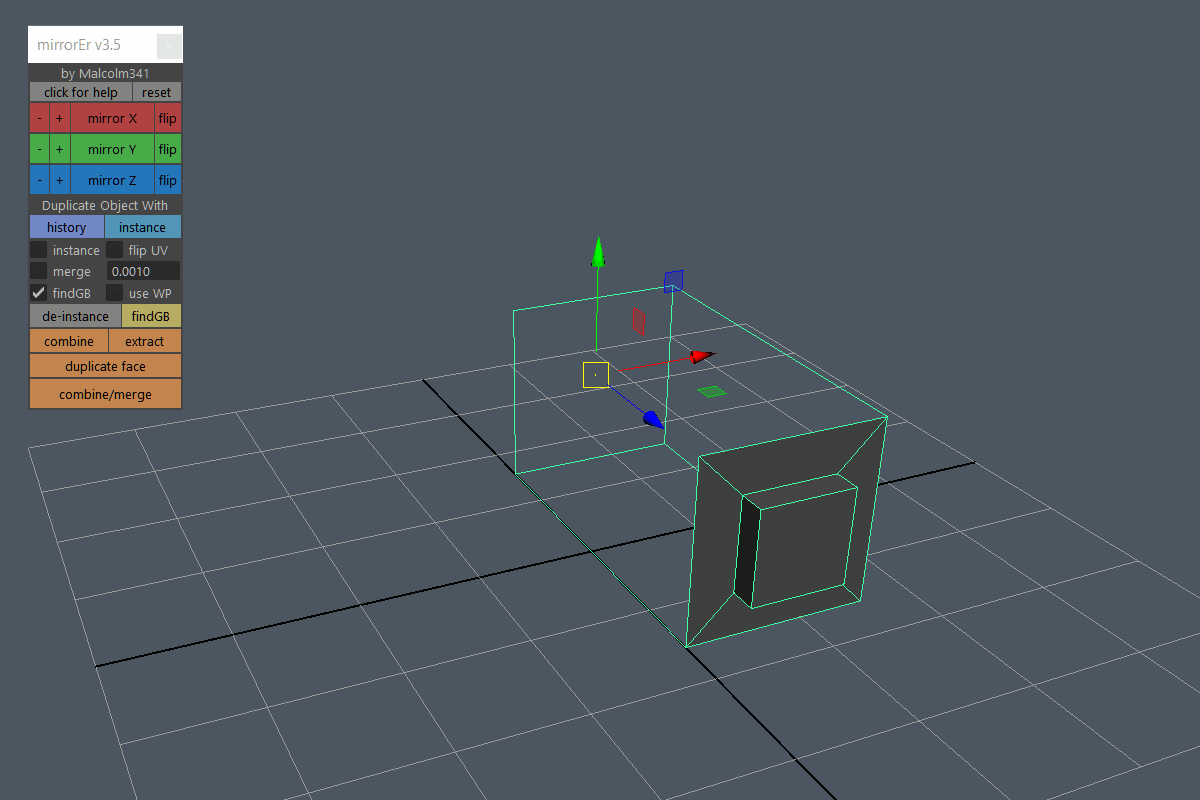
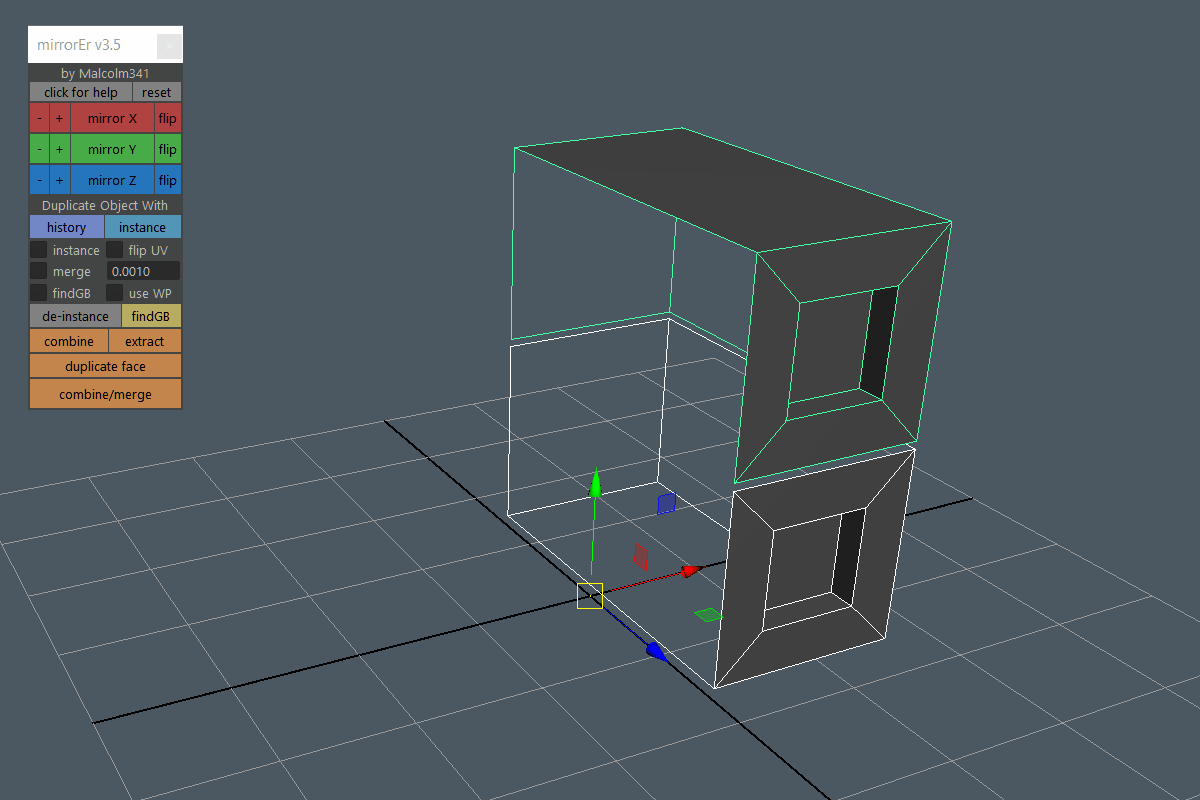
The mirror X button mirrors selected meshes or faces on the X axis. The flip button flips selected meshes or faces on the X axis. Meshes and faces are mirrored or flipped from their current pivot points. The + and - buttons activate the mirror cut tool on the X axis in the positive or negative direction. Use the + button if you're going to move the mirror cut manipulator along positive X in world space.
Use the - button if you're going to move the mirror cut manipulator along negative X in world space.
The mirror Y button mirrors selected meshes or faces on the Y axis. The flip button flips selected meshes or faces on the Y axis. Meshes and faces are mirrored or flipped from their current pivot points. The + and - buttons activate the mirror cut tool on the Y axis in the positive or negative direction. Use the + button if you're going to move the mirror cut manipulator along positive Y in world space.
Use the - button if you're going to move the mirror cut manipulator along negative Y in world space.
The mirror Z button mirrors selected meshes or faces on the Z axis. The flip button flips selected meshes or faces on the Z axis. Meshes and faces are mirrored or flipped from their current pivot points. The + and - buttons activate the mirror cut tool on the Z axis in the positive or negative direction. Use the + button if you're going to move the mirror cut manipulator along positive Z in world space.
Use the - button if you're going to move the mirror cut manipulator along negative Z in world space.
The history button duplicates selected objects with history and no mirroring. The instance button duplicates selected objects as instances and no mirroring. Duplicating objects with history is useful for primitives so you can adjust the number of segments without having to create a new primitive each time. Objects need to have usable history for this tool to work.
Turn on to create mirrored meshes as instances instead of duplicates.
Turn on to mirror UVs for the resulting mirrored mesh or faces.
Turn on if you'd like the mirrored mesh to be combined and verts merged using the current value from the merge input field.
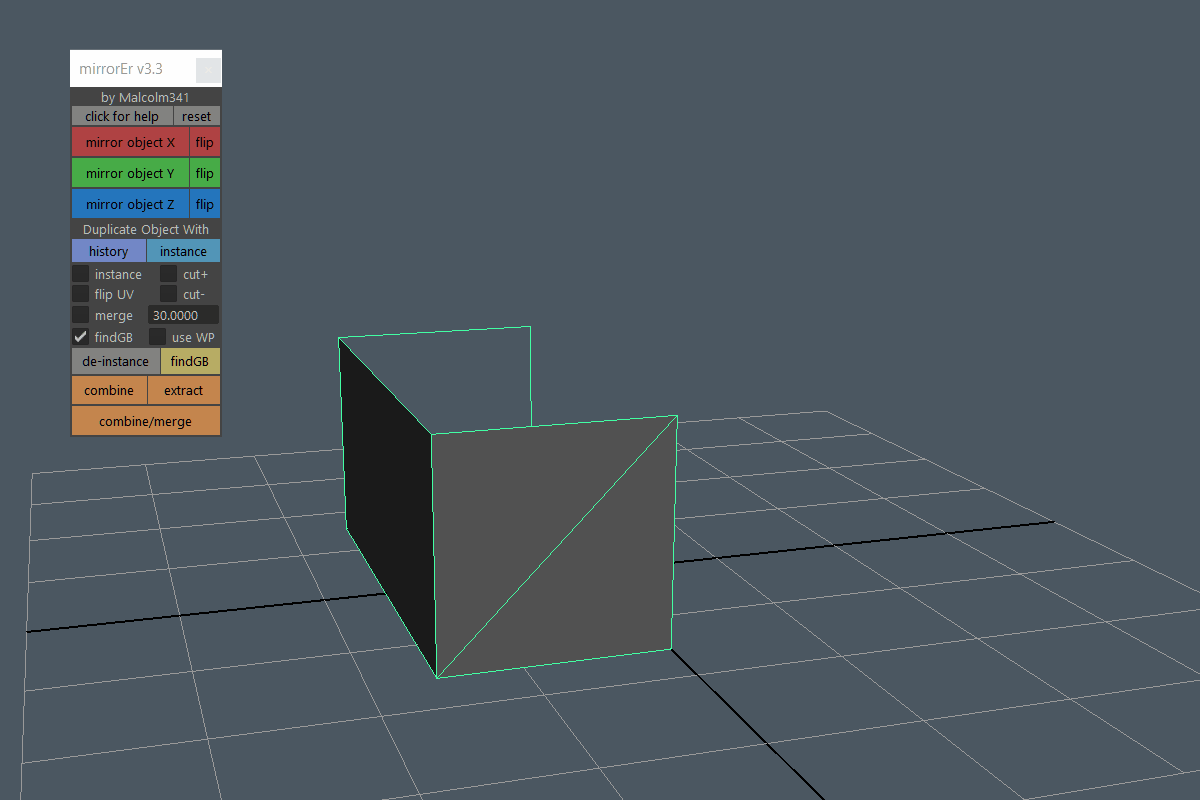
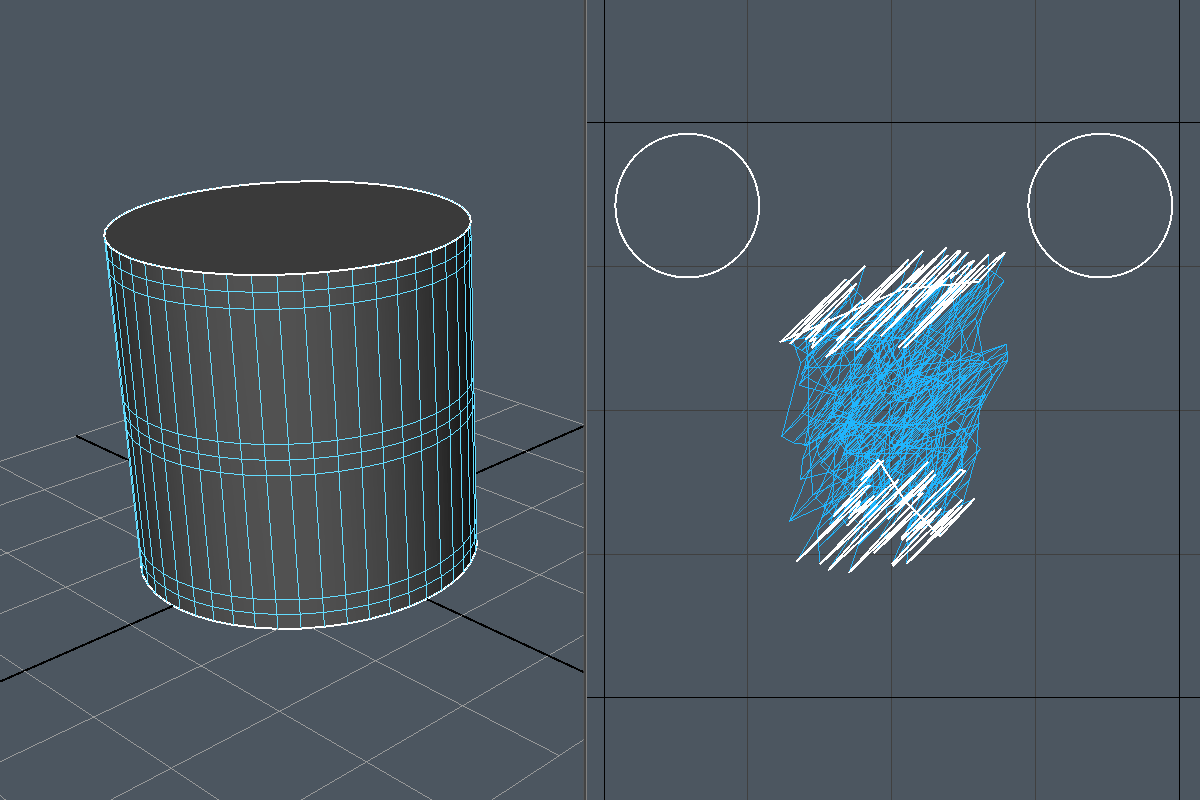
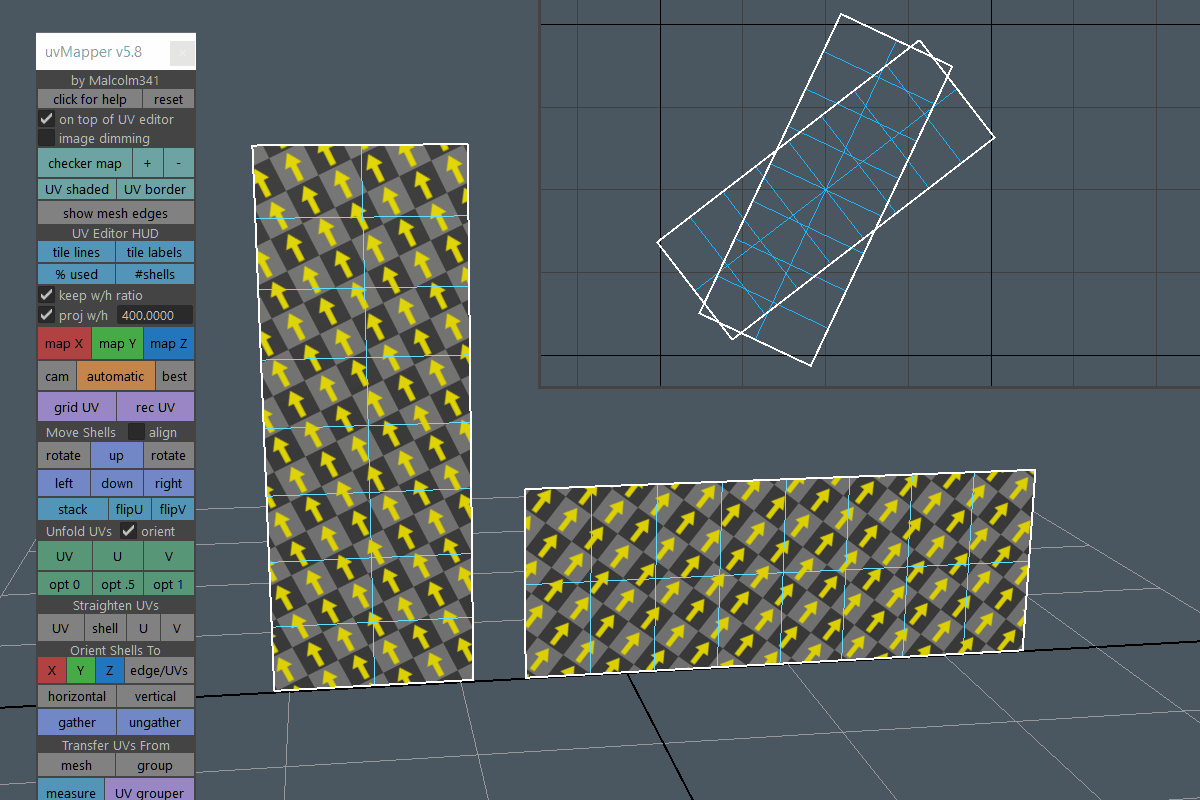
Turn on to select geometry border edges after meshes have been mirrored and merged, or merged using the combine/merge button. This is very helpful to show if overlapping verts have actually been merged during mirroring and if unwelded edges still remain. In the example image you can see the horizontal edges are merged because they fall within the merge distance I set. The vertical edges are automatically selected to indicate the merge distance was too low to merge those edges.
Turn on if you'd like the selected mesh or faces to be mirrored from the world pivot instead of the selection pivot. This can save time if you always work at the center of the grid and don't want to set a custom pivot point before mirroring.
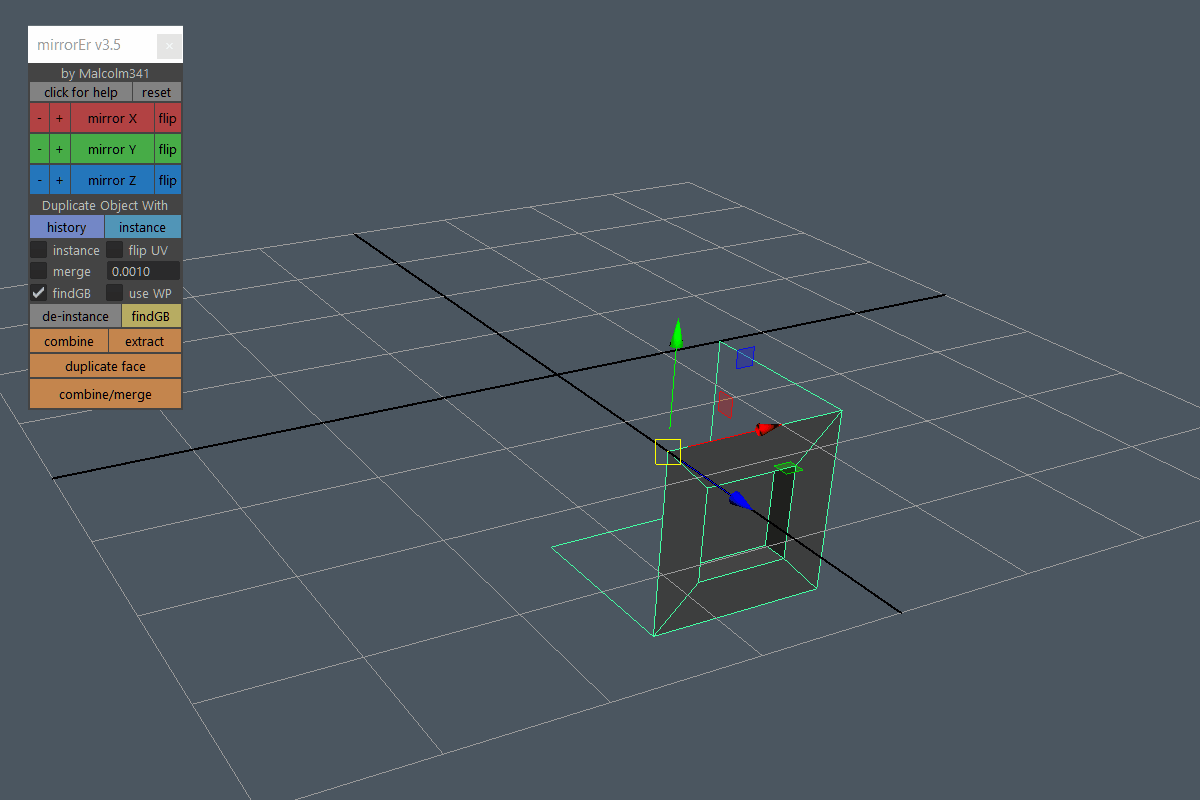
The de-instance button converts selected instances into regular objects, de-instances them. The findGB button selects geometry border edges. This is helpful for identifying unweled verts and open edges as you model, and is easier to see than the Maya viewport setting for border edges.
The combine button combines selected meshes without creating extra nodes in the outliner. The last selected mesh's name, pivot, and transform will be used to create the new combined object. The extract button extracts selected faces without creating extra nodes in the outliner. In object mode extract will separate each mesh element into a new object.
Duplicates selected faces as a new object without creating extra nodes in the outliner.
Combines selected meshes and merges overlapping verts using the distance value from the merge input field, combine/merge also works on instances. If you have exactly two verts selected combine/merge will merge them to center no matter how far apart they are. If you have more than two verts selected combine/merge will merge them using the current value from the merge input field. If you have a single object selected in object mode combine/merge will merge all verts on that object using the current value from the merge input field.
YouTube Video from 2020 YouTube Video from 2021 Mirror Cut Video at Time Stamp 14:04
Clean Combine
YouTube Video
Clean Extract

YouTube Video
Clean Duplicate
Marmoset Export Toolbox
Resets the toolbox back to default settings.
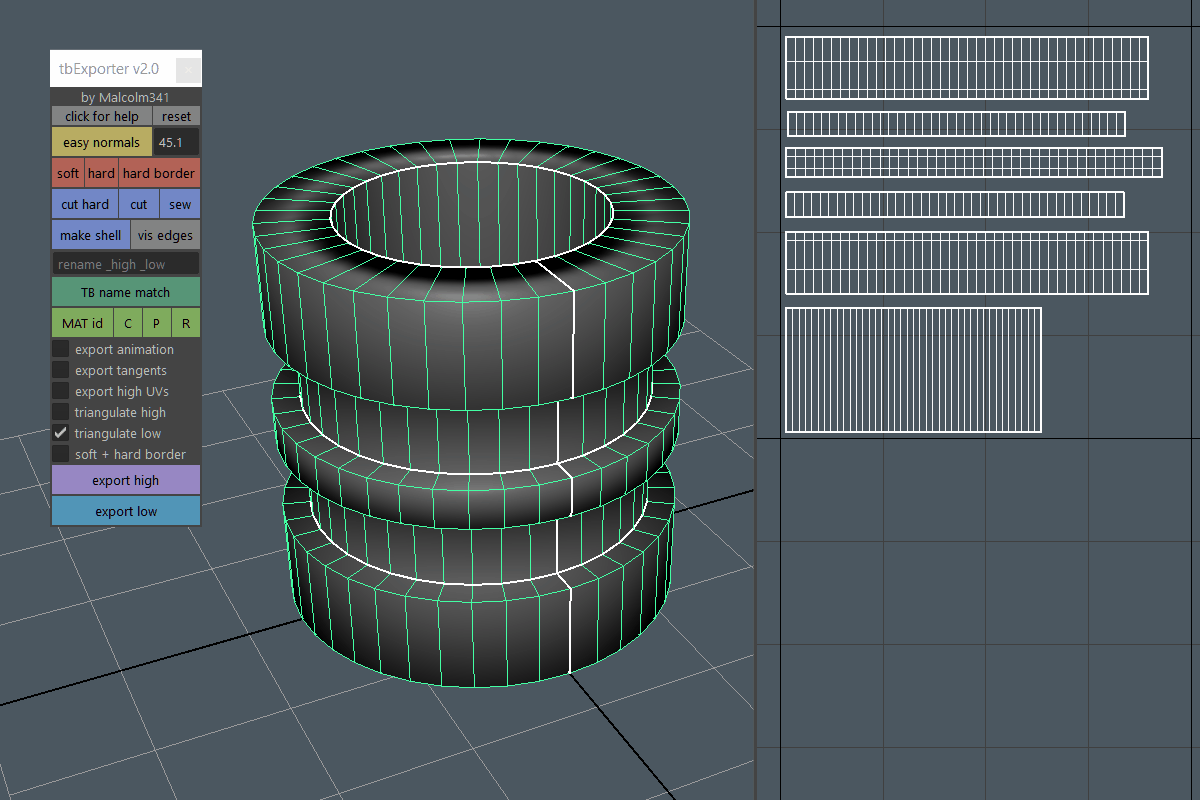
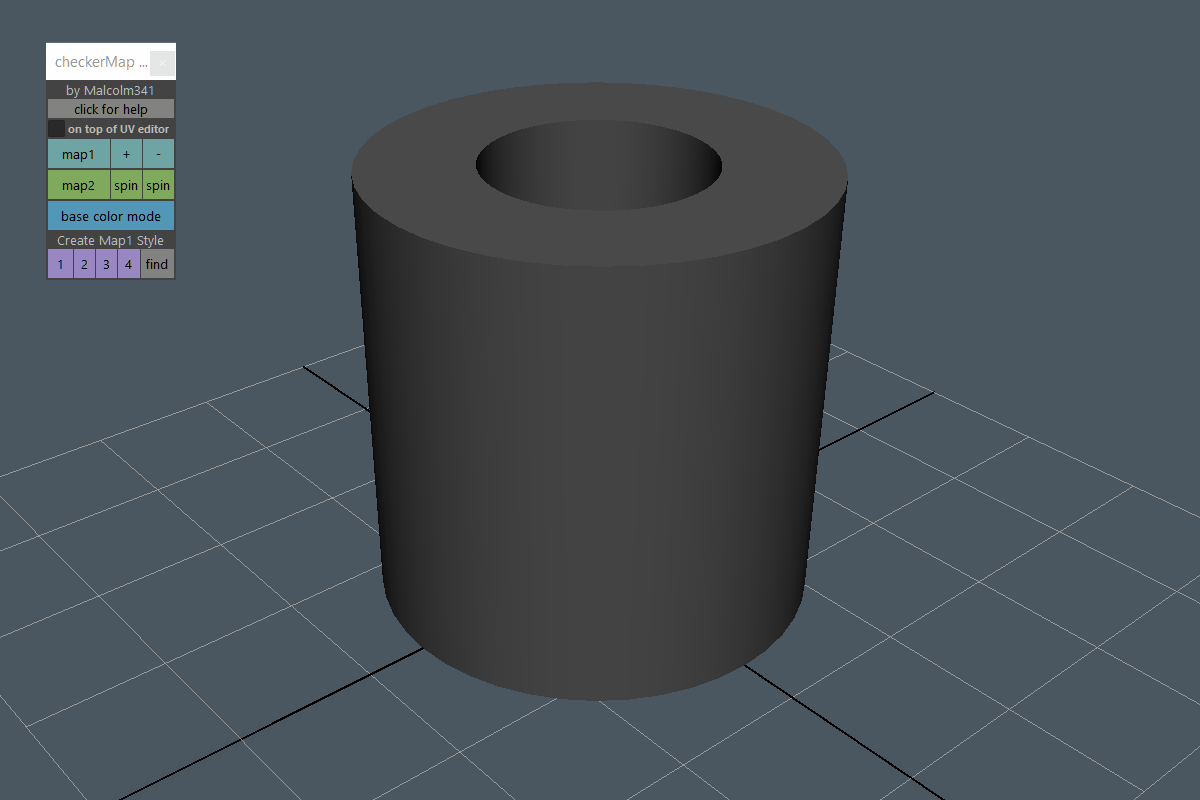
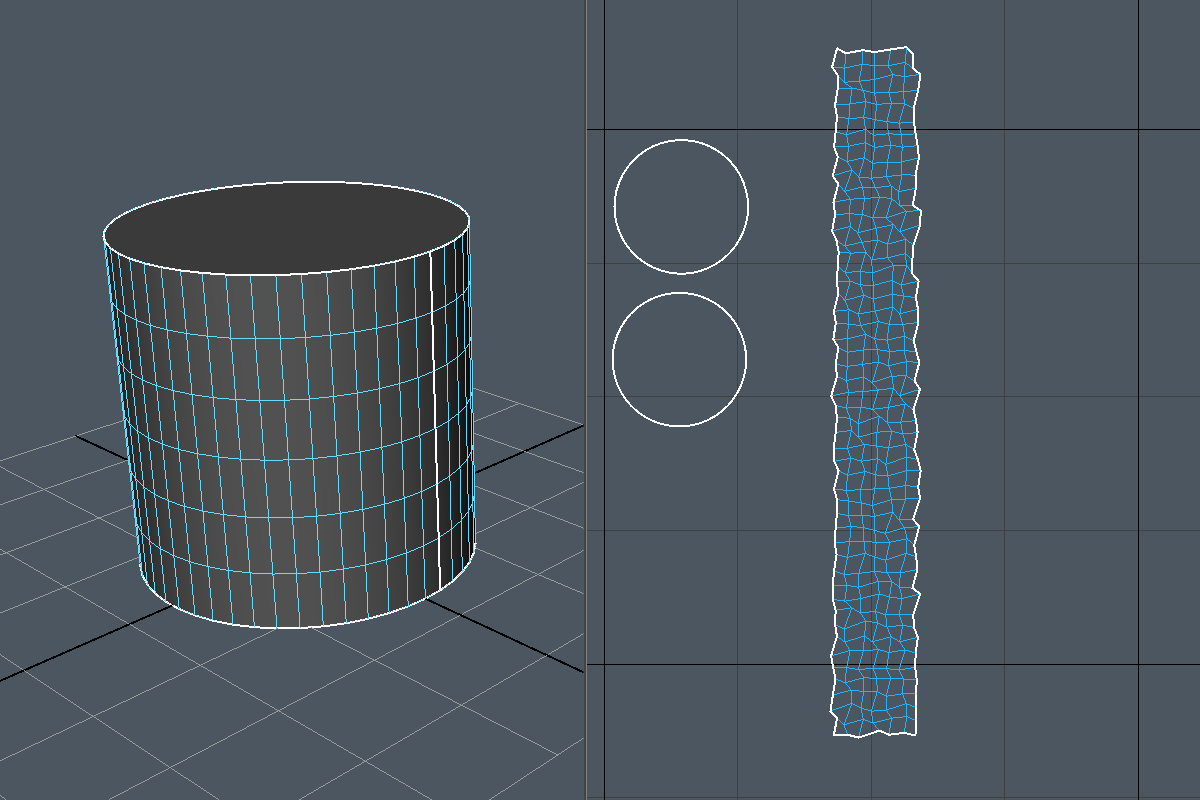
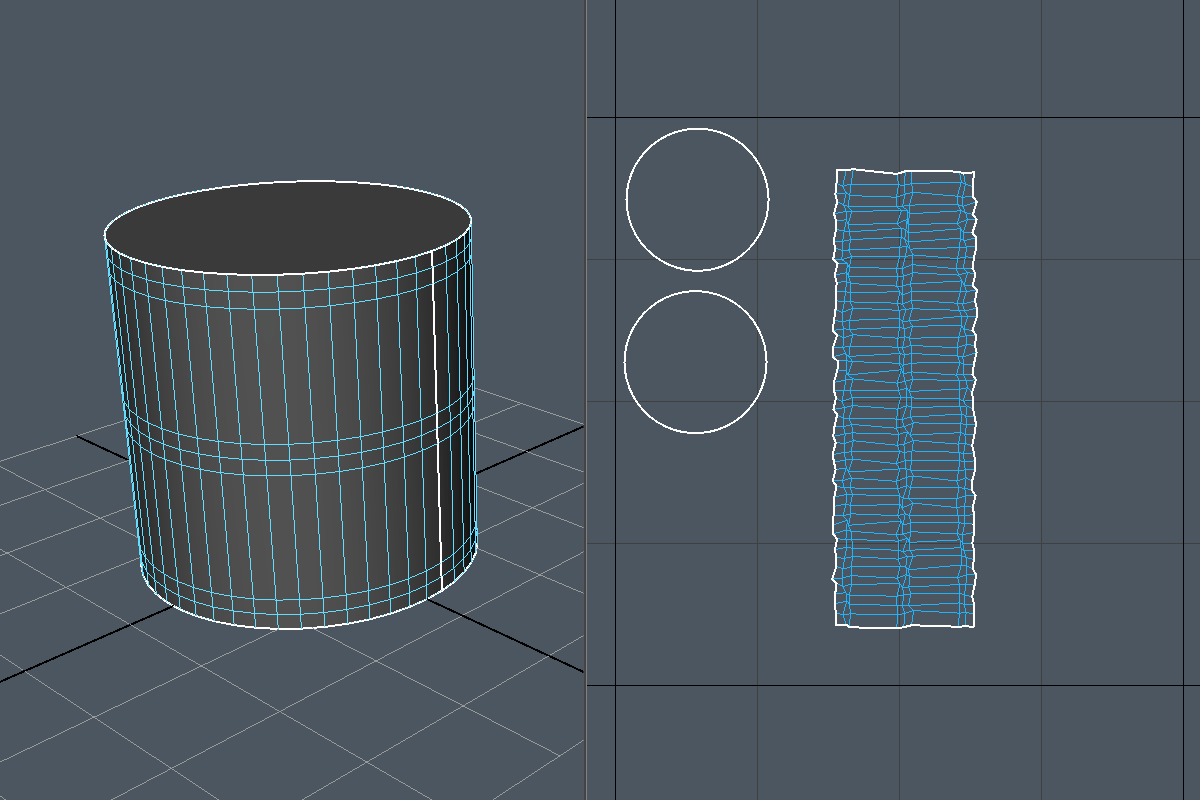
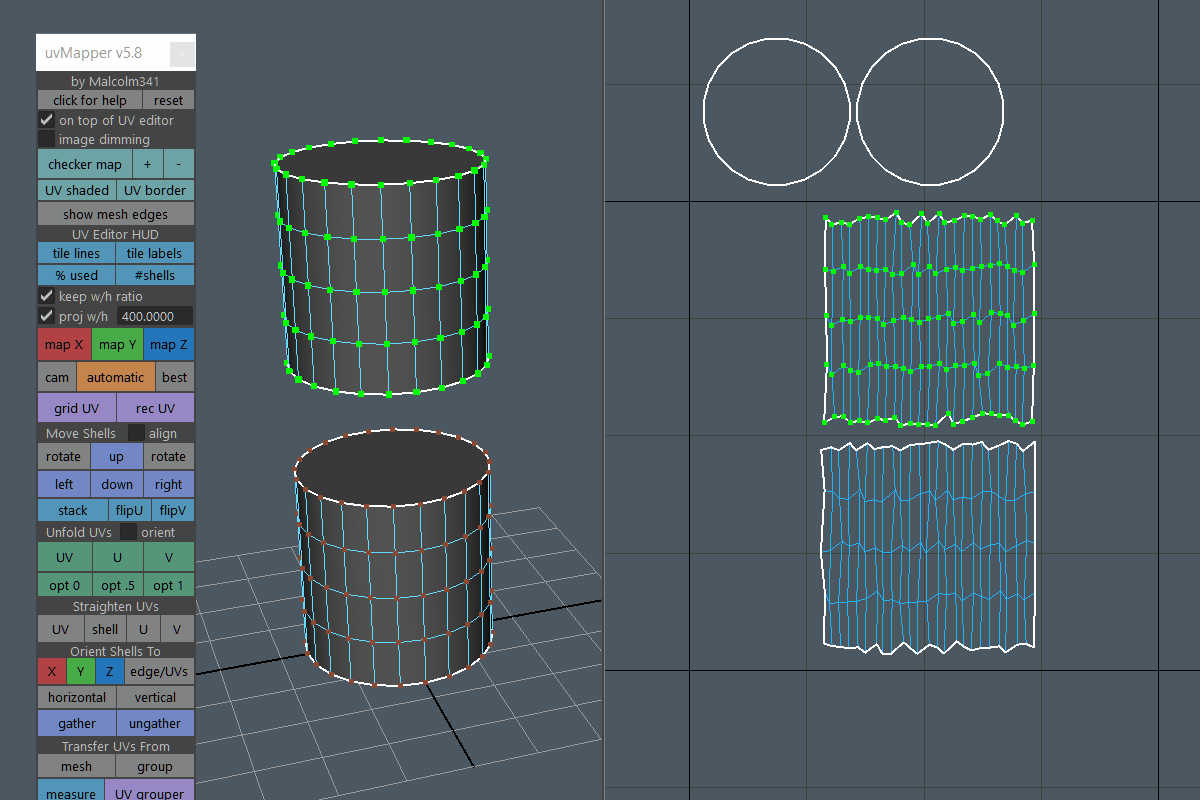
Softens all normals and then hardens UV border edges based on the tolerence angle you set in the easy normals input field. Lowering the tolerance will create more hard UV border edges and raising the tolerence will create more soft UV border edges. A good number to start with is 45.1, from there you can raise or lower the tolerence incrementally and run the tool again until you get the desired result. Easy normals can be helpful for automatically assigning hard edges for baking without hardening edges that should be left as soft, for example two halves of a sphere or a cylinder. In the example image notice the texture seam that runs vertically up the cylinder is not hardered, but other UV border edges are. Running the tool at default settings and then using the cut hard button can be a good way to prep your model for baking in two clicks. Remember that you also need to separate UV shells anywhere you have assigned a hard edge before baking.
Softens normals on selected components.
Hardens normals on selected components.
Hardens normals on all UV border edges of the currently selected mesh.
Cuts UVs on all hard edges of the currently selected mesh.
Cuts UVs on selected components.
Moves and sews UVs on selected edges.
Creates a new UV shell from selected faces.
Toggles polygon edge display on/off in the viewport.
Renames meshes and inserts the word _high or _low if the mesh is inside a group named high or low. This is helpful for renaming multiple meshes in one click if you're going to use the name matching feature of Marmoset Toolbag or another baking program. Create a group named high and a group named low. Put your high and low meshes into the corresponding groups. Type a name into the input field if you want to rename the meshes, leave it blank if you want to use existing names. Select the meshes in the groups, but not the groups themselves and click the name match button. Make sure to select meshes in the numeric order you want them named so the number increment works correctly. Meshes will be renamed
name_high_01, name_high_02, name_high_03, etc.
name_low_01, name_low_02, name_low_03, etc.
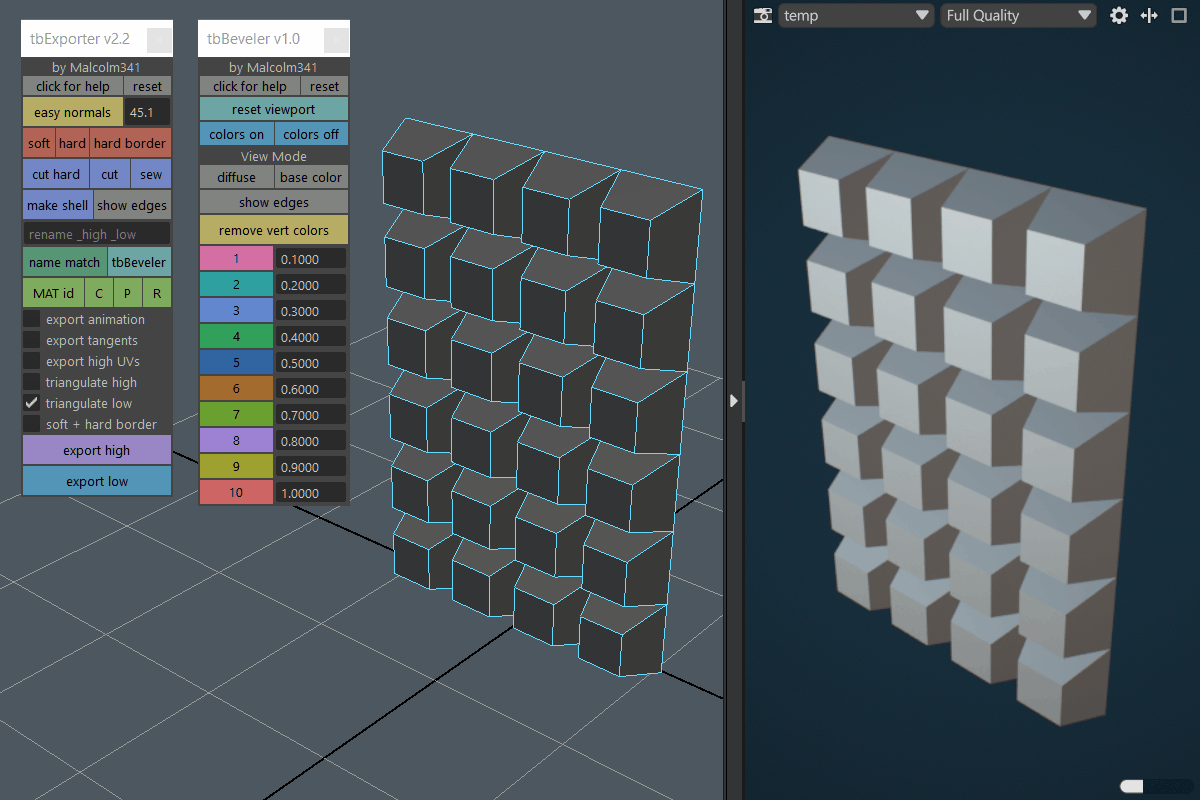
Opens the Marmoset Bevel Toolbox. The Marmoset Bevel Toolbox makes it easy to set up vertex colours for use with the Marmoset Toolbag Bevel Shader. It also makes it easy to view vertex colours in the viewport and identify what edges belong to what bevel width. This is important because the Marmoset Bevel Shader uses vertex colour values that range from 0-1 to set bevel width. The 0-1 vertex colour range is really hard to see in the viewport without using this toolbox.
Applies a randomly coloured material to each geometry shell/element on the currently selected mesh. Works on combined meshes with multiple geometry shells, or multiple meshes with a single geometry shell, or a combination of both. If faces are selected instead of meshes, a single randomly coloured material will be applied to the selected faces.

C copies the material id from a single selected face to the clipboard. P pastes the material id from the clipboard to selected faces or objects. R replaces the material id on the mesh with the copied material from the clipboard.

Turn on if you want to export animation with the .fbx file that gets created when using the export high or export low buttons.
Turn on if you want to export tangents with the .fbx file that gets created when using the export low button. If you want tangents included in the .fbx file that gets created when using the export high button you must turn on export tangents, turn on export high UVs, and turn off triangulate high. Tangents will not appear in the high .fbx file unless these exact checkboxes are set, this is due to a design flaw in Maya.
Turn on if you want to export UVs with the .fbx file that gets created when using the export high button. Exporting UVs for the high poly will slow down the export process dramatically, so only turn this on if you need it for something specific.
Turn on if you want to triangulate the .fbx file that gets created when using the export high button.
Turn on if you want to triangulate the .fbx file that gets created when using the export low button. This is highly recommended if you're baking high to low normal maps to avoid triangle flip errors between the game engine and the baking software.
Turn on if you want to soften all normals and harden all UV border edges each time the export low button is pressed.
Exports the contents of a selected group as .fbx using the various checkbox settings. Multiple meshes in the group is okay, smooth mesh preview will be exported correctly if active.
Exports the contents of a selected group as .fbx using the various checkboxes from above. Multiple meshes in the group is okay, smooth mesh preview will be disabled if active.
YouTube Video
Marmoset Bevel Toolbox
Resets the toolbox back to default settings.
Resets the Maya viewport to default settings.
The colors on button enables vertex colour display in the viewport. The colors off button disables vertex colour display in the viewport. Vertex colours are not removed from the mesh when you press the colors off button, they are just hidden in the viewport.
The diffuse button enables diffuse lighting in the viewport. The base color button enables base colour mode in the viewport. Base colour is the actual colour of the vertex without any lighting or shading.
Toggles polygon edge display on/off in the viewport.
Removes vertex colours from selected components, also works in object mode.
Applies the value from the input field associated with the button to the red channel of the vertex colour. Works on edges, faces, and meshes. You can modify the value the button uses from 0-1. This is helpful if you want specific bevel width values, but be aware if you change the value you need to select the components again and re-apply the new value to make sure your mesh is up to date. In Marmoset Toolbag the bevel width will be relative to what you set the Bevel Shader width value to and what units the current Marmoset scene is set to. For example, if you apply 0.5 vertex colour in Maya then set the Bevel Shader width value to 10mm and set imported units to centimeters(cm), the components you applied 0.5 vertex colour to will get a bevel width of 5mm in Marmoset Toolbag.
Easy Normals Toolbox
Resets the toolbox back to default settings.
Softens all normals and then hardens UV border edges based on the tolerence angle you set in the easy normals input field. Lowering the tolerance will create more hard UV border edges and raising the tolerence will create more soft UV border edges. A good number to start with is 45.1, from there you can raise or lower the tolerence incrementally and run the tool again until you get the desired result. Easy normals can be helpful for automatically assigning hard edges for baking without hardening edges that should be left as soft, for example two halves of a sphere or a cylinder. In the example image notice the texture seam that runs vertically up the cylinder is not hardered, but other UV border edges are. Running the tool at default settings and then using the cut hard button can be a good way to prep your model for baking in two clicks. Remember that you also need to separate UV shells anywhere you have assigned a hard edge before baking.
Softens normals on selected components.
Hardens normals on selected components.
Hardens normals on all UV border edges of the currently selected mesh.
Cuts UVs on all hard edges of the currently selected mesh.
Cuts UVs on selected components.
Moves and sews UVs on selected edges.
Creates a new UV shell from selected faces.
Toggles polygon edge display on/off in the viewport.
YouTube Video from 2019
Normal Map Viewport Mode
-Doesn't work in Arnold.
Once normal map viewport mode is applied to an object it can be rendered in the top down camera directly in the viewport, hardware renderer, or the Maya software renderer.

The advantages of creating normal maps this way is you can make modeling changes and see the result in real time in the top down viewport as you work. As well, you can use a combination of sub-d, polygons, and NURBS and they will all render seamlessly together, you can also float objects on top of each other to give the illusion they're part of a seamless mesh.
YouTube Video
Checker Map Toolbox
-Doesn't work in Maya LT
To start click the map1 button, if checker1.png is not found in the correct folder a procedural checker texture will be generated and applied. You can now click the find button to open the folder where checker1.png exists and overwrite it with your own texture. Make sure to name your texture checker1.png If you'd like textures to automatically reload when updated, in Maya go to:
Windows> Settings/Preferences> Files/Projects> Image Files> Automatically reload updated image files.

Turn on if you want the toolbox to stay on top of the UV editor when the UV editor is undocked. If you close the UV editor with this checkbox on, the toolbox will also close which is a limitation of how Maya works. If you're primarily working with a docked UV editor I recommend turning this checkbox off.
Toggles the checker map1 material override on/off. The plus and minus buttons increase or decrease the checker map tiling. If checker map mode is turned off, plus and minus will increase or decrease the tiling of any textures applied to the selected objects. If checker1.png isn't found in the correct folder a procedural checker texture will be generated and applied. For PC users the checker folder is C:\m341_temp\checker1.png For Mac users the checker folder is /Users/Shared/m341_temp/checker1.png
Toggles the checker map2 material override on/off. The rotate buttons rotate the checker texture left or right by 45 degrees. If checker map mode is turned off the rotate buttons rotate any textures applied to the selected objects. If checker2.png isn't found in the correct folder a procedural directional texture will be generated and applied. For PC users the checker folder is C:\m341_temp\checker2.png For Mac users the checker folder is /Users/Shared/m341_temp/checker2.png
Toggles base colour mode on/off. Base colour is the actual colour of the texture without any lighting or shading.
Procedurally generates four different built in checker map textures. Each map will overwrite checker1.png and become the main checker texture the tool uses, if you're using a custom checker texture it will be overwritten so make sure to back it up before using this feature.
Opens the folder where the checker textures are stored that the tool uses. Create your own checker textures here and name them checker1.png and checker2.png For PC users the checker folder is C:\m341_temp For Mac users the checker folder is /Users/Shared/m341_temp
YouTube Video from 2019
UV Grabber Toolbox
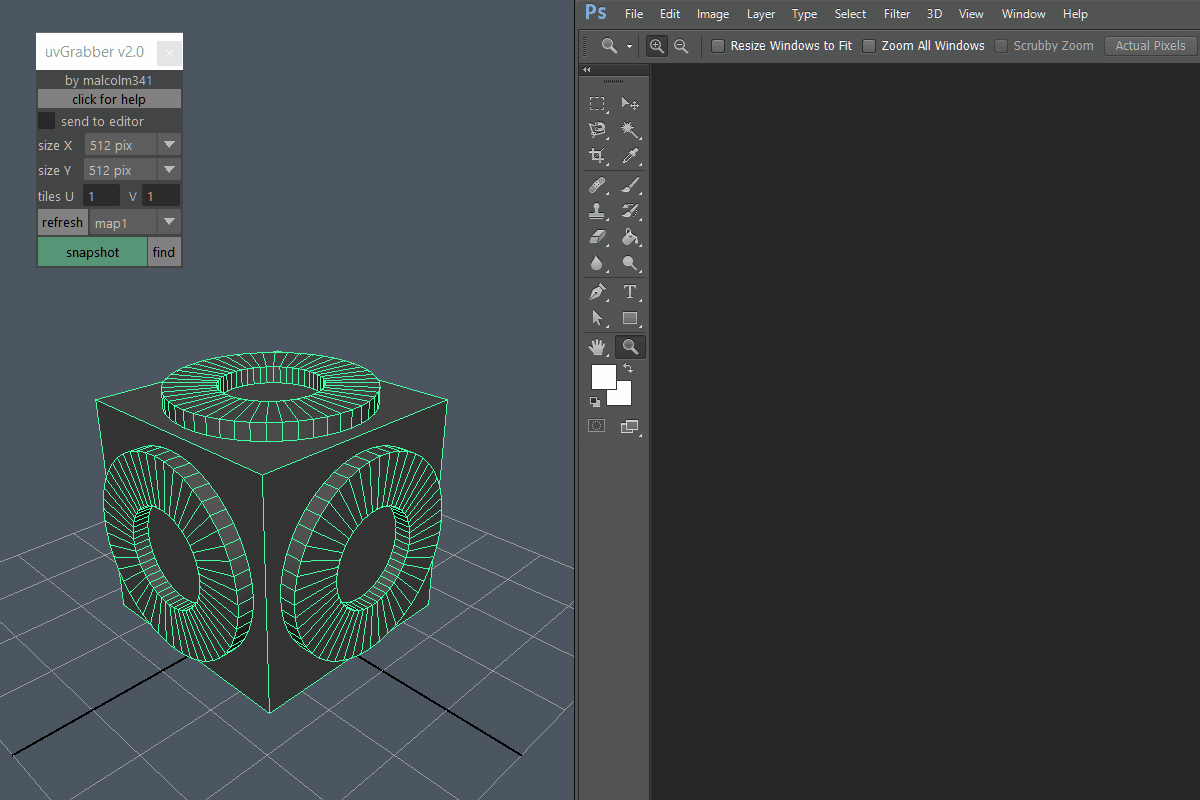
Turn on if you want to automatically send the UV snapshot to an image editor such as Photoshop.
The location of the image editor you want the UV snapshot to be sent to if the send to editor checkbox is turned on. Click the ... button to browse to Photoshop or another program that can open images. By default images open in fcheck which is Maya's built in image viewer.
Sets the resolution of the UV snapshot on the X axis.
Sets the resolution of the UV snapshot on the Y axis.
Sets how many UDIM tiles to capture in the UV snapshots. Each tile is captured as a separate image.
Refreshes the UV set list for the currently selected mesh. If a UV set is added, deleted, or you select a different mesh you need to click the refresh button to update the list so the tool works correctly. If multiple UV sets exist you can use the dropdown menu to the right of the refresh button to choose which UV set you want to capture.
Captures a UV snapshot of selected objects or faces and saves it to the hard drive.
Opens the folder where the UV snapshot is saved. For PC users the folder is C:\m341_temp For Mac users the folder is /Users/Shared/m341_temp
YouTube Video
UDIM Packing Toolbox
Resets the toolbox back to default settings.
Turn on if you want the toolbox to stay on top of the UV editor when the UV editor is undocked. If you close the UV editor with this checkbox on, the toolbox will also close which is a limitation of how Maya works. If you're primarily working with a docked UV editor I recommend turning this checkbox off.
Toggles UV editor image dimming on/off. After the checkbox is turned on the desired brightness level can be adjusted in the UV editor using the standard controls. The image dimming checkbox loads your last dimming settings the next time you open the toolbox. This is helpful because image dimming always resets to off when you close Maya.
Toggles the checker map on/off, press the plus or minus buttons to increase or decrease the checker map size.
Toggles shaded UVs and UV border edges on/off in the UV editor.
Toggles polygon edge display on/off in the viewport.
Toggles UV tile lines and UV tile labels on/off in the UV editor.
Toggles % used UV space and number of shells on/off in the UV editor HUD.
Rotates selected shells 90 degrees left or right. To save time only one component needs to be selected on the shell to spin the whole shell.
Moves selected shells by one tile in the choosen direction. To save time only one component needs to be selected on the shell to move the whole shell.
Stacks selected UV shells on top of each other. To save time only one component needs to be selected on each shell to stack them. Flips selected components along U or V. Unlike Maya's standard flip tool, UVs are not cut in the flipping process and modified pivots are supported.
Orients selected UV shells to world space X, Y, or Z. Clicking the button again will flip the shell to face positive or negative along that axis. Using orient X, Y, Z can be faster than using orient to edge or orient to UVs because you can select whole shells in the 3D viewport which is more intuitive, especially for circular shells where you can't tell which edge is facing which way in the UV editor.
Orients a UV shell to a selected edge, or two selected UVs.
Orients selected UV shells to the horizontal or vertical axis in the UV editor. Clicking the button again will flip the shell to face positive or negative along that axis. These tools should be used in conjunction with orient X, Y, Z. If orient X and Z don't produce a straight shell use orient horizontal. If orient Y doesn't produce a straight shell use orient vertical.

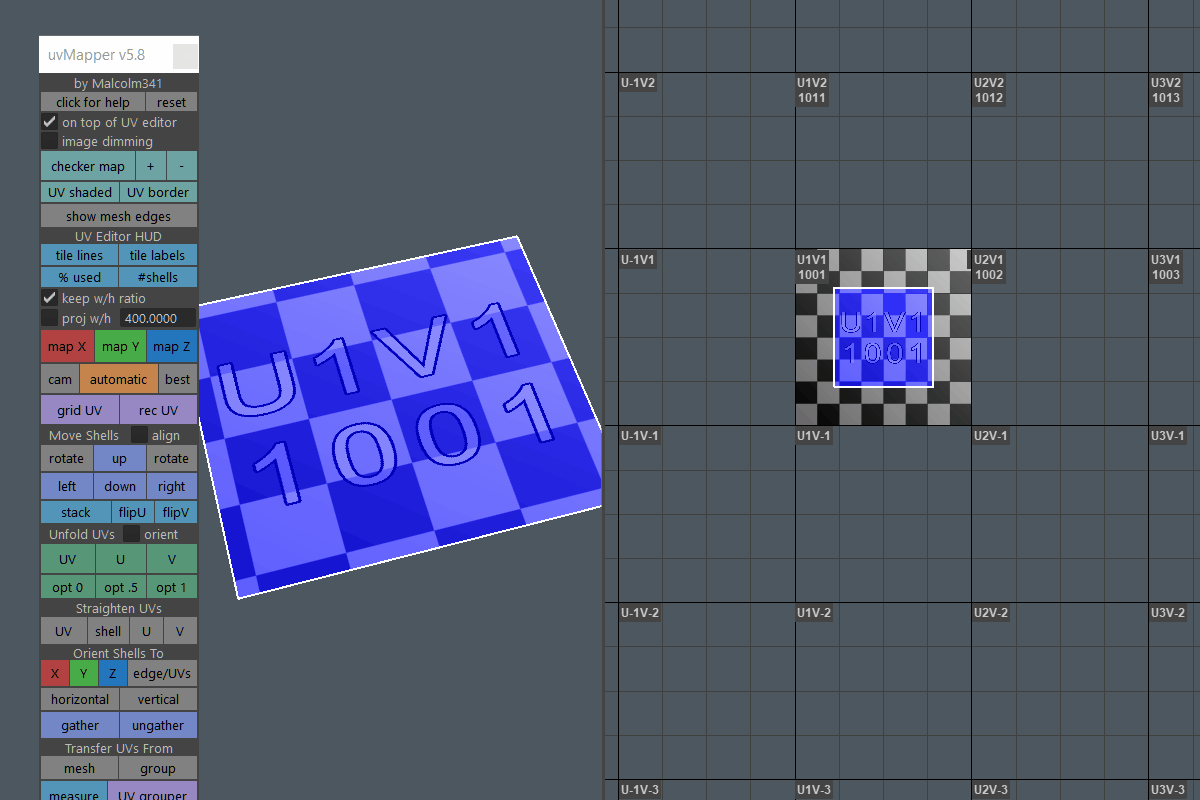
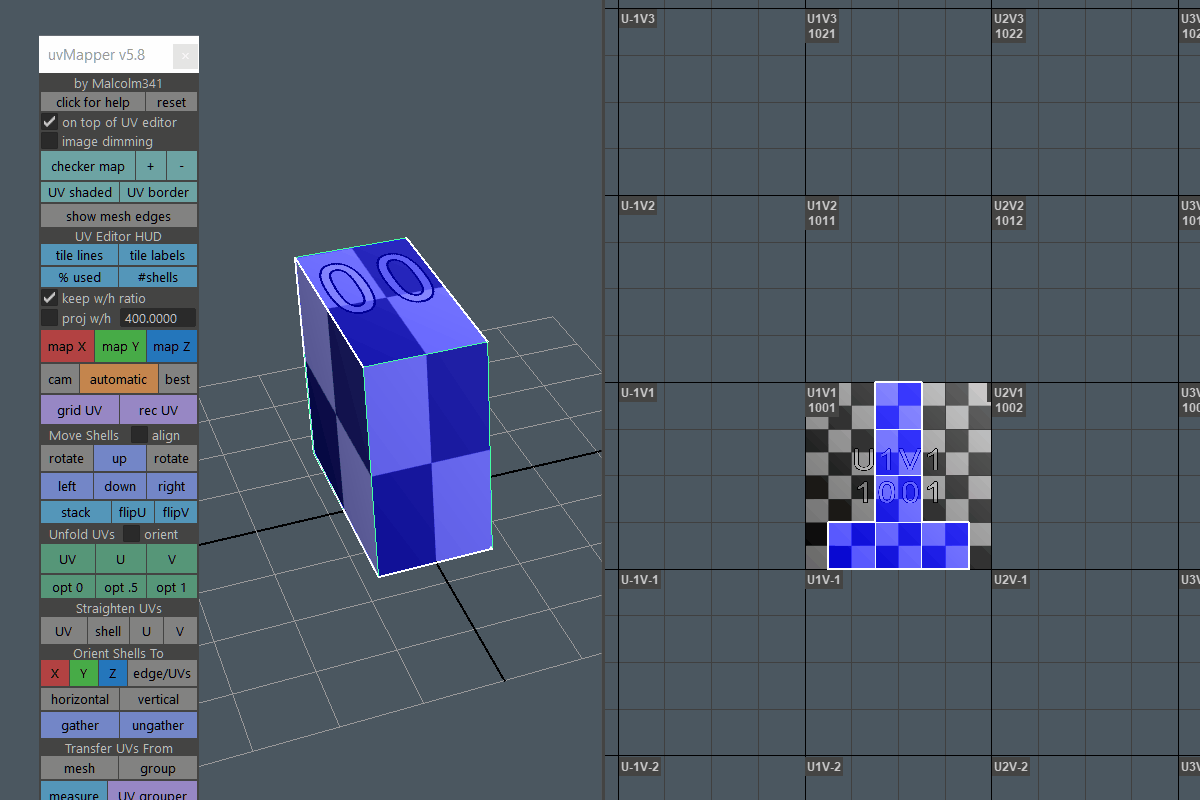
The map size drop down allows you to control how padding works relative to what the final texture size is you're going to apply to the model. Set map size to the final texture resolution you plan to use on your model.
Padding controls the amount of space between each UV shell and is relative to what you set the map size to. UV tile edge padding will automatically be half of whatever you set padding to.
Turn on to automatically rotate diagonal shells to be right angle facing when you use any of the following buttons: -pack all 0-1
-pack selected get TD
-pack selected 0-1
-pack selected to pivot
-layout up
-layout right
-send shells to UDIM #
-send shells to NEXT #
-world space to NEXT # The recommended workflow is to turn spin shells on for your first pack all 0-1 operation, then turn it off so you have full control over shell rotatation from that point on during the layout process.
Turn on if you want all similar UV shells to stack on top of each other during UDIM packing.
Lays out all UVs on selected meshes into the 0-1 UV space.
Lays out selected UV shells into the 0-1 UV space and pastes the resulting texel density on to all other UV shells, then moves them to the side for organization purposes.
Lays out selected UV shells into the 0-1 UV space.
Lays out selected UV shells to their pivot location while maintaining texel density and UV padding. You can move the pivot of the selected shells before using this tool to control where the UVs pack to. This tool is very useful for organizing shells into clusters without needing to lay them out into a UDIM tile first. For example, if you have specific shells you want packed beside each other.
Lays out selected UV shells to their pivot location in a vertical rectangular shape while maintaining texel density and UV padding. Each time you press the button the rectangle cluster spreads out and gets thinner. To reset the shape back to a square use the pack selected to pivot button. This tool is very useful for organizing shells into vertical clusters without needing to lay them out into a UDIM tile first. This is helpful if you need to organize a bunch of shells into a vertical strip with correct padding.
Lays out selected UV shells to their pivot location in a horizontal rectangular shape while maintaining texel density and UV padding. Each time you press the button the rectangle cluster spreads out and gets thinner. To reset the shape back to a square use the pack selected to pivot button. This tool is very useful for organizing shells into horizontal clusters without needing to lay them out into a UDIM tile first. This is helpful if you need to organize a bunch of shells into a horizontal strip with correct padding.
Selects all UV shells that overlap between UV tiles. In object mode the tool searches all UV shells on the selected objects. In UV, face, or UV shell mode, the tool searches your current selection for overlap and ignores unselected shells. If UV, face, or UV shell mode are active, but nothing's selected the tool searches all UV shells for the current meshes. Selecting only the shells you care about will significantly reduce search time.
Selects all UV shells that reside in a single UV tile including shells that partially overlap into that tile. Select one component or UV shell and run the tool to expand your selection to the current tile contents. Tile selection speed is based on how many shells exist in the current tile, more shells will take longer to process.
Selects all UV shells that have pivot points that reside in a single UV tile. This tool runs faster than the bbox method because it only needs to calculate one point per UV shell and ignores the shell's bounding box. Select one component or UV shell and run the tool to expand your selection to the current tile contents that have pivot points that reside in the current tile. Tile selection speed is based on how many shells exist in the current tile, more shells will take longer to process.
Sets which UDIM tile UV shells will be sent to when you press the send shells to UDIM # button. Enter a number into the input field or use the +/- buttons to increase or decrease the value by 1 or 10. Press the x button to reset the input field back to 1001.
Turn on if you want the selected UV shells to layout into a square with padding after they've been sent to a UV tile. I recommend leaving this checkbox on for most operations, turning it off means that no packing will occur during layout and UV shells will be moved to a UDIM tile maintaining their current layout. UV shells are packed into the center of the UDIM tile unlike Maya’s Layout UVs tool which packs shells into the bottom left of the UDIM tile. In the film industry shells are commonly packed into the center of UDIM tiles so this tool does the same.
Turn on if you want to automatically select UV shells that don't fit into the tile they were sent to and overflow into the next tile. This checkbox only works if you also have the auto pack shells checkbox turned on. Select pack overflow works when you press the send shells to UDIM # button, or the send shells to NEXT # button. A helpful workflow can be to select all your shells and turn the checkbox on, then press the send shells to NEXT # button which will pack all the shells to the next tile and select the shells that don't fit. You can then press the send shells to NEXT # button again to fit the selected shells to the next UDIM tile and repeat the process until all your shells fit into tiles. Packing time is much slower with this checkbox on, so turn it off if you don't need it.
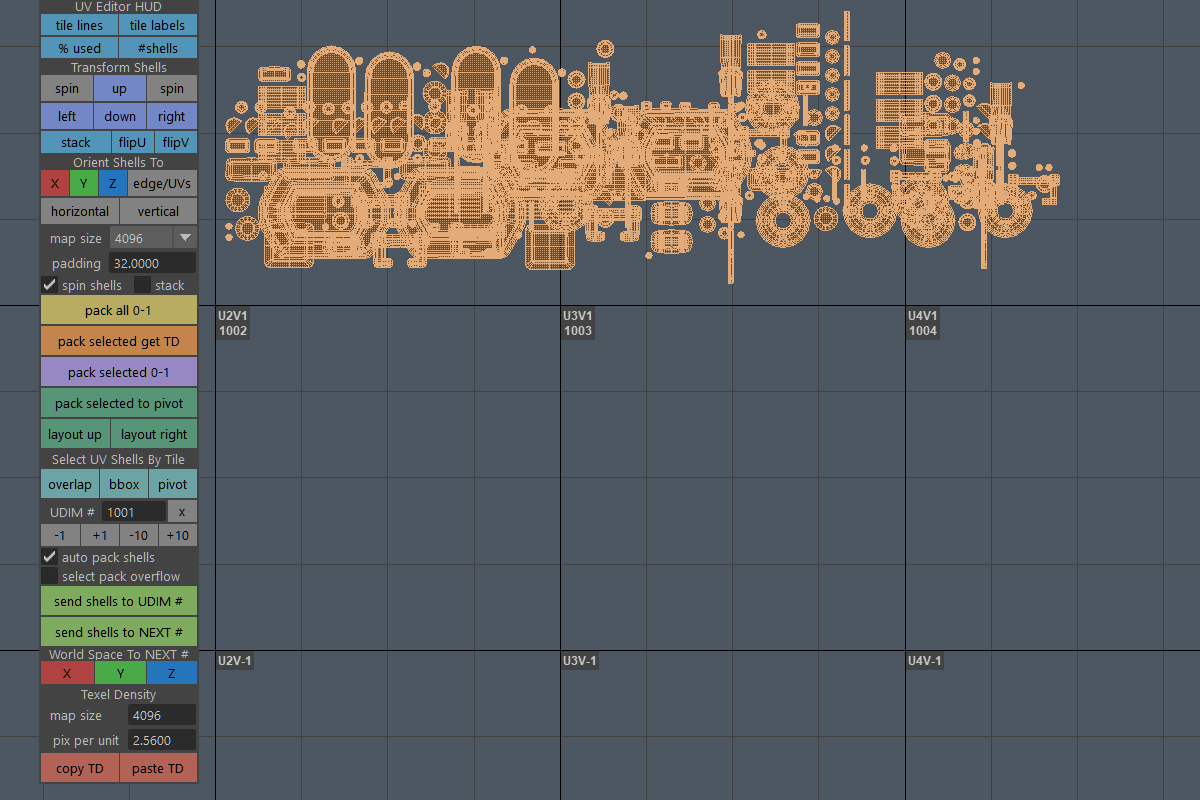
Lays out selected UV shells to the UDIM tile number set in the UDIM # input field. UV shells are packed into the center of the UDIM tile unlike Maya’s Layout UV window which packs shells into the bottom left of the UDIM tile. In the film industry shells are more commonly packed into the center of UDIM tiles so this tool does the same.
Lays out selected UV shells to the next UDIM tile number set in the UDIM # input field. The input field is updated each time you press this button. UV shells are packed into the center of the UDIM tile unlike Maya’s Layout UV window which packs shells into the bottom left of the UDIM tile. In the film industry shells are more commonly packed into the center of UDIM tiles so this tool does the same.
Lays out each mesh's UV shells into a UDIM tile from left to right based on world space location of the meshes. The starting UDIM can be set using the UDIM # input field. This tool only works on separate meshes. Meshes that happen to be at zero and aren't positive or negative are treated as center meshes and are sorted between negative and positive meshes in world space. World space is determined by the center of each mesh's bounding box. Use the corresponding button to layout along X, Y, or Z from left to right into UDIM tiles. The order the world space layout occurs in is: -Negative X to positive X
-Positive Y to negative Y
-Positive Z to negative Z
Stores the texture resolution used to calculate the pixels per unit below. Set this input field to the pixel size your final texture will be, for example 4096 if you plan to use a 4096x4096 texture on your model.
Stores the texel density the paste TD button uses and is updated by the copy TD button. The value can be manually input or will auto update if one or more faces are selected and the copy TD button is pressed.
Copy TD copies the current texel density from selected faces and updates the pix per unit field. Texel density is displayed in pixels per unit and will be relative to what map size is currently set before copying. Paste TD applies the current texel density from the pix per unit field to selected UVs, objects, or faces. The paste TD button is significantly faster than the set TD button found in the Maya UV Toolkit.
YouTube Video 1 YouTube Video 2
Light Mapping Toolbox
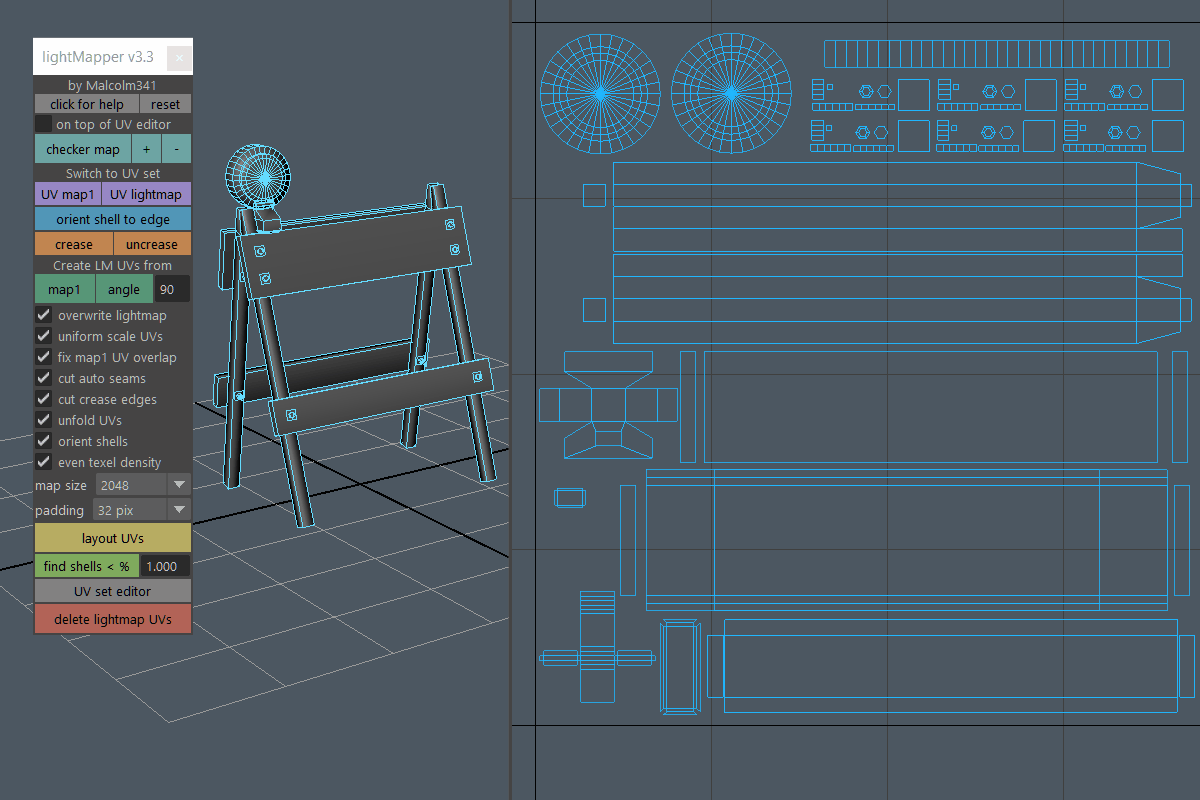
Resets the toolbox back to default settings.
Turn on if you want the toolbox to stay on top of the UV editor when the UV editor is undocked. If you close the UV editor with this checkbox on, the toolbox will also close which is a limitation of how Maya works. If you're primarily working with a docked UV editor I recommend turning this checkbox off.
Toggles the checker map on/off, press the plus or minus buttons to increase or decrease the checker map size.
Switches all meshes in the scene to UV set map1 or UV set lightmap. Meshes don't need to be selected first, every mesh in the scene will be automatically switched.
Orients the rotation of a shell to the selected edge or two selected UVs. Works on multiple shells at the same time, for best results select sets of UVs on each shell to avoid shared edges.
Sets the crease amount to one or zero on selected edges. In object mode uncrease sets the crease amount to zero for all edges on the mesh. Creases are used to mark edges that will be cut when creating the light map UV set using the map1 method or the angle method. Creases are non-destructive and appear as a thicker looking edge in the viewport.
Creates light map UVs for the currently selected mesh from the existing map1 UV set and stores them in a second UV set named lightmap. Use the map1 method when you have really good map1 UVs that you want to convert into light map UVs. The cut auto seams checkbox doesn't have any effect on the map1 method of light map generation.
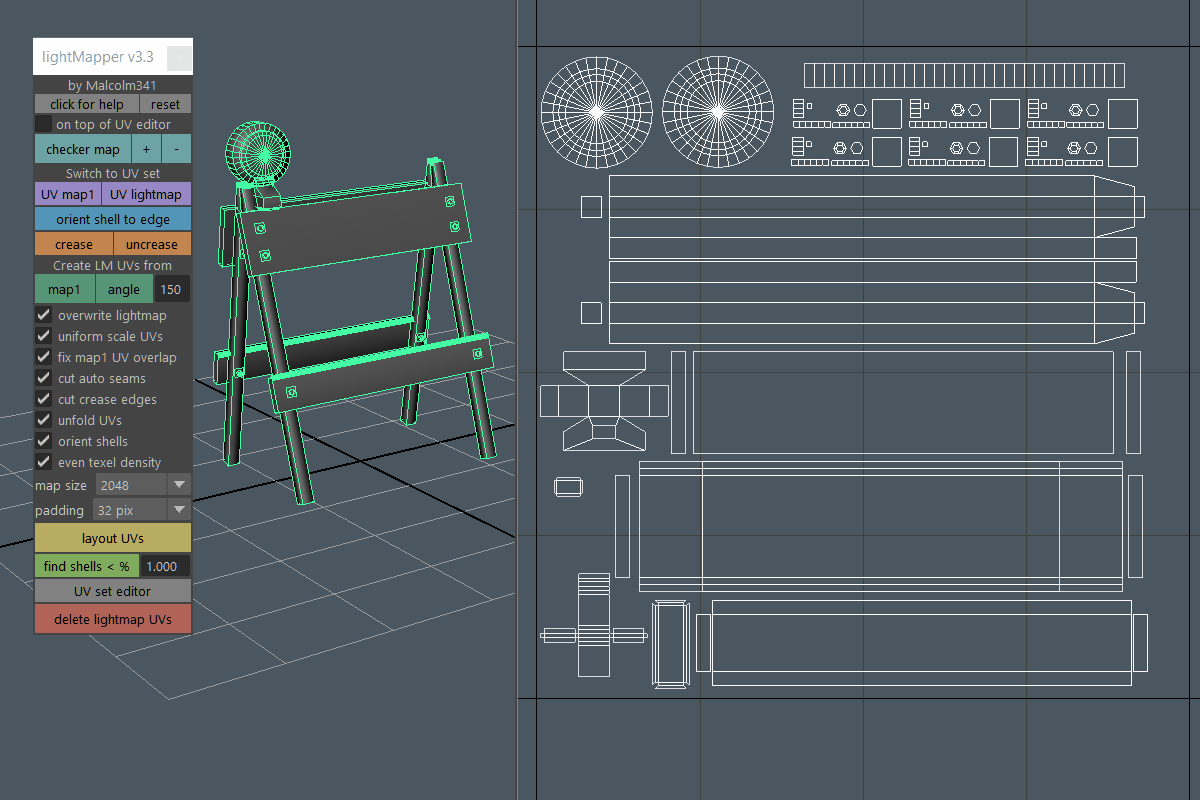
Creates light map UVs for the currently selected mesh, texture seams are automatically cut where the normal angle of the mesh is greater than the angle input field. Lower values will produce more UV cuts/shells. Existing normals and UVs are not modified or used to create the light map UVs. Light map UVs are stored in a second UV set named lightmap. The angle method can be superior to the map1 method if the map1 UVs aren't suitable to generate light map UVs from. The angle method produces minimal seams, but you may have to lower the angle input field or add crease edges to guide light map generation if the UVs don't unfold correctly. The fix map1 UV overlap checkbox, uniform TD checkbox, and the orient shells checkbox don't have any effect on the angle method of light map generation. If you want to scale or rotate specific shells after using the angle method, use the layout UVs button with the uniform TD checkbox and orient shells checkbox turned off.
Turn on if you want to overwrite the lightmap UV set each time you generate new light map UVs using the map1 or angle method.
Turn on if you want the light map UVs to be stretched to fit into the 0-1 UV space.
Turn on if you want the tool to automatically search for shells that won't unfold correctly because they self intersect. Faces that can't unfold will get an automatic map to avoid baking errors and warnings in Unreal. The fix map1 UV overlap checkbox doesn't have any effect on the angle method of light map generation.
Turn on if you want the tool to automatically cut light map UV seams for you when using the angle method of light map generation. If some shells still won't unfold correctly try lowering the angle value and regenerating the light map UVs, or add crease edges to guide the light map UV generation. The cut auto seams checkbox doesn't have any effect on the map1 method of light map generation.
Turn on if you want the tool to cut light map UV seams on creased edges. This feature allows you to non-destructively fine tune exactly how your lightmap UVs unwrap and works with the map1 and angle methods. If you want full control of where UV seams appear in the light map, turn off the cut auto seams checkbox and add crease edges everywhere you want light map UV seams.

Turn on if you want the light map UVs to be unfolded during creation. Unfolding takes time, so turn this checkbox off if you don't need it. You may also find when creating lightmap UVs from map1 that unfolding rounds shells that were perfectly square which you may not want. The unfold UVs checkbox doesn't have any effect on the angle method of light map generation.
Turn on if you want the UV shells to be rotated 90 degrees for best fit. The orient shells check box doesn't have any effect on the angle method of light map generation.
Turn on if you want the light map UVs to be scaled evenly to the same texel density during creation. If you turn this checkbox off you can manually scale specific shells up or down and then use layout UVs to repack them at that new scale relative to the rest of the UV shells. This is helpful if there are parts of the light map that are less important and require less space in the UV pack overall. It's also helpful if there are tiny shells that won't bake correctly unless they're scaled up a bit. The uniform TD checkbox doesn't have any effect on the angle method of light map generation.
The map size drop down allows you to control how padding works relative to what the final light map size is you're going to apply to the model. Set map size to the final light map texture resolution you plan to use on your model.
The padding drop down controls the amount of space between each UV shell and is relative to what you set the map size to. UV tile edge padding will automatically be half of whatever you set padding to.
Lays out UVs using the checkbox options from above. Works on the whole mesh rather than selected UVs so you can save time not needing to make UV selections before pressing the layout UVs button. If you turn off the orient shells checkbox and the uniform TD checkbox you can adjust the rotation and scale of specific shells and then press the layout UVs button again to repack everything. These manual edits will be lost if you press the map1 button or the angle button to regenerate light map UVs.
Selects all UV shells smaller than the % number you type into the input field. The 0-1 UV space is considered to be 100%, the default value is 1.0 which will select any UV shell smaller than 1% of the 0-1 UV space. This is helpful for selecting small shells that won't bake correctly so you can scale them up and then turn off the uniform TD checkbox and layout UVs again to give them more space in the final pack. Doing this will keep those shells larger than they should be and give them a better chance to bake correctly. After changing the value in the input field you can press enter on the keyboard numpad to automatically run the tool again so you don't need to click the button each time as you fine tune the number to select the small shells.
Toggles Maya's UV set editor on/off.
Deletes the UV set named lightmap on selected meshes.
YouTube Video
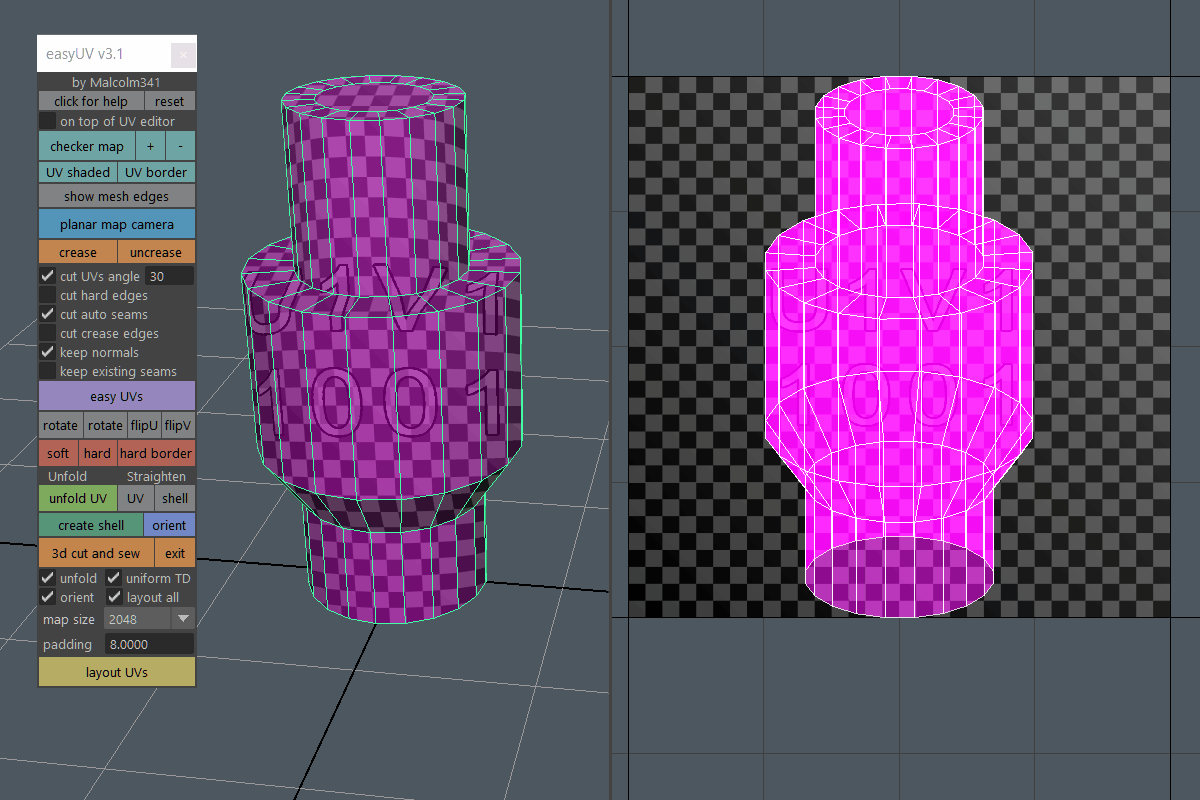
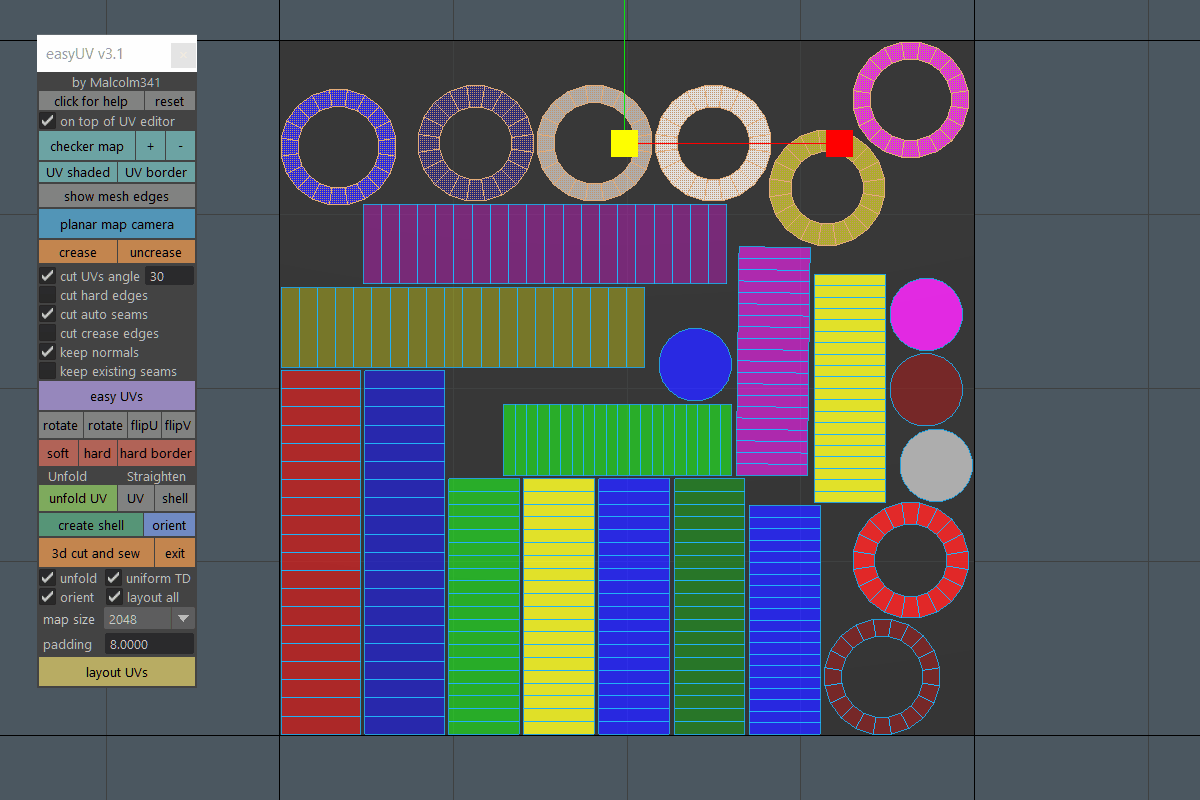
Easy UVs Toolbox
-Hold Ctrl and double click to sew UVs along that loop.
-Click and drag to cut along edges or hold Ctrl and click and drag to sew edges. This is useful for edges that don't form an edge loop or if you want to cut two or more edges in a row.
-For a full list of hotkeys press the 3d cut and sew button to make the tool active, then in Maya go to Windows> General Editors> Tool Settings.

Resets the toolbox back to default settings.
Turn on if you want the toolbox to stay on top of the UV editor when the UV editor is undocked. If you close the UV editor with this checkbox on, the toolbox will also close which is a limitation of how Maya works. If you're primarily working with a docked UV editor I recommend turning this checkbox off.
Toggles the checker map on/off, press the plus or minus buttons to increase or decrease the checker map size.
Toggles shaded UVs and UV borders on/off in the UV editor.
Toggles mesh edges on/off in the 3D viewport.
Applies a planar map from camera, this is helpful to quickly create temporary UVs.
Sets the crease amount to one or zero on selected edges. In object mode uncrease sets the crease amount to zero for all edges on the mesh. Creases are used to mark edges that will be cut when using the easy UVs button if the cut crease edges checkbox is turned on. Creases are non-destructive and appear as a thicker looking edge in the viewport.
Turn on if you want to use the angle of the mesh to create UV cuts when you press the easy UVs button. Use the angle input field to enter a value from 0 to 180, higher values will produce UVs with less cuts/shells. After changing the value in the angle input field you can press enter on the keyboard numpad to automatically run easy UVs, this is helpful to quickly experiment with different values until you're happy with the results. Turning the checkbox off will use automatic mapping to create the base UVs instead of the angle of the mesh, this is typically not recommended.
Turn on if you want to cut UVs on hard edges when you press the easy UVs button.
Turn on if you want to cut UVs using Maya's auto seams feature when you press the easy UVs button. This is helpful for cylindrical and spherical shaped meshes so they unwrap without errors. It's recommended to leave this checkbox on in most cases.
Turn on if you want to cut UVs on crease edges when you press the easy UVs button. Crease edges can be used to non-destructively mark up your mesh for UV unwrapping. If you want to exclusively use crease edges to unwrap your model set the angle input field to 180, and turn off the cut hard edges, cut auto seams, and keep existing seams checkboxes.
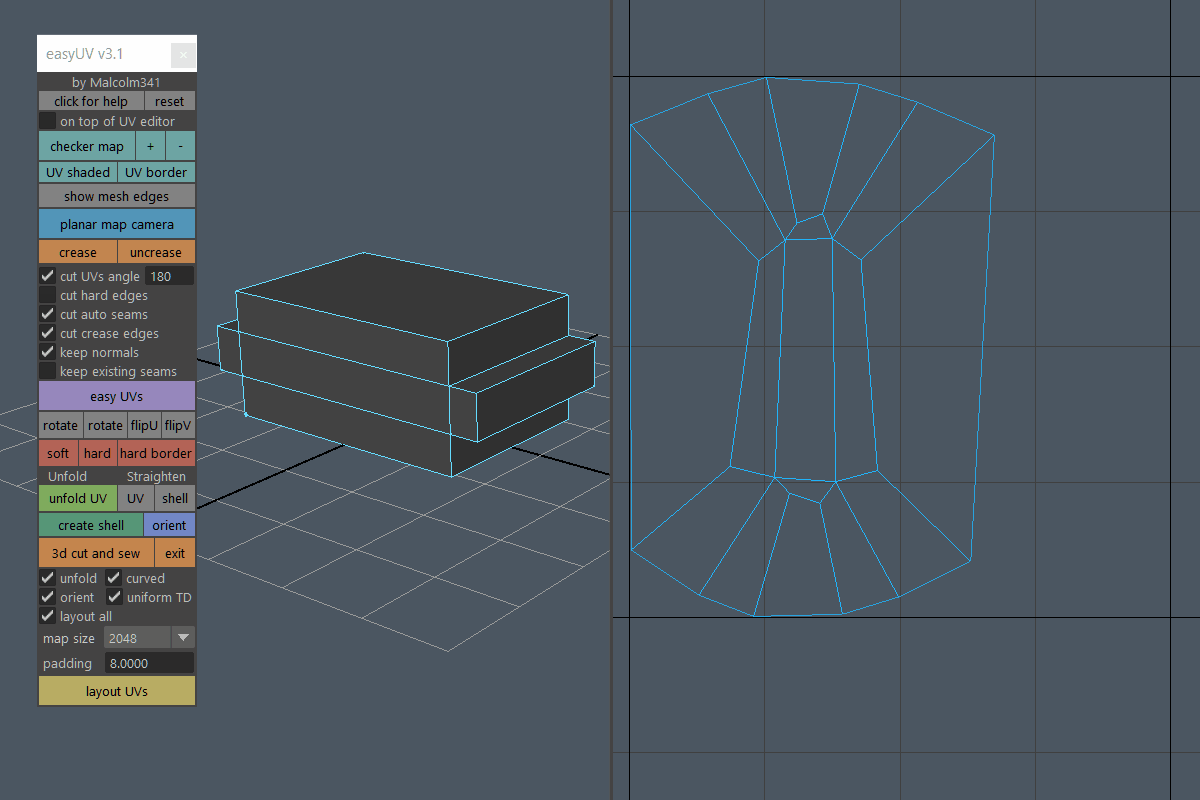
Turn on if you want to keep the normals intact when you press the easy UVs button. Turn off if you want the angle input field value to be applied as a soften/harden normals value when you press the easy UVs button.
Turn on if you want to keep the existing UV cuts/shells you have when you press the easy UVs button. It's recommend to leave this checkbox off, but turning it on can be useful in certain situations.
Automatically creates UVs for your mesh with less seams than automatic mapping. Use the different checkboxes to configure how you'd like the easy UVs to be created, different checkbox combinations will create different results. See the instructions at the top of this document to get started learning this tool. The uniform TD checkbox has no effect on the easy UVs method of UV generation.
Rotates selected UVs left or right 90 degrees. The left rotate button rotates left, and the right rotate button rotates right. Flips selected UVs along U or V based on their current pivot point. UVs are not cut during flipping which avoids unwanted seams like the Maya default flip UV commands.
Softens normals, hardens normals, or hardens all UV border edges on the selected mesh.
Unfolds UVs on selected components. Straightens UVs on selected components or straightens UV shell based on the edge loop you select first. An angle of 30 is used for the straighten UV command.
Create shell converts selected components into a new UV shell, for best results select faces first. Orient aligns the rotation of a UV shell to the selected edge or two selected UVs. Works on multiple shells at the same time, for best results select sets of UVs on each shell to avoid shared edges.
Enters and exits the 3d cut and sew tool. To interactively cut and sew edges click the 3d cut and sew button to enter the 3d cut and sew tool:
-Hold Ctrl and double click to sew UVs along that loop.
-Click and drag to cut along edges or hold Ctrl and click and drag to sew edges. This is useful for edges that don't form an edge loop or if you want to cut two or more edges in a row.
-For a full list of hotkeys press the 3d cut and sew button to make the tool active, then in Maya go to Windows> General Editors> Tool Settings.
Turn on if you want the layout UVs button and easy UVs button to unfold UVs during UV layout, it's recommended to leave this checkbox on in most cases.
Turn on if you want the layout UVs button to scale UV shells to have uniform texel density relative to one another in the 0-1 UV space. The uniform TD checkbox has no effect on the easy UVs method of UV generation.
Turn on if you want the layout UVs button and easy UVs button to rotate UV shells for best fit during UV layout.
Turn on if you want the layout UVs button to layout all UVs on the current mesh. Turn off if you want the layout UVs button to layout selected UVs. If the 3d cut and sew tool is active the layout UVs button will always layout all UVs on the mesh even if the checkbox is turned off, this prevents the unwrapping process from failing when using the 3d cut and sew tool.
The map size drop down allows you to control how padding works relative to what the final texture size is you're going to apply to the model. Set map size to the final texture resolution you plan to use on your model.
Padding controls the amount of space between each UV shell and is relative to what you set the map size to. UV tile edge padding will automatically be half of whatever you set padding to.
Lays out UVs, use the unfold, uniform TD, orient, and layout all checkboxes to configure how layout UVs works. Finalize your UVs using all the different tools in the toolbox, press the layout UVs button each time you make an edit so you can see how the UVs pack together. If you turn off the orient checkbox and the uniform TD checkbox you can adjust the rotation and scale of specific shells relative to the rest of the UVs and then press the layout UVs button to repack everything.
YouTube Video
Gridify UVs
-Doesn't work on triangles.
-Doesn't work on n-gons.
If the newly created grid of UV's is facing the wrong way, click the gridUV button a second time to rotate it by 90 degrees.
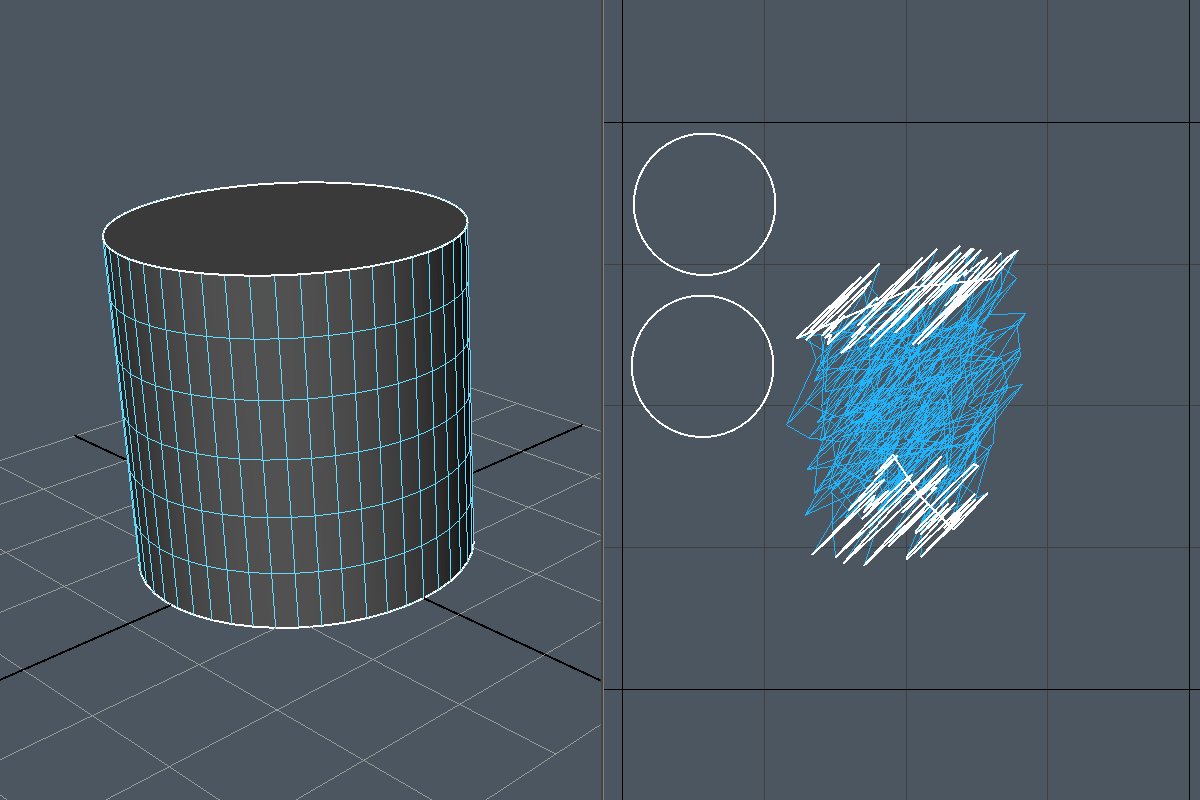
This tool uses Maya's auto seam feature to automatically cut a UV seem when needed. For example, on cylindrical shaped meshes that don't have a natural UV border edge. If you're not happy with the resulting auto seam you can manually choose which edge loop to use as the UV seam:
-Select the edge loop you want to use as the UV cutting seam.
-Hold shift and select the faces you want to gridify so you have edges and faces selected at the same time.
-Selection order doesn't matter if you prefer to select faces first.
-Run the tool.

The texel density the UVs are created with is 5.12 pixels per unit, if you'd like to modify this value locally:
-A window opens displaying the code for the tool.
-Near the top of the code look for float $pixPerUnit = 5.1200;
-Change 5.1200; to whatever texel density you prefer.
-Next time you run the tool it will use the updated value you set.
If you'd like to keep the existing texel density of the selected faces and apply that to the grid of UVs:
-A window opens displaying the code for the tool.
-Near the top of the code look for $gridUVs_keepExistingShellTD = 0;
-Change the 0 to a 1.
-Next time you run the tool it will use the size of the selected faces in the UV editor as the texel density. If no UVs exist for the selected faces it will normalize the resulting grid of UVs to fill the 0-1 UV space.
If you'd like to always normalize the grid of UVs to fill the 0-1 UV space:
-A window opens displaying the code for the tool.
-Near the top of the code look for $gridUVs_normalizeShell = 0;
-Change the 0 to a 1.
-Next time you run the tool it will normalize the resulting grid of UVs to fill the 0-1 UV space.
YouTube Video
Rectangularize UVs
-Doesn't work on triangles.
-Doesn't work on n-gons.
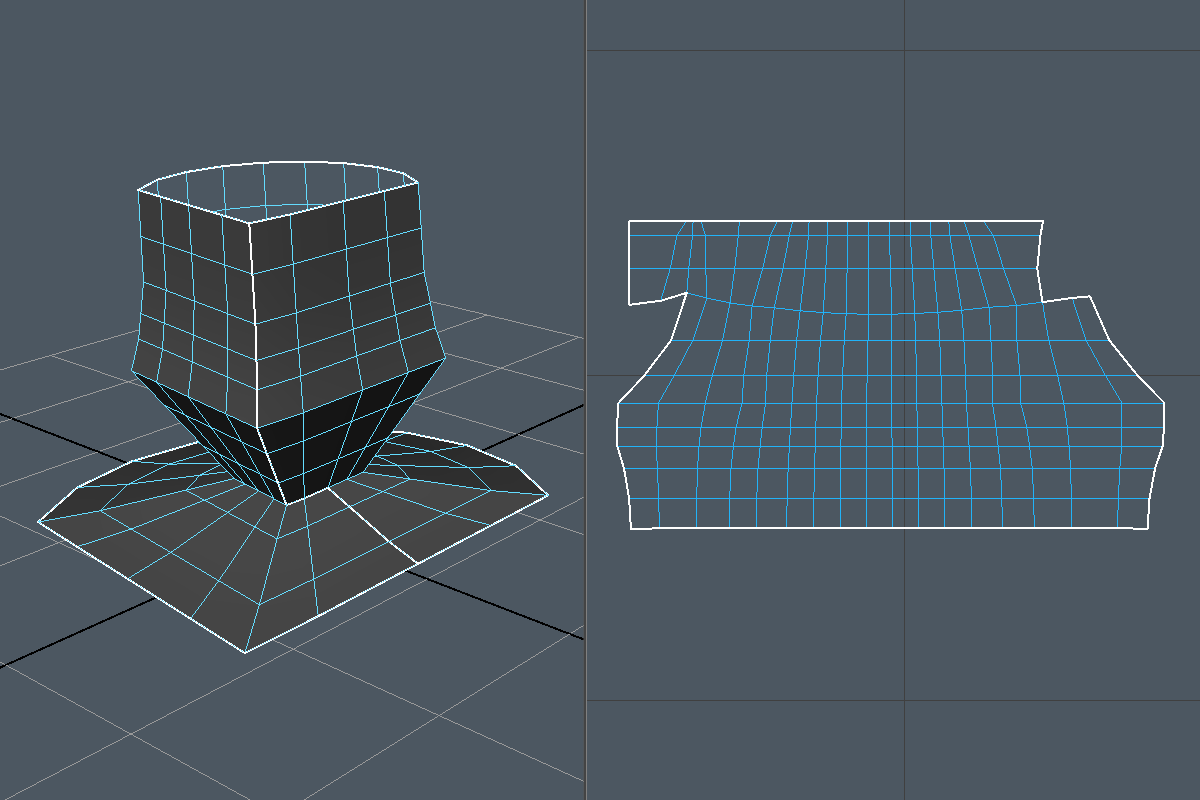
-Doesn't work on selections that are jagged/stair stepped.
If the newly created grid of UV's is facing the wrong way, click the recUV button a second time to rotate it by 90 degrees.
The recUV tool doesn't work on selections that are jagged or stair stepped, for the tool to work you need to select faces that form a square, rectangle, or strip. If you want to gridify a jagged selection use the gridUV tool instead. In the example image below you can see what type of face selection will work with the tool and what won't.
This tool uses Maya's auto seam feature to automatically cut a UV seem when needed. For example, on cylindrical shaped meshes that don't have a natural UV border edge. If you're not happy with the resulting auto seam you can manually choose which edge loop to use as the UV seam:
-Select the edge loop you want to use as the UV cutting seam.
-Hold shift and select the faces you want to gridify so you have edges and faces selected at the same time.
-Selection order doesn't matter if you prefer to select faces first.
-Run the tool.

In certain situations even though you selected faces that form a square, rectangle, or strip, you may find that the tool fails. This is because Maya's auto seam created a UV border edge automatically that doesn't form a square, rectangle, or strip. If this happens you'll need to manually choose which edge loop to use as the UV seam. To determine if this is happening on your mesh, select the faces you want and run the gridUV tool instead of the recUV tool. The gridUV tool works on any shape of selection and will reveal the issue. If you run the gridUV tool and the UVs that get created are jagged or stair stepped, then you know the problem with recUV is caused by Maya's auto seam feature cutting a jagged edge and you'll need to manually choose which edge loop to use as the UV seam as shown in the example image above.
The texel density the UVs are created with is 5.12 pixels per unit, if you'd like to modify this value locally:
-A window opens displaying the code for the tool.
-Near the top of the code look for float $m341_recUVs_pixPerUnit = 5.12;
-Change 5.12; to whatever texel density you prefer.
-Next time you run the tool it will use the updated value you set.
If you'd like to keep the existing texel density of the selected faces and apply that to the grid of UVs:
-A window opens displaying the code for the tool.
-Near the top of the code look for $m341_recUVs_keepExistingShellTD = 0;
-Change the 0 to a 1.
-Next time you run the tool it will use the size of the selected faces in the UV editor as the texel density. If no UVs exist for the selected faces it will normalize the resulting grid of UVs to fill the 0-1 UV space.

If you'd like to always normalize the grid of UVs to fill the 0-1 UV space:
-A window opens displaying the code for the tool.
-Near the top of the code look for $m341_recUVs_normalizeShell = 0;
-Change the 0 to a 1.
-Next time you run the tool it will normalize the resulting grid of UVs to fill the 0-1 UV space.
YouTube Video
UV Mapping Toolbox
-Right click the uvMap button on the shelf and choose edit.
-A window opens displaying the code for the toolbox.
-Near the top of the code look for $historyType = 1;
-Change the number to 1, 2 or 3.
-Delete history = 1.
-Delete history, but not deformers = 2.
-Keep history = 3.
-Next time you run the tool it will use the updated value you set.
Resets the toolbox back to default settings.
Turn on if you want the toolbox to stay on top of the UV editor when the UV editor is undocked. If you close the UV editor with this checkbox on, the toolbox will also close which is a limitation of how Maya works. If you're primarily working with a docked UV editor I recommend turning this checkbox off.
Toggles UV editor image dimming on/off. After the checkbox is turned on the desired brightness level can be adjusted in the UV editor using the standard controls. The image dimming checkbox loads your last dimming settings the next time you open the toolbox. This is helpful because image dimming always resets to off when you close Maya.
Toggles the checker map on/off, press the plus or minus buttons to increase or decrease the checker map size.
Toggles shaded UVs and UV border edges on/off in the UV editor.
Toggles polygon edge display on/off in the viewport.
Toggles UV tile lines and UV tile labels on/off in the UV editor.
Toggles % used UV space and number of shells on/off in the UV editor HUD.
Turn on if you want to keep the width/height ratio during UV creation when you press the map X, Y, Z, cam, automatic, and best buttons. If you turn off keep w/h ratio the proj w/h checkbox is also turned off.
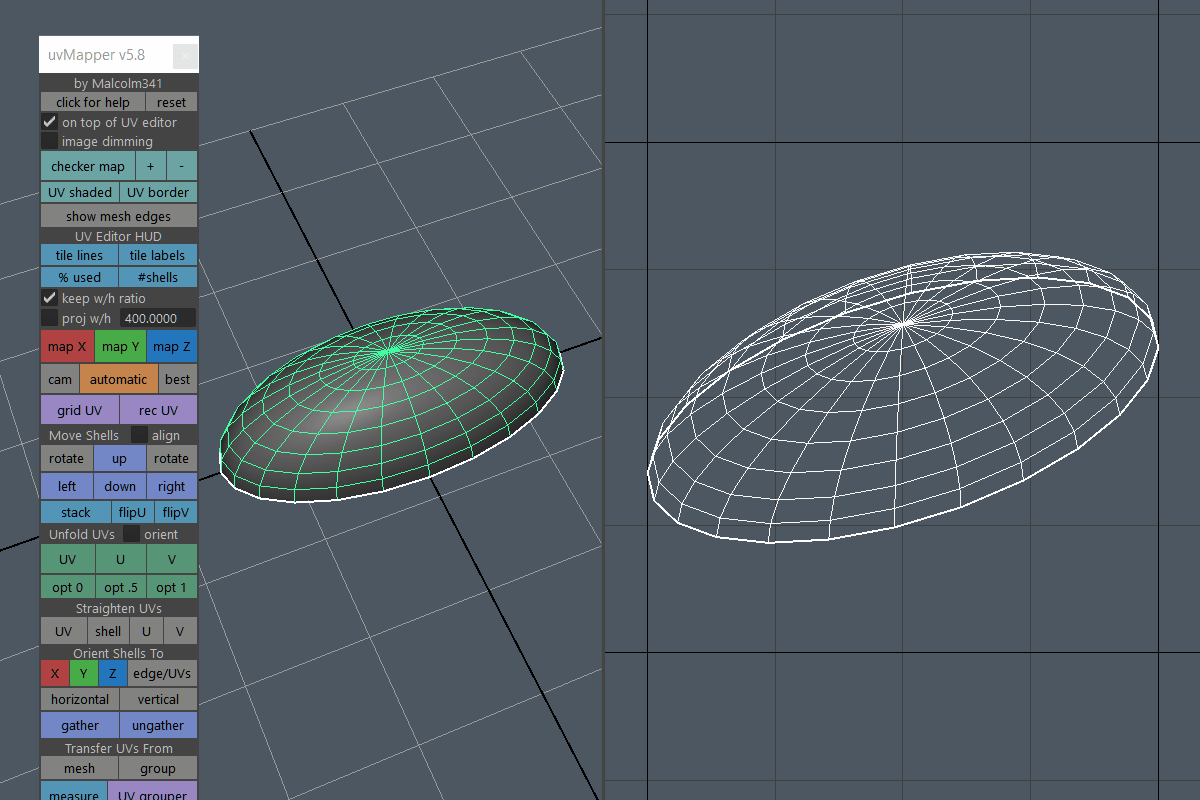
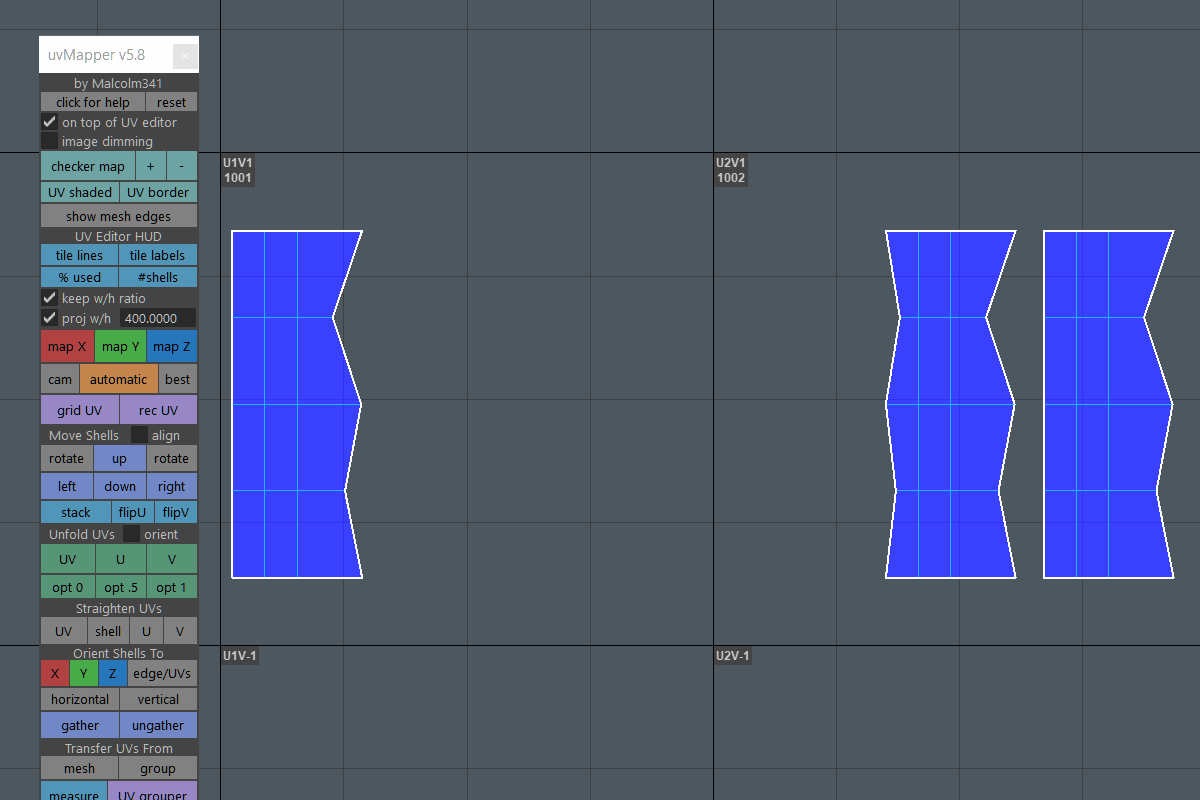
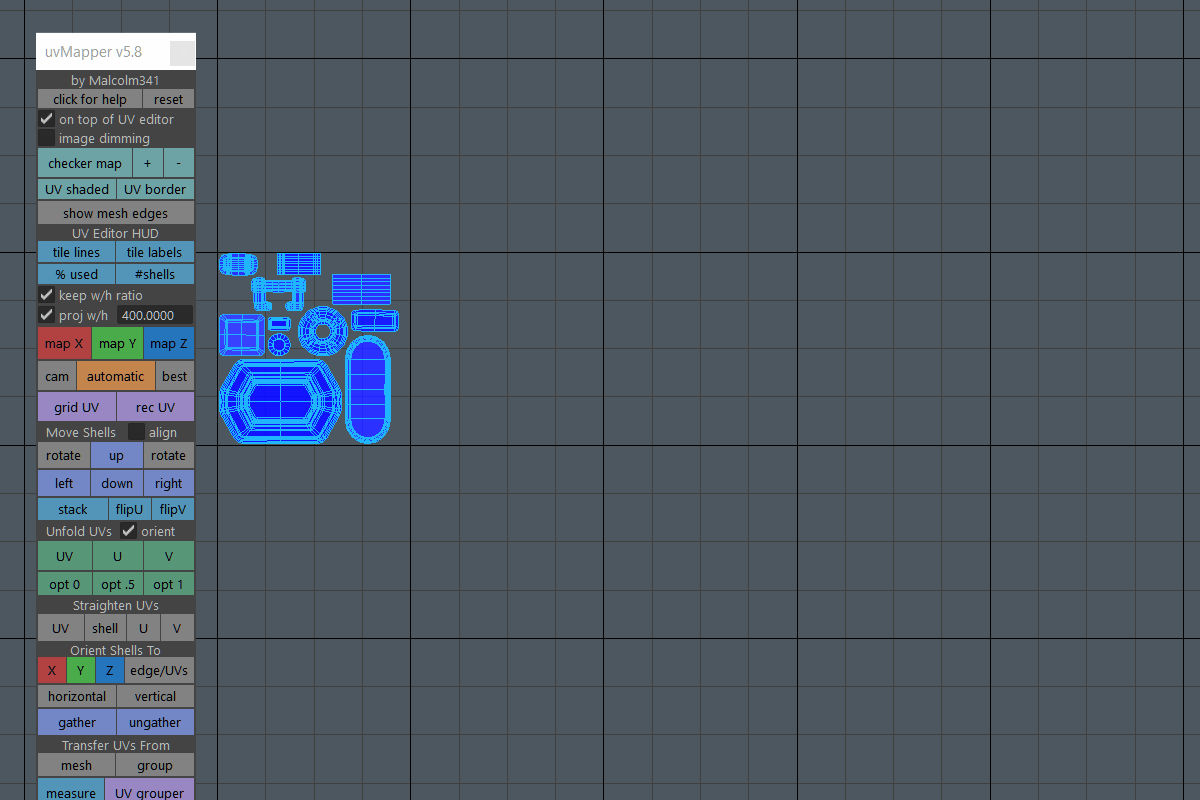
Turn on if you want to apply world space texel density during UV creation using the map X, Y, Z, cam, automatic, and best buttons. Use the input field to set a world space value you want the UV mapping created at and then press the map X, Y, Z, cam, automatic, or best buttons to create UVs at that world space texel density. This is helpful if you want to create UV mapping at a consistent scale as you work. The default value is 400 world space units in Maya which is equal to 5.12 pixels per unit using a 2048x2048 texture. If you want to find out what value you should use if you prefer pixels per unit as a measurement, take the target texture resolution divided by the pix per unit you want. For example, 2048 texture ÷ 5.12 pix per unit = proj w/h 400 In this example image the plane is 400x400 world space units so applying a proj w/h of 400 and planar mapping on Y projects the UVs into the 0-1 UV space.
Applies X, Y, Z, planar mapping to your selection.
Applies camera mapping, automatic mapping, or best plane mapping to your selection. Automatic mapping needs to be done in world space for the proj w/h checkbox to work correctly so the scale transform will be frozen on any meshes you use automatic mapping on. If you want to change the number of automatic map projection planes you can modify the script locally:
-Right click the uvMap button on the shelf and choose edit.
-A window opens displaying the code for the toolbox.
-Near the top of the code look for $m341_uvMapper_autoMapPlanes = 6;
-Change 6 to any number between 3 and 12.
-Next time you run the tool it will use the updated value you set.
The grid UV button maps selected faces into a uniform grid of UVs, the rec UV button maps selected faces into a non-uniform grid of UVs with correct aspect ratio. To get help on gridUV and recUV click the links below to go to their individual help pages:
Gridify UVs
Rectangularize UVs Both tools work the same as the shelf button versions, but these versions use the texel density from the pix per unit input field found in this toolbox to create the grid of UVs. The shelf button versions of these tools have a fixed texel density that you have to modify in the script itself if you want to change it.
Turn off if you want the up, left, down, right buttons to move selected UV shells by one tile in the specified direction. Turn on if you want the up, left, down, right buttons to align UVs in the specified direction. Switch to UV shell component mode and select two or more UV shells if you want to align UV shells in the specified direction instead of aligning individual UVs.
Rotates selected UVs left or right 90 degrees. The left rotate button rotates left, and the right rotate button rotates right. If you want to change the rotation amount you can modify the script locally:
-Right click the uvMap button on the shelf and choose edit.
-A window opens displaying the code for the toolbox.
-Near the top of the code look for $m341_uvMapper_uvRotateAmount = 90;
-Change 90 to whatever rotate amount you like.
-Next time you run the tool it will use the updated value you set.
-Right click the uvMap button on the shelf and choose edit.
-A window opens displaying the code for the toolbox.
-Near the top of the code look for $m341_uvMapper_uvRotateWholeShell = 0;
-Change the 0 to a 1.
-Next time you run the tool it will use the updated value you set.
-Right click the uvMap button on the shelf and choose edit.
-A window opens displaying the code for the toolbox.
-Near the top of the code look for $m341_uvMapper_uvRotateCreateNewShell = 0;
-Change the 0 to a 1 and change $m341_uvMapper_uvRotateWholeShell to 0.
-Next time you run the tool it will use the updated value you set.
Moves selected shells by one tile in the choosen direction. To save time only one component needs to be selected on the shell to move the whole shell.
Stacks selected UV shells on top of each other. To save time only one component needs to be selected on each shell to stack them. Flips selected components along U or V. Unlike Maya's standard flip tool, UVs are not cut in the flipping process and modified pivots are supported.
Turn on if you want the unfold UV button to unfold and then orient the UV shell to the longest edge on the mesh. This is helpful for unfolding certain shapes so they aren't rotated diagonally after the unfolding is complete.
Unfolds selected components along U and V, U only, or V only.
Optimizes selected UVs with a surface angle of 0, .5, or 1. Optimize UVs can sometimes give better results than unfold UVs depending on the shape of the mesh and the UV shell. If you have a lot of stretching in your UVs after using unfold UV, try using the opt 0 button multiple times to even out the UV distribution.
Straightens selected UVs along U and V, shell, U only, or V only. UVs are straightened using an angle of 30. For best results using the straighten shell button, select an edge loop that runs across the shell first so that edge loop is used as the line to try to straighten the shell to.
Orients selected UV shells to world space X, Y, or Z. Clicking the button again will flip the shell to face positive or negative along that axis. Using orient X, Y, Z can be faster than using orient to edge or orient to UVs because you can select whole shells in the 3D viewport which is more intuitive, especially for circular shells where you can't tell which edge is facing which way in the UV editor.
Orients a UV shell to a selected edge, or two selected UVs.
Orients selected UV shells to the horizontal or vertical axis in the UV editor. Clicking the button again will flip the shell to face positive or negative along that axis. These tools should be used in conjunction with orient X, Y, Z. If orient X and Z don't produce a straight shell use orient horizontal. If orient Y doesn't produce a straight shell use orient vertical.
Moves selected UV shells to the 0-1 UV space maintaining their relative positions. If you're in object mode or component mode with nothing selected, all UV shells on the mesh are moved to the 0-1 UV space.
Moves each selected UV shell to a different UV tile to the right maintaining their relative positions. In object mode, moves all UV shells on the mesh to different UV tiles to the right maintaining their relative positions. In component mode with no components selected, moves all overlapping UV shells on the mesh to different UV tiles to the right maintaining their relative positions.
Transfers UVs from one source mesh to multiple target meshes, or transfers UVs from one source group with multiple meshes inside it to one target group with multiple meshes inside it. To transfer UVs from one source mesh to multiple target meshes:
-Hold shift and select any number of additional meshes.
-Click the mesh button to transfer UVs from the source mesh to multiple target meshes.
-Rigging is preserved on skinned target meshes, otherwise history is deleted.
-For best results source and target meshes should have identical geometry.
-In group 1 place a bunch of individual meshes that have correct UVs.
-In group 2 place the same number of individual meshes in the exact same hierarchy order as group 1.
-Select group 1, then hold ctrl and select group 2.
-Click the group button to transfer UVs from the source meshes in group 1 to the target meshes in group 2.
-Rigging is preserved on skinned target meshes, otherwise history is deleted.
-For best results source and target meshes should have identical geometry.
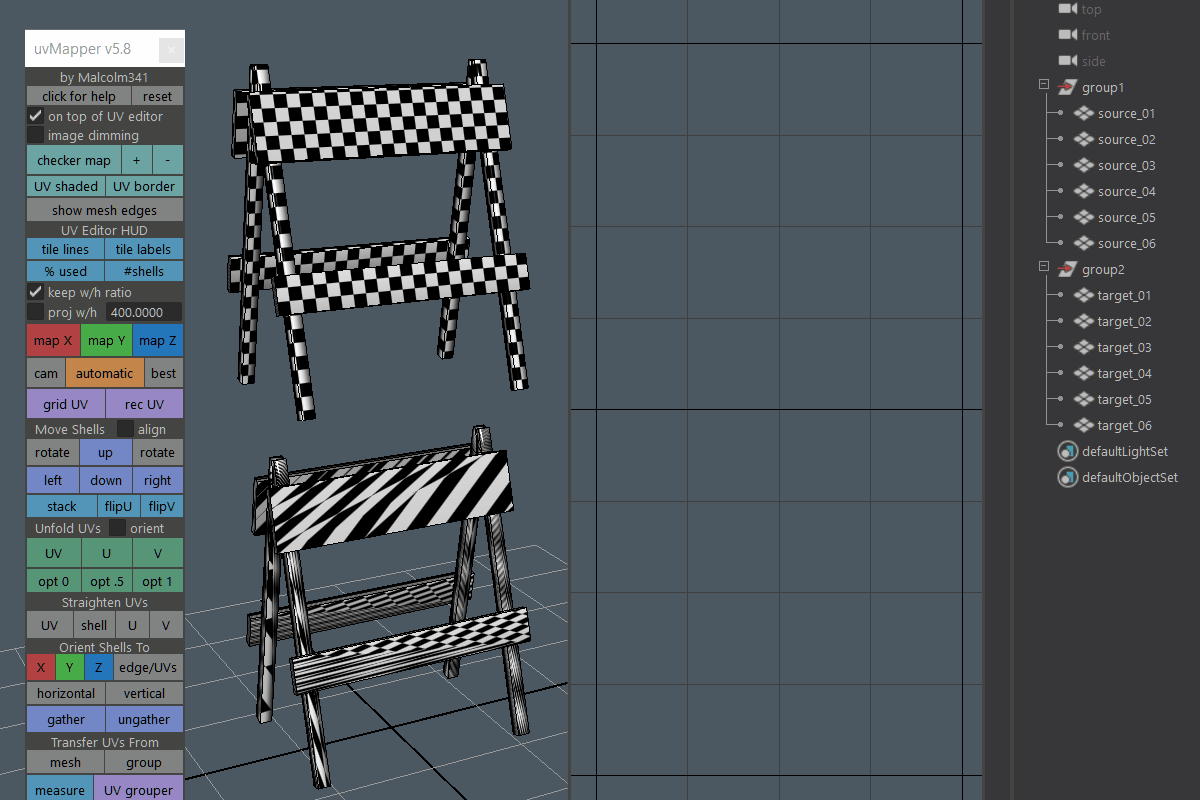
If nothing's selected, toggles Maya's UV measure window on/off. If something's selected, opens Maya's UV measure window and updates the measure results. If the measure window is open, updates the measure results from the current selection. To quickly measure multiple UV selections, make sure the UV measure window is open, select some UVs and click the measure button. Select some different UVs and press the g key on the keyboard to repeat last command to measure different UV selections without needing to click back into either interface.
Opens the UV Grouping Toolbox. Grouping UVs allows you to manually choose which UV shells stack on top of eachother when you press the layout UVs button in the UV Mapping Toolbox or the UV Grouping Toolbox.
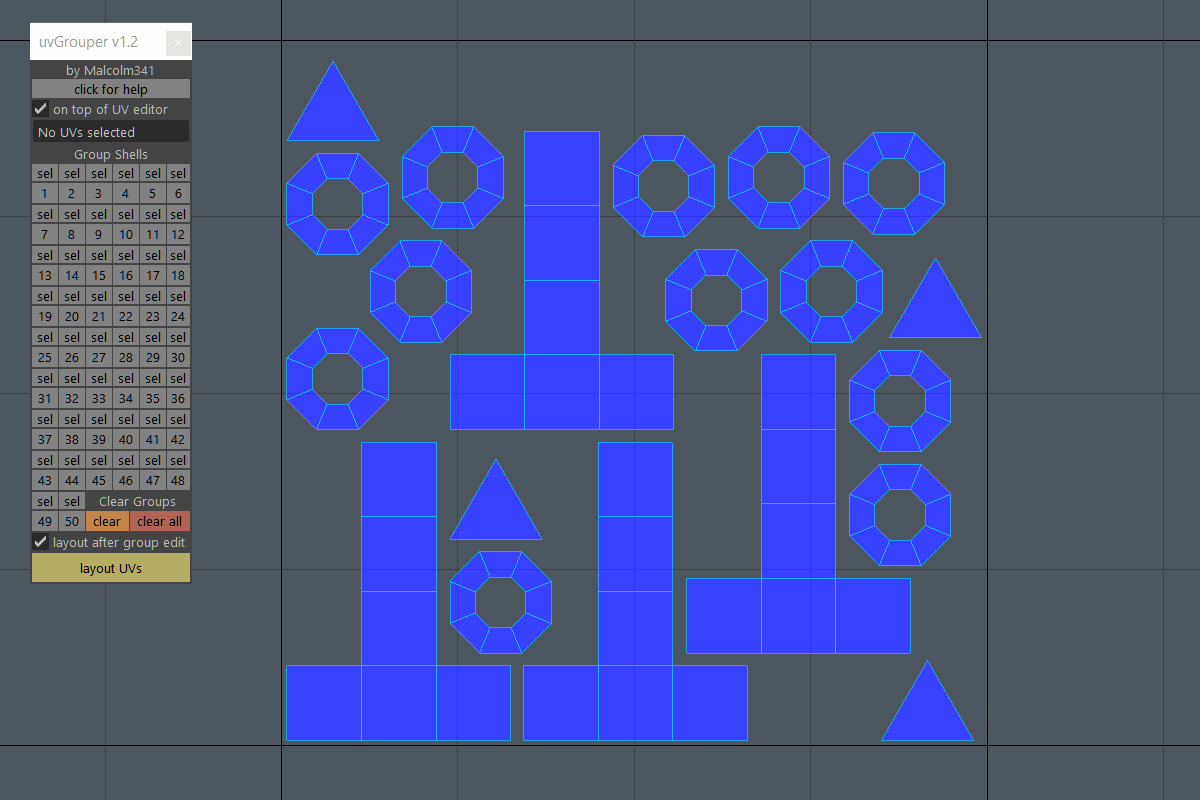
Selects all UV shells smaller than the % number you type into the input field. The 0-1 UV space is considered to be 100%, the default value is 1.0 which will select all UV shells smaller than 1% of the 0-1 UV space. After changing the value in the input field you can press enter on the keyboard numpad to automatically run the tool again so you don't need to click the button each time as you fine tune the number to select small shells.
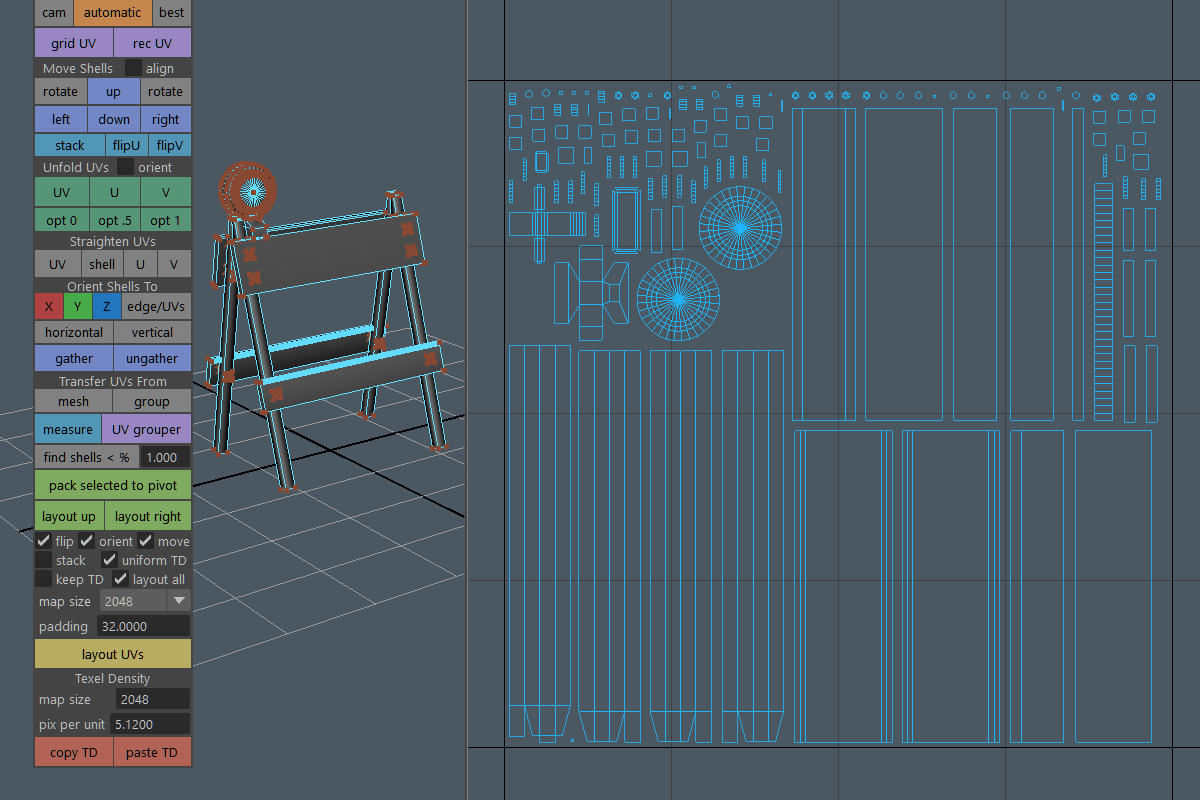
Lays out selected UV shells to their pivot location while maintaining texel density and UV padding. You can move the pivot of the selected shells before using this tool to control where the UVs pack to. This tool is very useful for organizing shells into clusters without needing to lay them out into a UDIM tile first. For example, if you have specific shells you want packed beside each other.
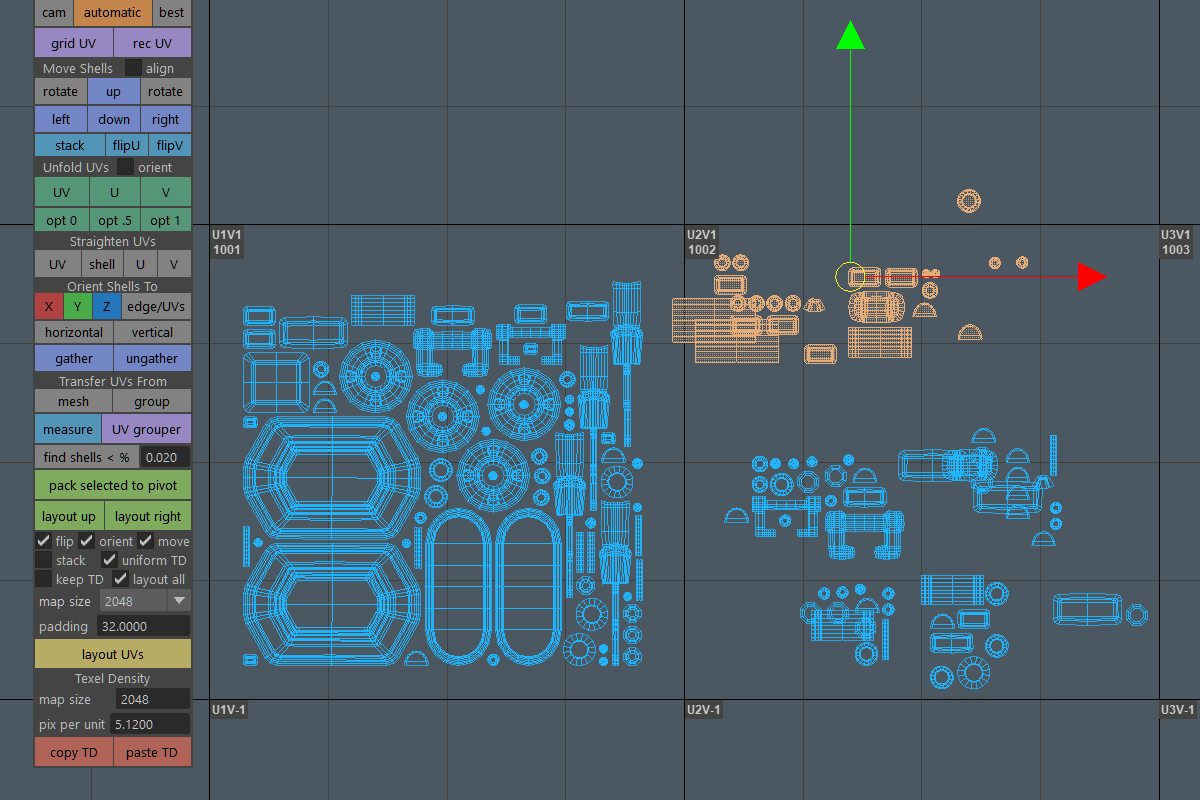
Lays out selected UV shells to their pivot location in a vertical rectangular shape while maintaining texel density and UV padding. Each time you press the button the rectangle cluster spreads out and gets thinner. To reset the shape back to a square use the pack selected to pivot button. This tool is very useful for organizing shells into vertical clusters without needing to lay them out into a UDIM tile first. This is helpful if you need to organize a bunch of shells into a vertical strip with correct padding.
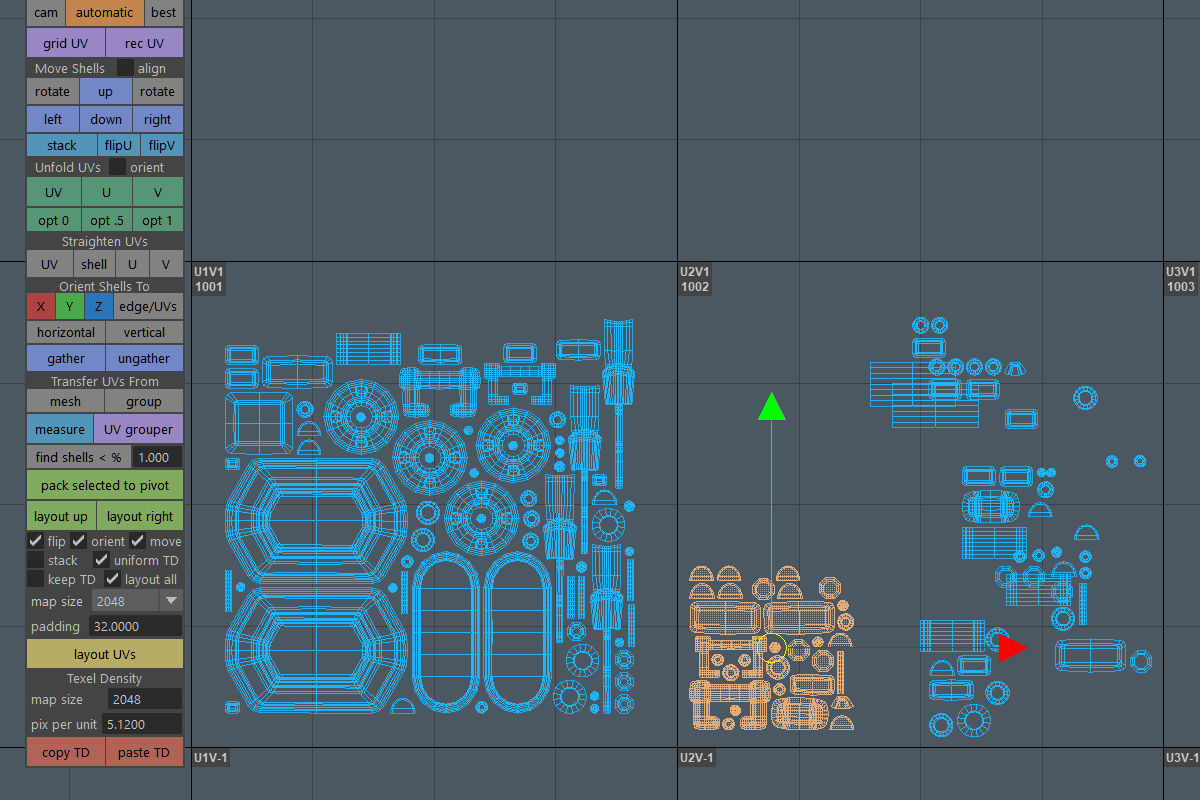
Lays out selected UV shells to their pivot location in a horizontal rectangular shape while maintaining texel density and UV padding. Each time you press the button the rectangle cluster spreads out and gets thinner. To reset the shape back to a square use the pack selected to pivot button. This tool is very useful for organizing shells into horizontal clusters without needing to lay them out into a UDIM tile first. This is helpful if you need to organize a bunch of shells into a horizontal strip with correct padding.
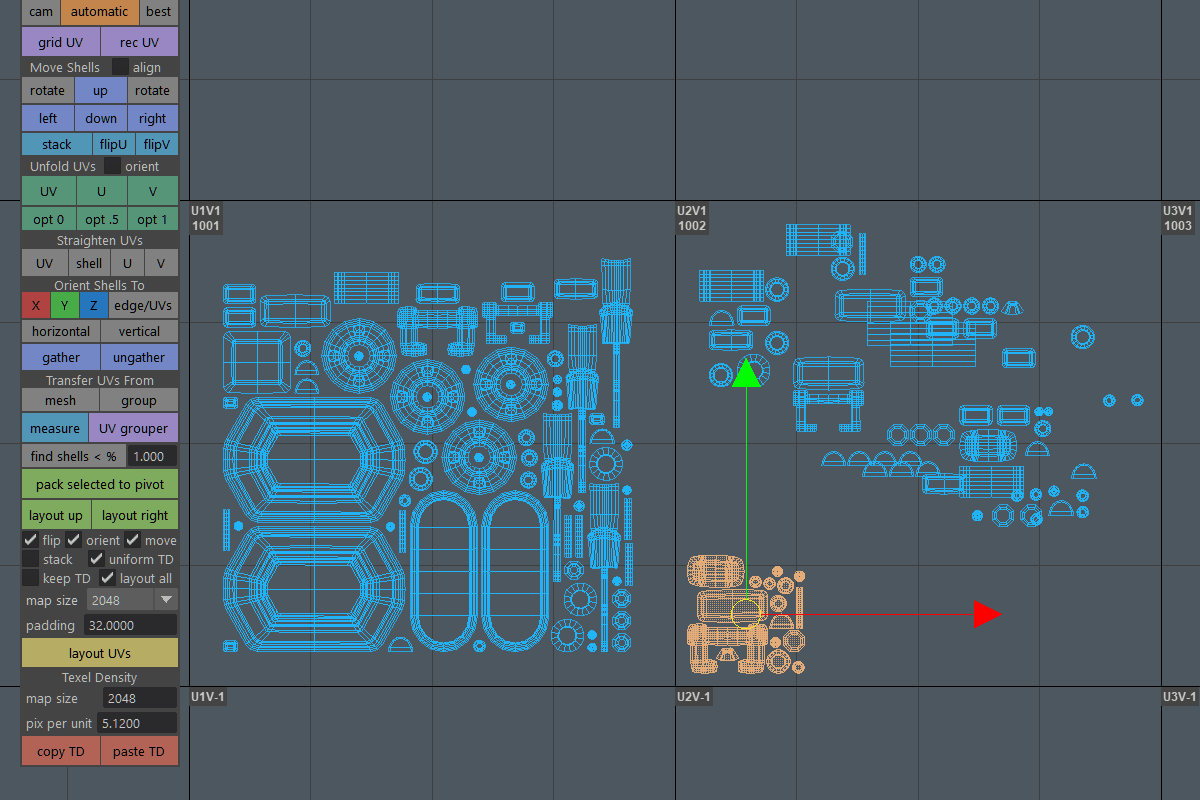
Turn on if you want to flip reversed UV shells when you press the layout UVs button.
Turn on if you want to rotate UV shells for best fit when you press the layout UVs button.
Turn on if you want to move UV shells for best fit when you press the layout UVs button. In most cases you'll want to leave this checkbox on. Turning this checkbox off will keep your existing UV layout, but scale it up to fill the 0-1 UV space. This is helpful if you want to adjust your UV layout by hand and try different arrangements to get the most efficient UV pack.
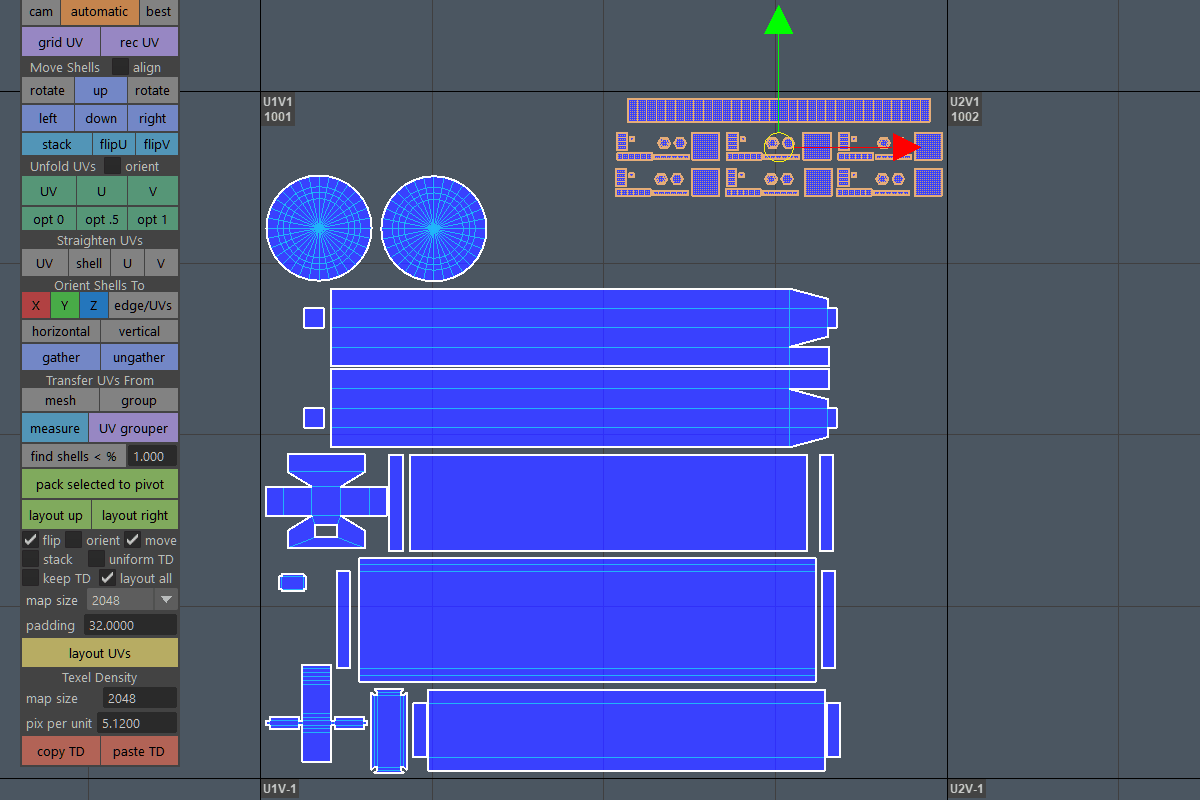
Turn on if you want all similar UV shells to stack on top of each other when you press the layout UVs button. If you want only specific UV shells to stack, turn off the stack checkbox and use the UV Grouping Toolbox instead.
Turn on if you want to scale UV shells to have uniform texel density relative to one another in the 0-1 UV space when you press the layout UVs button.
Turn on if you want to keep the current texel density of the UV shells when you press the layout UVs button. Keeping the current texel density can result in a UV pack which extends outside the 0-1 UV space. The keep TD checkbox works in conjunction with the uniform TD checkbox, so if you'd like to keep the exact texel density you see on all your shells during UV layout, you have to turn off the uniform TD checkbox to avoid shells having uniform texel density relative to one another.
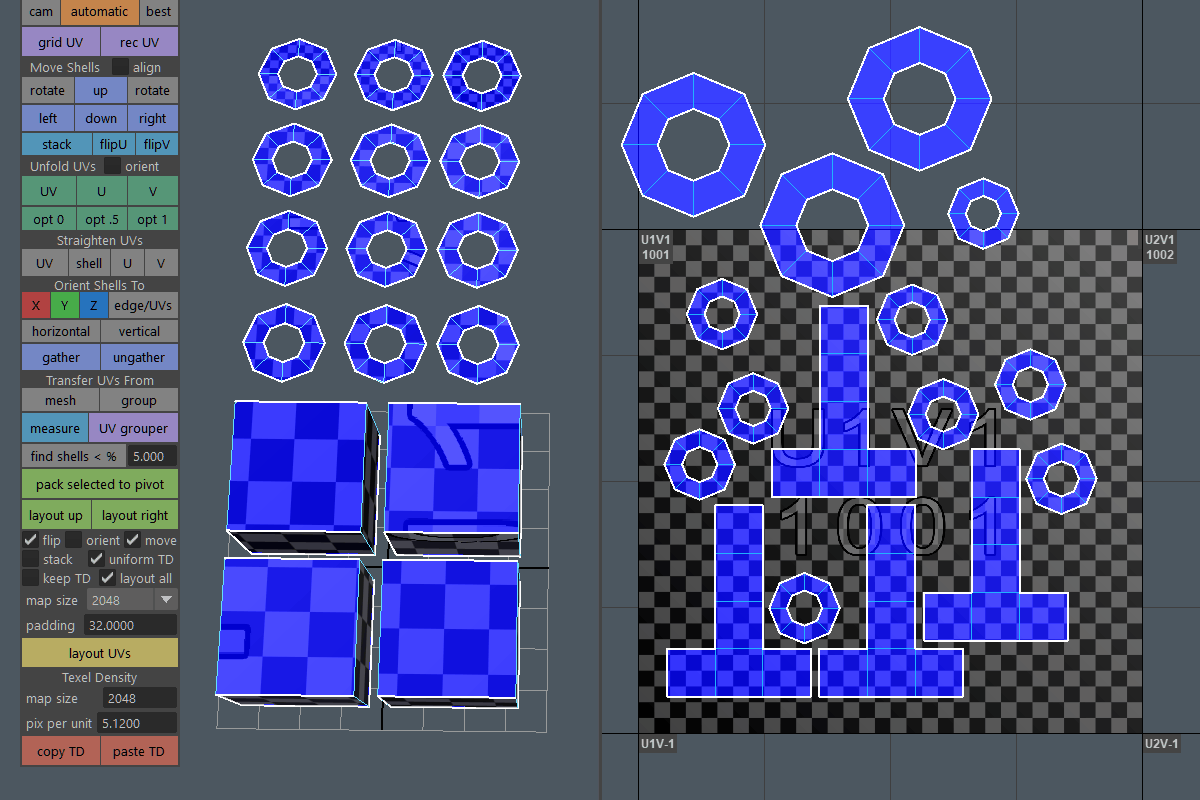
Turn on if you want to layout all UVs on the current mesh when you press the layout UVs button. Turn off if you want to layout only selected UVs when you press the layout UVs button. To save time only one component needs to be selected on each shell you want to layout when the layout all checkbox is turned off.
The map size drop down allows you to control how padding works relative to what the final texture size is you're going to apply to the model. Set map size to the final texture resolution you plan to use on your model.
Padding controls the amount of space between each UV shell and is relative to what you set the map size to. UV tile edge padding will automatically be half of whatever you set padding to.
Lays out UVs using the checkboxes you've configured above.
Stores the texture resolution used to calculate the pixels per unit below. Set this input field to the pixel size your final texture will be, for example 4096 if you plan to use a 4096x4096 texture on your model.
Stores the texel density the paste TD button uses and is updated by the copy TD button. The value can be manually input or will auto update if one or more faces are selected and the copy TD button is pressed.
Copy TD copies the current texel density from selected faces and updates the pix per unit field. Texel density is displayed in pixels per unit and will be relative to what map size is currently set before copying. Paste TD applies the current texel density from the pix per unit field to selected UVs, objects, or faces. The paste TD button is significantly faster than the set TD button found in the Maya UV Toolkit.
YouTube Video from 2018 Update Video 1 from 2018 Update Video 2 from 2019 Update Video 3 from 2019 Update Video 4 from 2020 Update Video 5 from 2021
UV Grouping Toolbox
-There's only one set of UV groups saved per scene file.
-If you duplicate a mesh that has UV groups you need to clear all the groups from the newly created mesh to avoid errors.
To create a UV group, first turn off the stack checkbox in the UV Mapping Toolbox, then select two or more UV shells and press one of the 1 to 50 number buttons to assign the UV shells to that group number. When you assign shells to a UV group faces are selected to show you what shells the group consists of. To save time you only need to select one or more UVs on each shell to assign them to a group. Number buttons in the toolbox are coloured if they contain one or more shells, buttons that don't contain any shells are grey. UV groups are exclusive, so if you assign shells from group 1 to group 2 those shells are automatically removed from group 1. If you forget which shells are assigned to which groups, select UVs on the shells in question and the group numbers will display at the top of the toolbox. UV shells that don't belong to any group will display as None. The clear button removes all shells from the group, you only need to select one component from a grouped shell to remove all shells from that group. The clear all button clears all UV shell groups.
Number buttons assign selected UV shells to that group number, sel buttons select the contents of the corresponding group number. To save time you only need to select one or more UVs on each shell to assign them to a group.
Clears selected UVs shells from whatever group they're in or clear all UV shells from all groups. To save time you only need to select one or more UVs on each shell you want to clear from whatever group they're in. Clear all doesn't require any selection.
Turn on if you want to layout UVs each time you add or remove something from a UV group. This is helpful to see how your UV shells stack without needing to press the layout UVs button each time you make an edit to a UV group.
Lays out UVs using the checkboxes you've configured in the UV Mapping Toolbox.
Copy Material to Clipboard
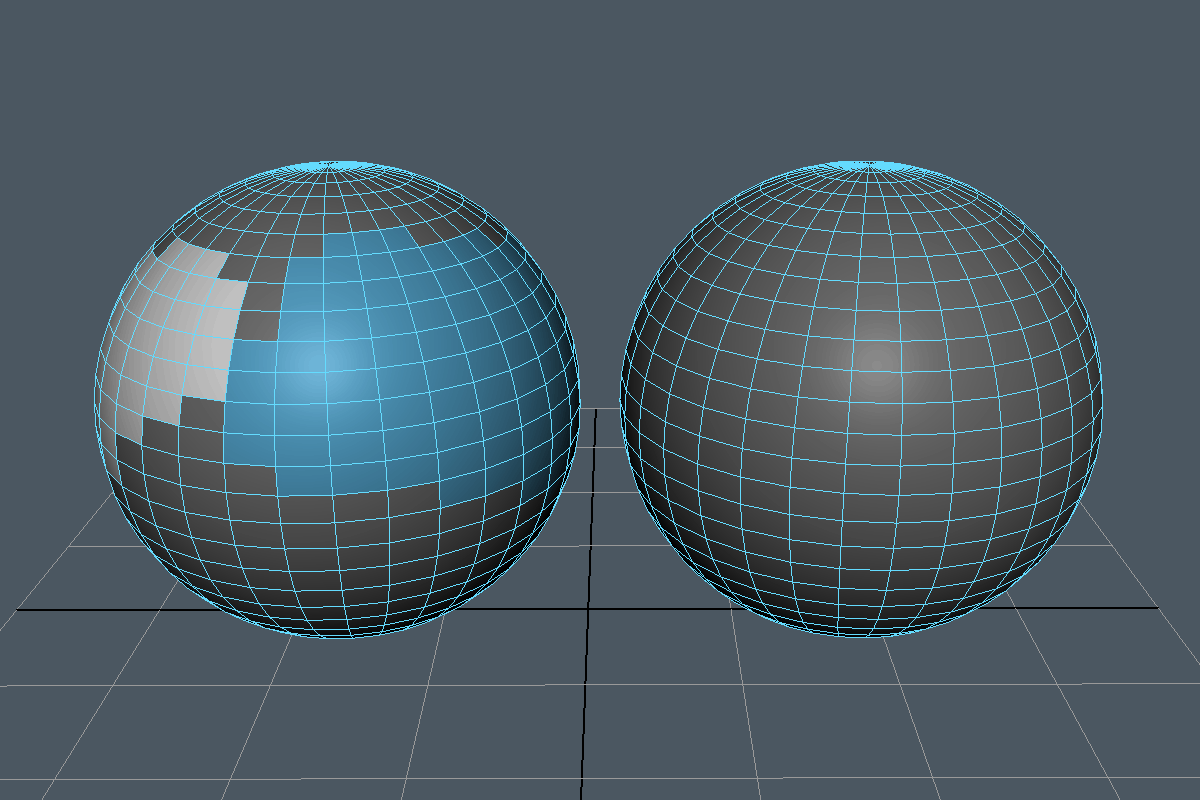
Paste Material from Clipboard
Replace Material id from Clipboard
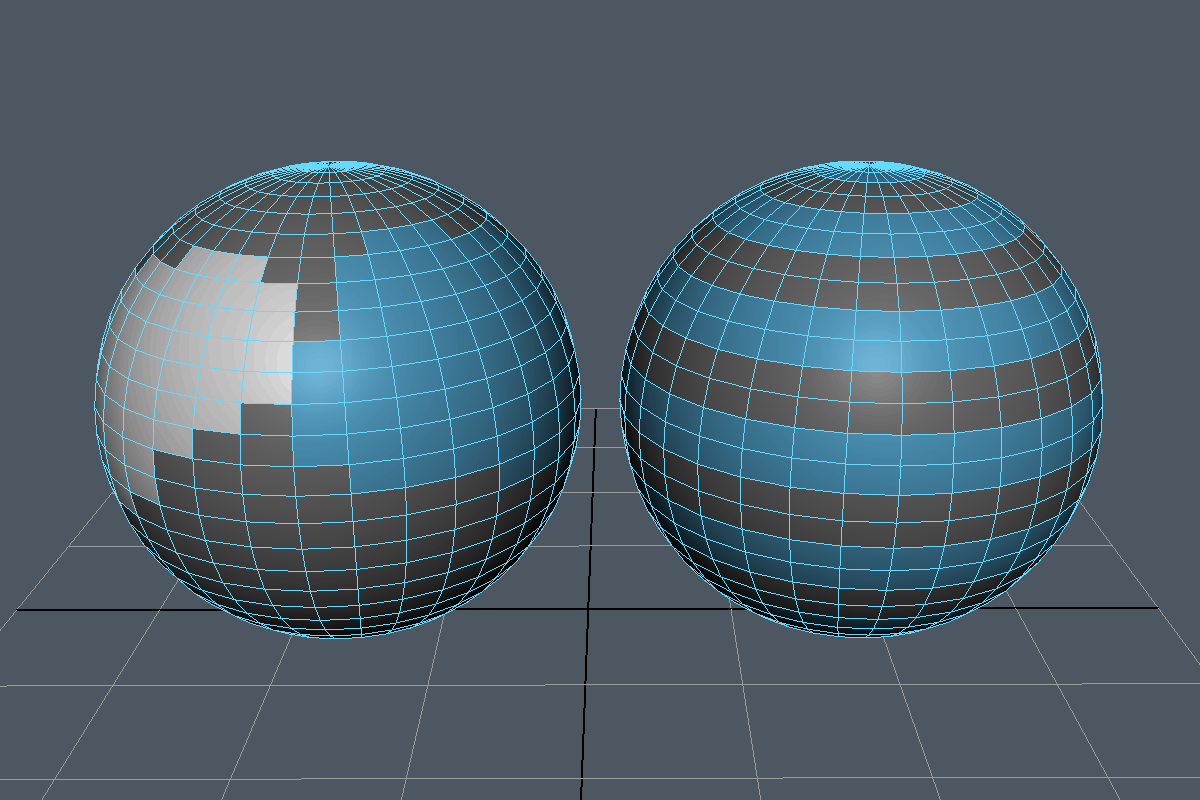
Change Default Material Toolbox
-Doesn't work in Maya LT
Press any of the default material buttons to override the scene with that material type. Press the button again to disable the material override. To override the scene with a custom material, select a single face that has the material you want to use as the default material override. Press the export button to export your material to the hard drive. In object mode the first material the tool finds on the mesh gets exported, so you need to select a face if your mesh has more than one material assigned. Press the custom material button to override the scene with the material you exported. Press the custom material button again to disable the material override. The exported material stays on the hard drive so you only need to export it once for the custom material button to work, even after Maya restart.
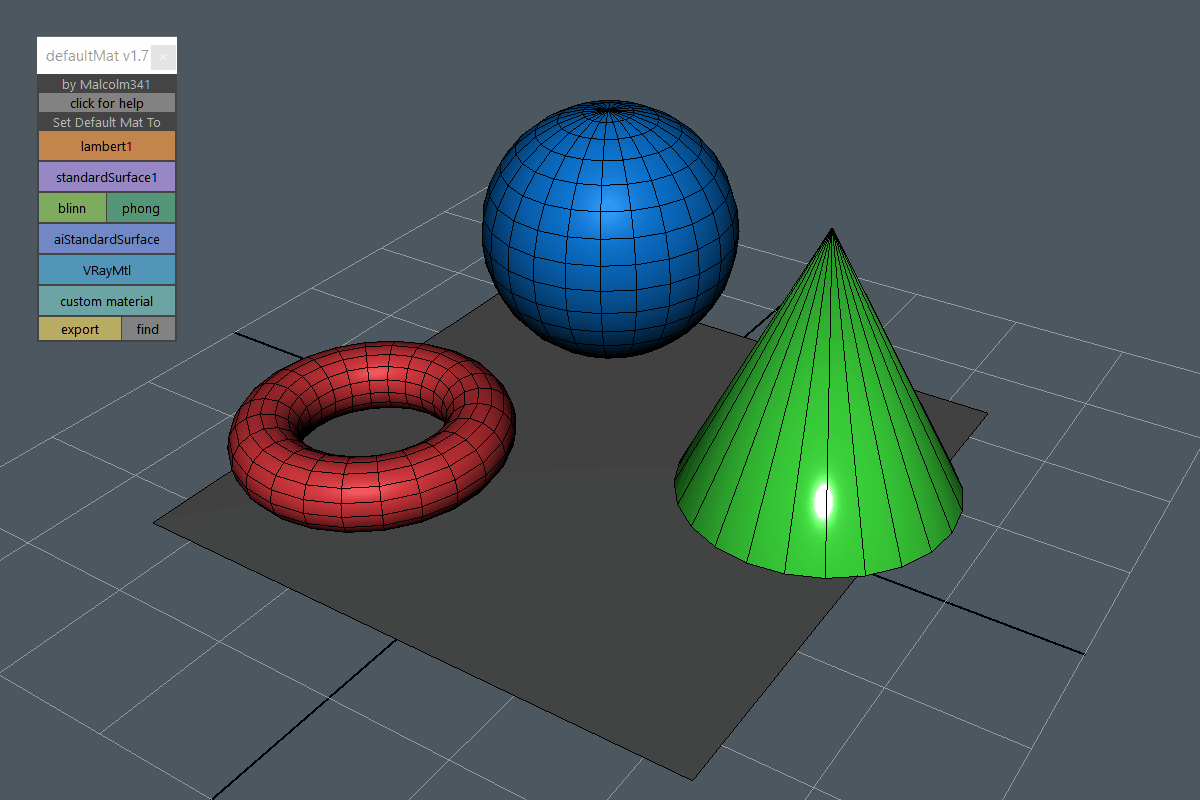
Toggles the default material override to lambert1. Press the button again to disable the material override.
Toggles the default material override to standardSurface1. Press the button again to disable the material override.
Toggles the default material override to blinn or phong. Press the button again to disable the material override.
Toggles the default material override to aiStandardSurface. Press the button again to disable the material override.
Toggles the default material override to VRayMtl. Press the button again to disable the material override.
Toggles the default material override to a custom material. Before you can use this button you need to select a single face that has the material you want to use as the override and press the export button. Material node networks are supported so you can connect a texture or other nodes to your custom material if you want to use something more advanced as the default material override.
The export button exports the material assigned to the currently selected face and saves it to the hard drive. In object mode the first material the tool finds on the mesh gets exported, so you need to select a face if your mesh has more than one material assigned. The find button opens the folder where the exported material is stored that the tool uses when you press the custom material button.
YouTube Video from 2021
Obj Import Export Toolbox
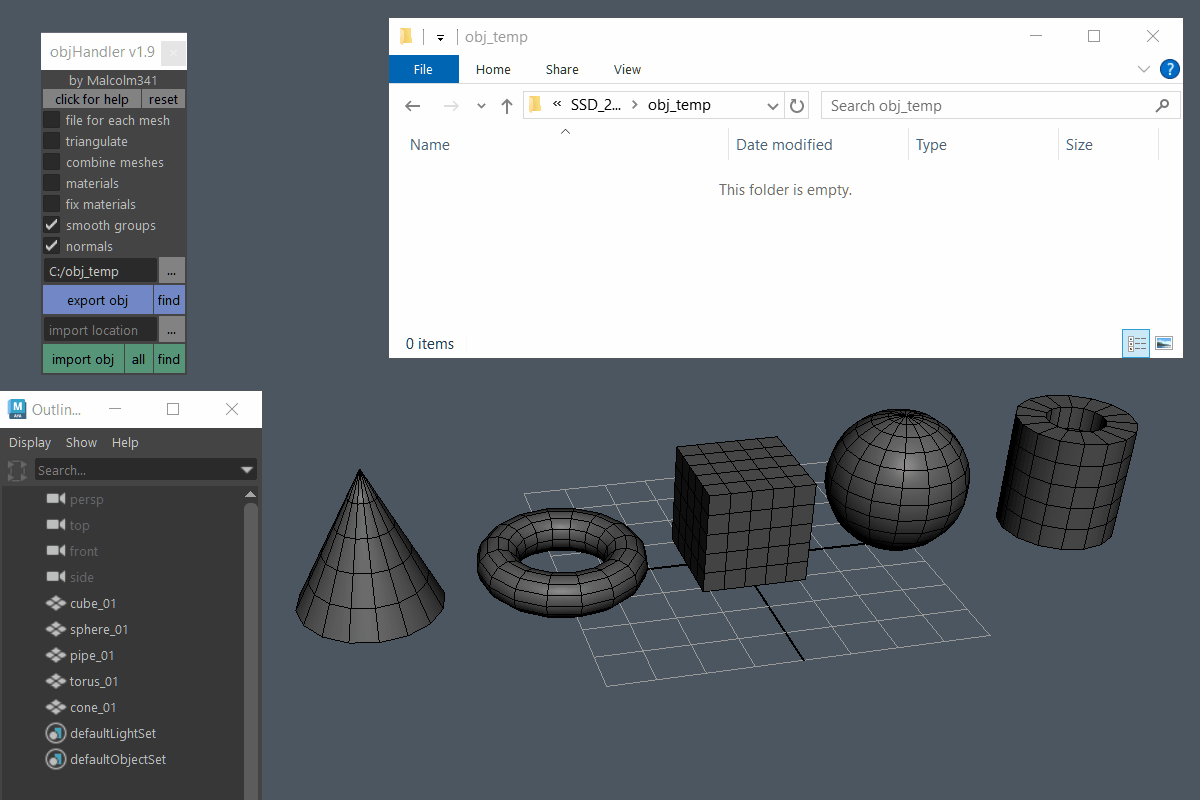
Resets the toolbox back to default settings.
Turn on if you want to export a separate .obj file for each selected mesh when you press the export obj button. File names are derived from the currently selected mesh names in the outliner.
Turn on if you want the meshes in the exported .obj file to be triangulated. Meshes in the current scene are not affected.
Turn on if you want the meshes in the exported .obj file to be combined into a single object. Meshes in the current scene are not affected.
Turn on if you want materials to be included in the exported .obj file. Materials are stored in a separate file with the extension .mtl and that file is needed if you want to import the mesh with more than one mat id. The .obj file format is outdated compared to Maya 2024 and because of this the materials you get when you import the file are all black and set to either Lambert or Phong no matter what material types you had applied when you exported the file. If you'd like the materials to import correctly you'll need to apply Lambert or Phong materials before export. Newer materials like standardSurface1 and openPBR_shader1 are not supported in the .obj file format. If you don't want to apply Lambert or Phong materials before export, turn on the fix materials checkbox to automatically brighten any materials that are imported when you press the import obj button.
Turn on if you want to brighten any materials that are imported when you press the import .obj button. This is helpful if your materials are importing black and you want see what you're doing without having to adjust the imported materials manually. Imported materials will be greyscale and mat ids will be different shades of grey.
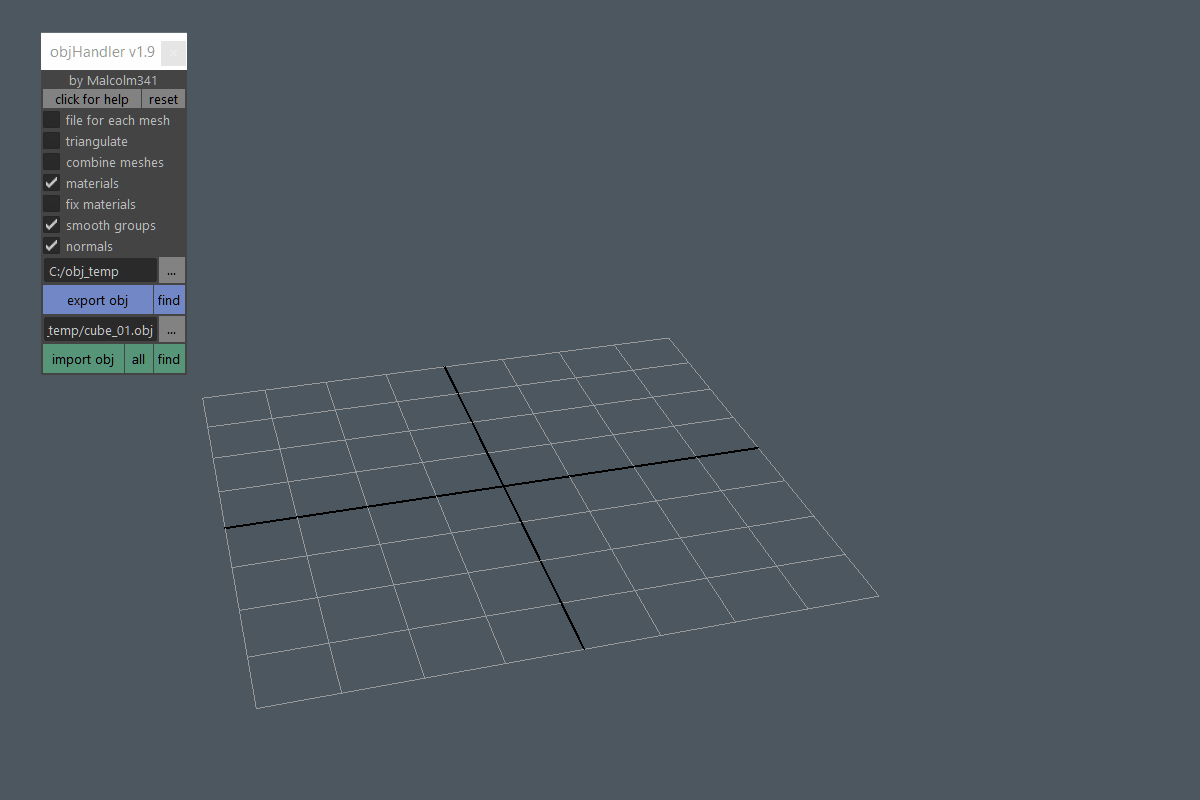
Turn on if you want smooting groups to be included in the exported .obj file.
Turn on if you want normals to be included in the exported .obj file.
Sets the export location the export obj button uses. Use the ... button to browse to a folder where the exported file will go when you press the export obj button. You have to select an existing folder, a file won't work.
The export obj button exports selected objects as .obj to the folder specified in the export location field. The find button opens the folder specified in the export location field.
Sets the import location the import obj and all buttons use. Use the ... button to browse to a specific file you want to import when you press the import obj button. You have to select an existing file, a folder won't work.
The import obj button imports the file specified in the import location field. The all button imports all .obj files found in the same folder as the file specified in the import location field. The find button opens the folder specified in the import location field.
YouTube Video from 2021
Fbx Import Export Toolbox
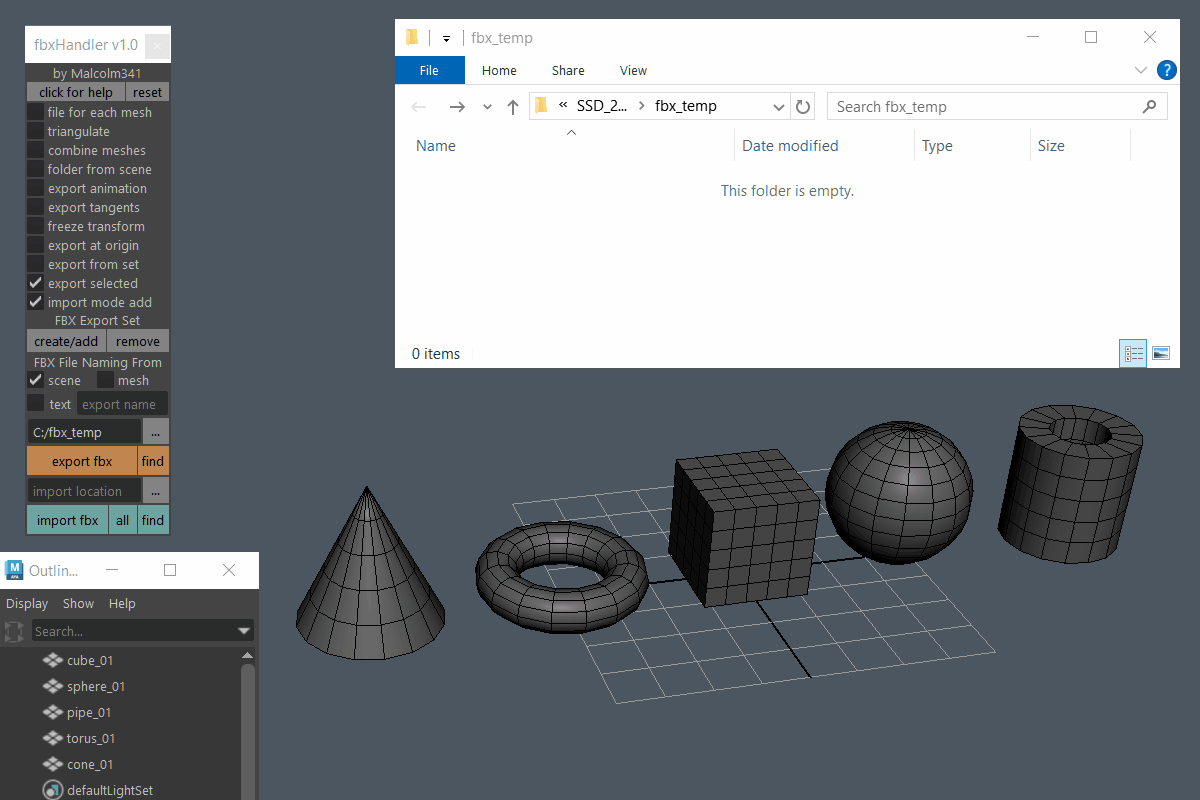
Resets the toolbox back to default settings.
Turn on if you want to export a separate .fbx file for each mesh when you press the export fbx button. File names are derived from the mesh names in the outliner.
Turn on if you want the meshes in the exported .fbx file to be triangulated. Meshes in the current scene are not affected.
Turn on if you want the meshes in the exported .fbx file to be combined into a single object. Meshes in the current scene are not affected.
Turn on if you want the exported meshes to be placed in a folder named the same as the scene name. This is helpful if you want to store each file in it's own folder inside the main folder that you browsed to with the export location field. For example, if you have a main folder named C:\Game\Props\ and want each prop you export to go into its own folder inside the \Props\ folder. This checkbox will save time because you don't have to do any file browsing when working with different prop scene files.
Turn on if you want animation to be included with the exported .fbx file.
Turn on if you want to export tangents with the .fbx file. Note you must also turn off the triangulate checkbox or tangents will not appear in the .fbx file, this is due to a design flaw in Maya.
Turn on if you want transforms frozen for everything in the exported .fbx file. Objects in the current scene are not affected.
Turn on if you want to move everything to the world origin in the exported .fbx file. Objects in the current scene are not affected. This is helpful if you want to model a modular kit in context in one scene with correct pivot points and then automatically export the kit at the world origin for use in Unreal or Unity. You can turn on the file for each mesh checkbox to export each mesh to a seperate file at the world origin, this lets you use your main scene as the working file and overwrite all the kit piece files in Unreal or Unity with one click.
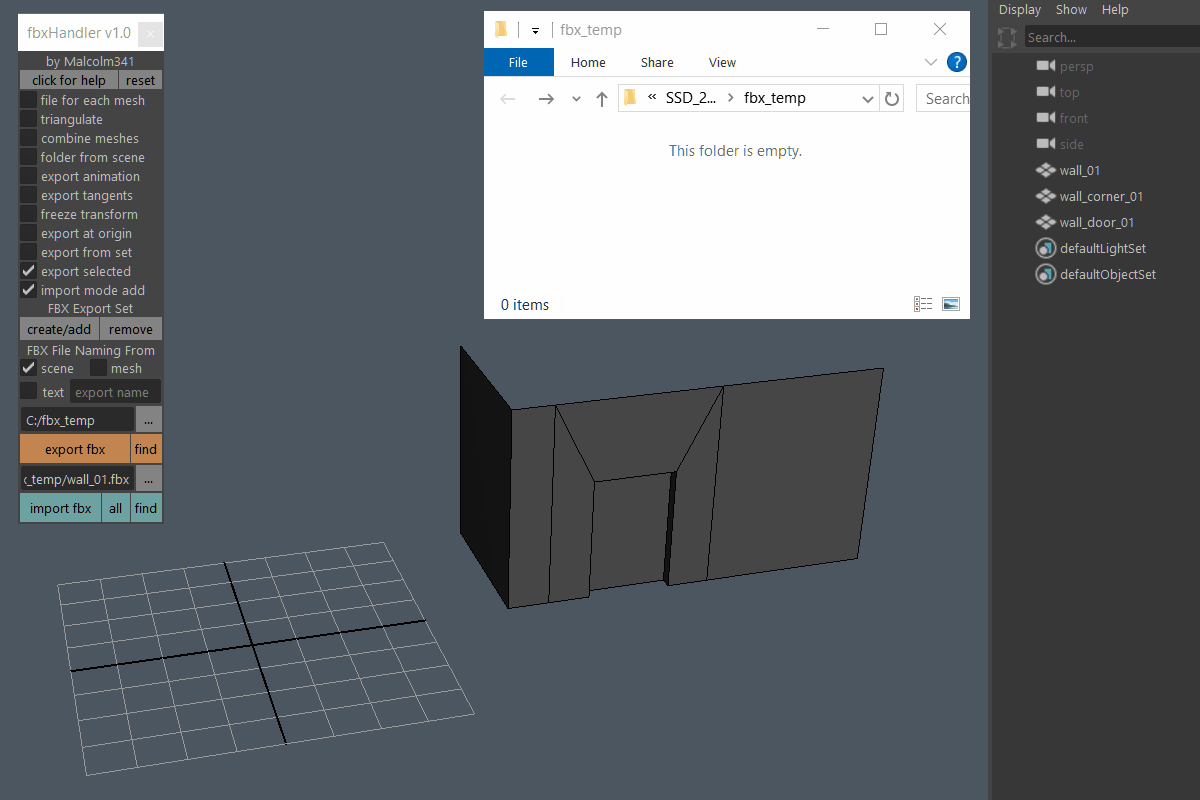
Turn on if you want to export only the objects found in the fbxHandler_Export_Set when you press the export fbx button. Selected objects are ignored when this checkbox is turned on. This is helpful so you don't have to select meshes each time you want to export, but also because you can include work in progress meshes and other objects in the scene and still export a clean file for Unreal or Unity. To create the fbxHandler_Export_Set in the Outliner press the create/add button to add objects to the set, use the remove button to remove objects from the set.
Turn on if you want to export only selected objects when you press the export fbx button.
Turn on if you want to import .fbx files and add the objects contained in the file to the existing scene rather than overwriting the existing objects with the objects you just imported. In most cases for environment assets when you import anything into the scene it's expected to be added as new objects, this is how file import works for almost all file types. For .fbx this is not the case, by default when you import a .fbx file that contains meshes that are already in the scene it tries to update the meshes in place which often leads to confusion and sometimes lost work. If you're working primarily with static meshes I recommend turning this checkbox on.
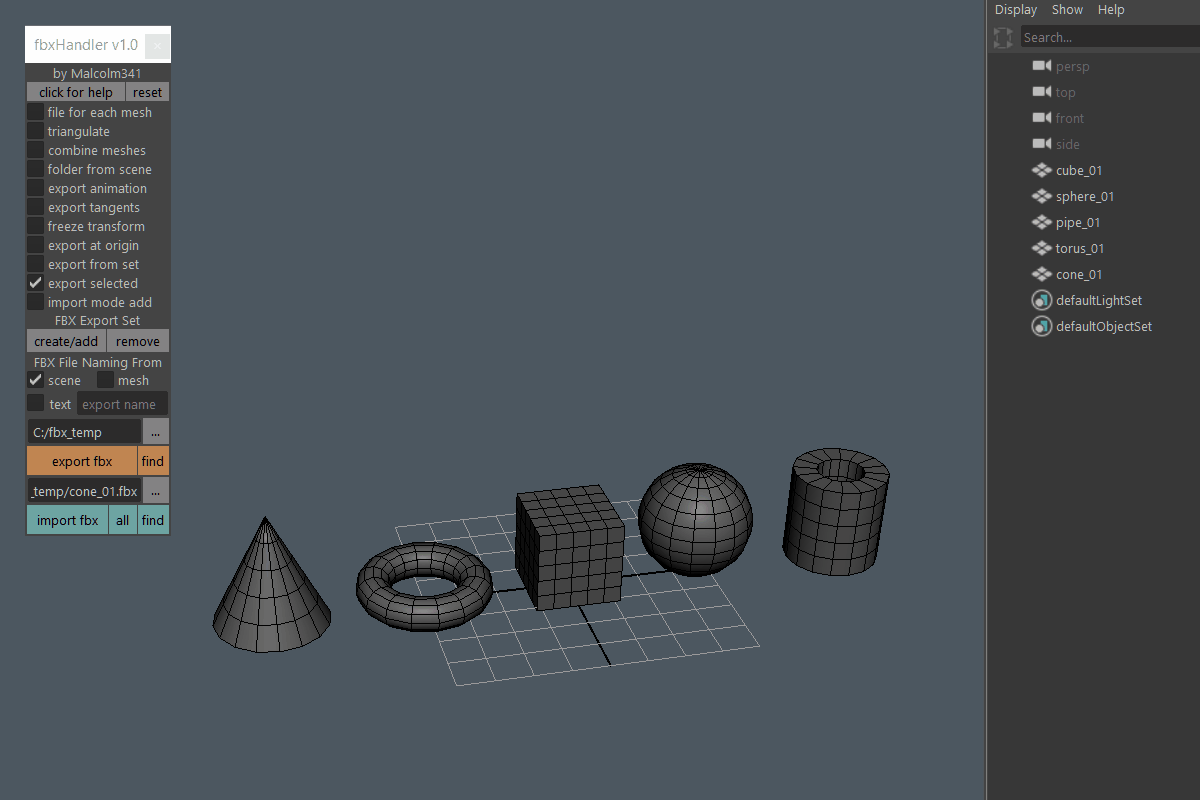
The create/add button creates and adds selected objects to the fbxHandler_Export_Set in the Outliner. The remove button removes selected objects from the fbxHandler_Export_Set. If the export from set checkbox is turned on only objects found in the fbxHandler_Export_Set get exported when you press the export fbx button. This is helpful so you don't have to select meshes each time you want to export, but also because you can include work in progress meshes and other objects in the scene and still export a clean file for Unreal or Unity.
Turn on the scene checkbox if you want the exported .fbx file to be named the same as the scene file. Turn on the mesh checkbox if you want the exported .fbx file to be named the same as the first mesh you select. If you also have the export from set checkbox turned on the file will be named alphabetically based on what names it finds in the fbxHandler_Export_Set. Turn on the text checkbox if you want the exported .fbx file to be named what you type in the text field.

Sets the export location the export fbx button uses. Use the ... button to browse to a folder where the exported file will go when you press the export fbx button. You have to select an existing folder, a file won't work.
The export fbx button exports selected objects as .fbx to the folder specified in the export location field. The find button opens the folder specified in the export location field. Turn on the export from set checkbox if you want the export fbx button to export only the objects found in the fbxHandler_Export_Set.
Sets the import location the import fbx and all buttons use. Use the ... button to browse to a specific file you want to import when you press the import fbx button. You have to select an existing file, a folder won't work.
The import fbx button imports the file specified in the import location field. The all button imports all .fbx files found in the same folder as the file specified in the import location field. The find button opens the folder specified in the import location field.
One Click Export to C:\drive
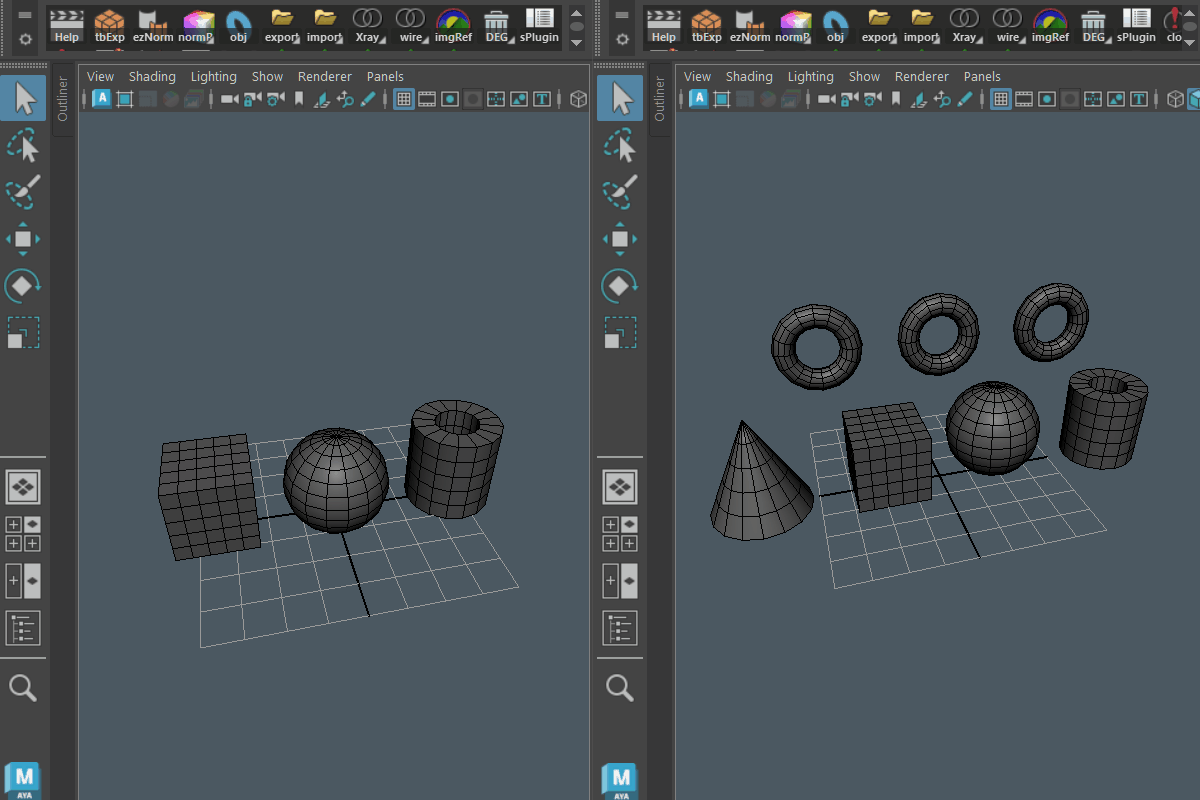
One Click Import from C:\drive
Delete Empty Groups
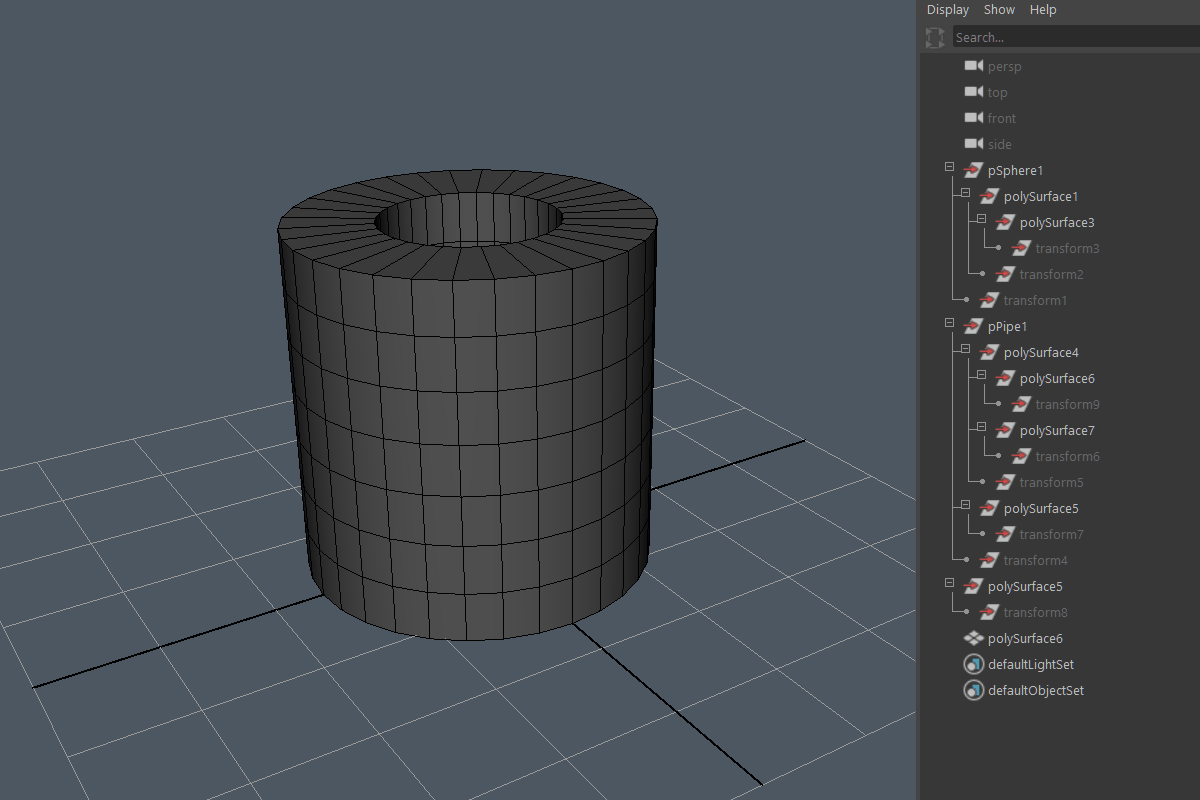
YouTube Video from 2020
Fast Open Maya
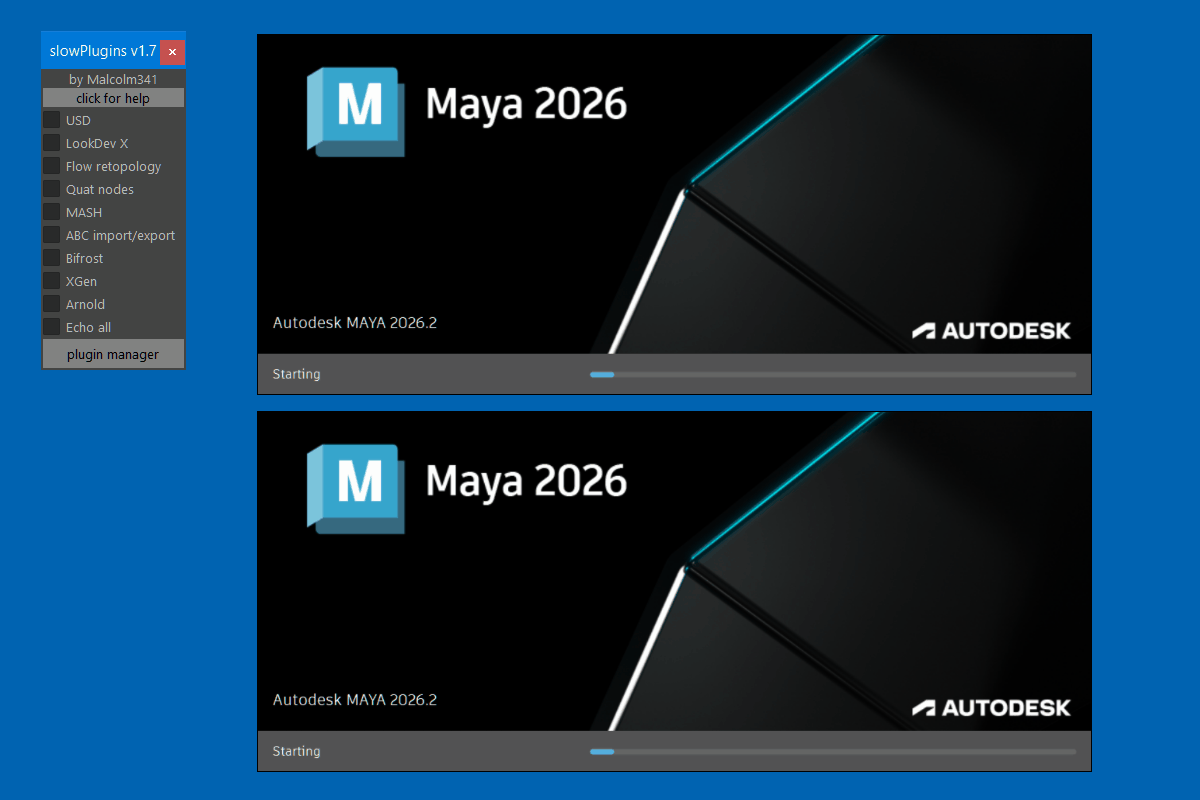
Enables USD (Universal Scene Description) workflows directly in Maya, allowing artists to create, edit, and collaborate on USD data natively.
Material authoring system for USD workflows, designed to create renderer-agnostic shading networks. It replaces traditional Hypershade workflows when working with USD scenes and supports both USD and MaterialX standards.
Cloud-based tool that simplifies complex 3D meshes by automatically creating a new, optimized mesh with cleaner edge flow.
Provides a set of quaternion math nodes for advanced rotation handling, especially useful in rigging and animation workflows where smooth interpolation and gimbal lock avoidance are critical.
Procedural motion graphics toolkit, used to create complex animations, instancing effects, and dynamic simulations through a node-based workflow.
Support for Alembic .abc files, a widely used format for caching and exchanging animated geometry, especially in VFX and animation pipelines.
Node-based visual programming environment for creating procedural effects such as, simulations, fluids, particles, and instancing.
Procedural instancing and grooming system used to create realistic hair, fur, feathers, and vegetation.
Physically based ray tracing renderer integrated into Maya for creating photorealistic images and animations.
Toggles echo all commands on/off in the script editor.
Opens the Maya Plug-in Manager.
YouTube Video from 2020
Fast Close Maya
-Not useful for Maya 2022 or newer
In the example image you can see how fast Maya 2017 closes when using the tool.
YouTube Video from 2020
Advanced Save Preferences
YouTube Video from 2020
Dynamic Measuring Toolbox
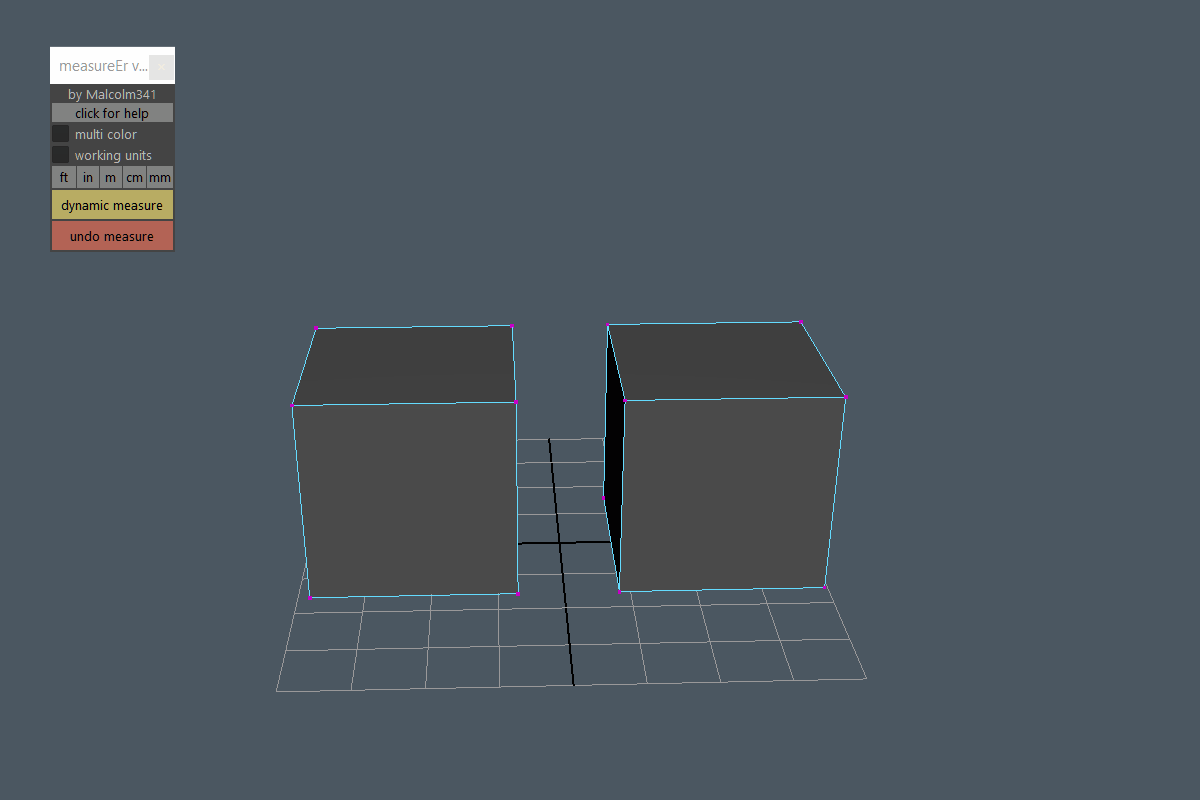
Turn on if you want each measure node to be created with a random colour. This is helpful if you're creating more than one measure node on the same mesh so you can tell which distance belongs to which measure node. Colours are chosen at random from a predetermined list to avoid ugly hard to see measurments, a different random colour is used if the previous measure node already used that colour.
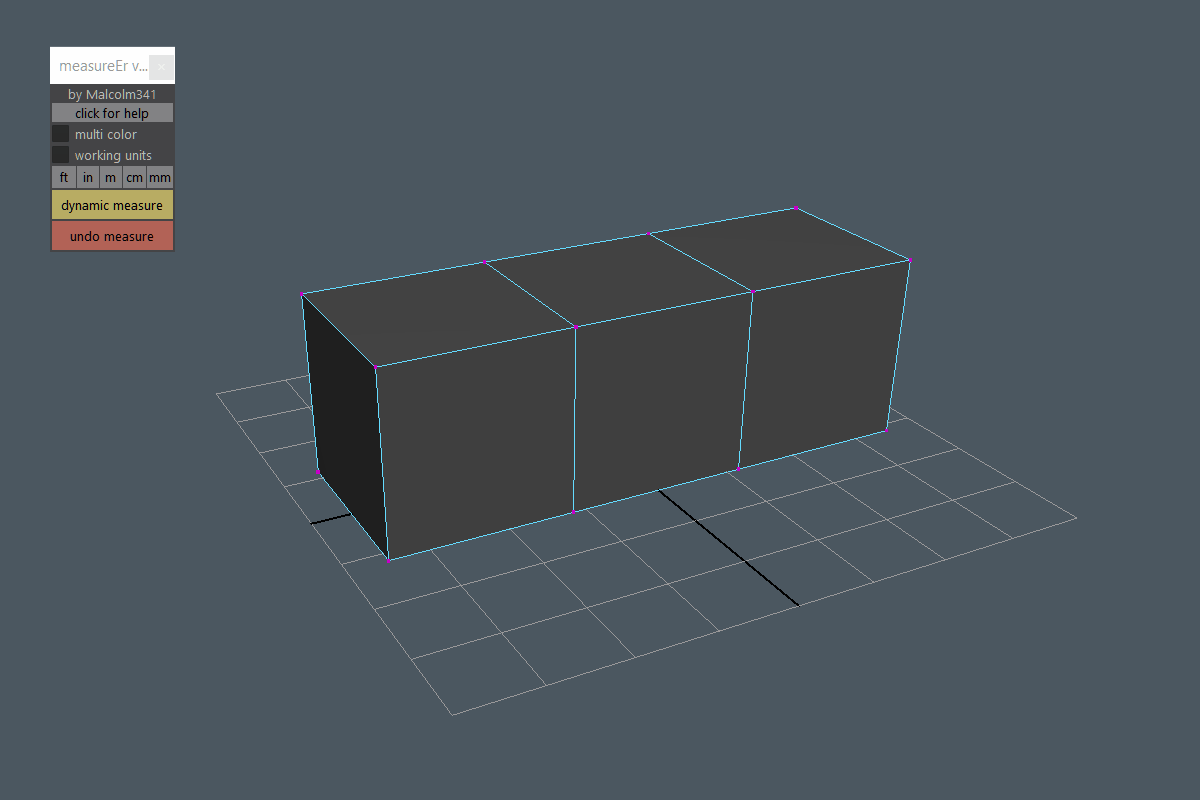
Turn on if you want to see the current working units Maya is set to displayed in the HUD. For example, meters, centimeters, feet, etc.
Sets the Maya working units to feet, inches, meters, centimeters, or millimeters. Measure nodes update automatically to display distance in the working units Maya is currently set to.
Creates a dynamic measure node between two or more selected vertices.
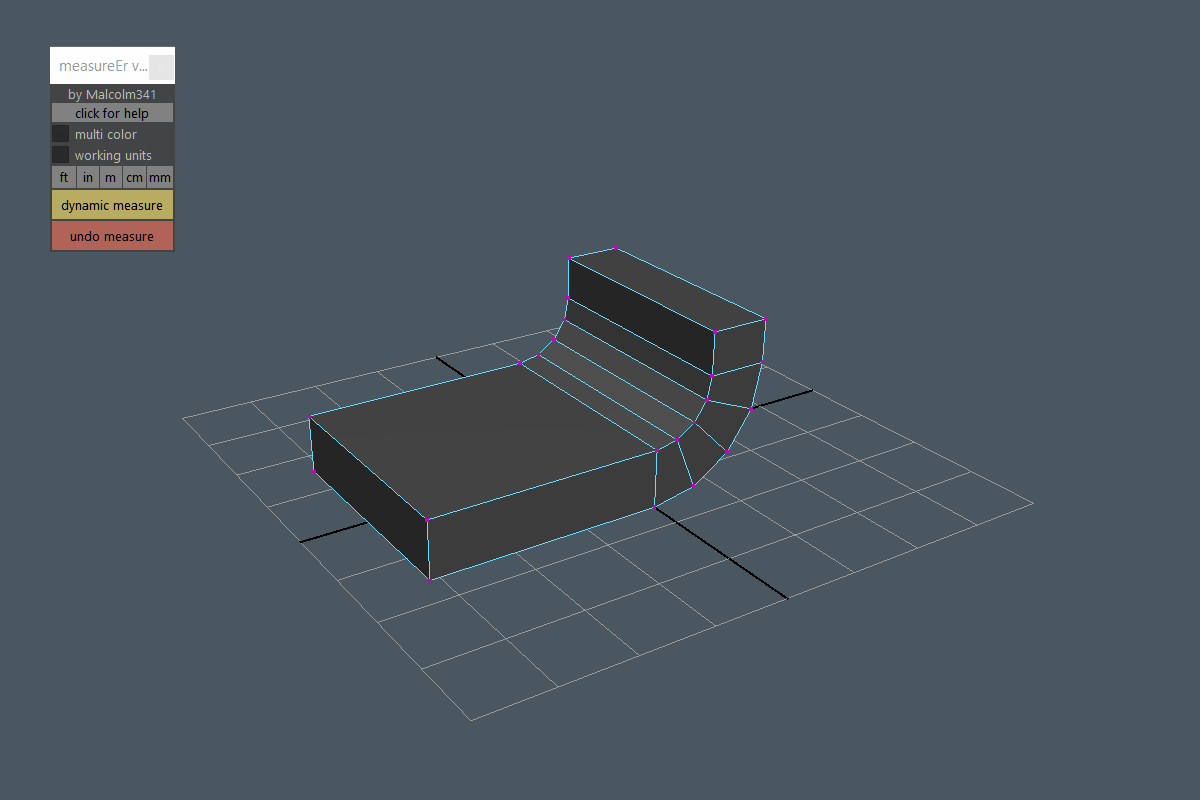
The undo measure button removes the last created measure node each time you press the button. The all button removes all measure nodes from the scene. Maya's undo doesn't work correctly with this toolbox and undoing will create empty nodes in the Outliner. To avoid this, use the undo measure button, or select a measure group in the Outliner and delete it.
YouTube Video
Naming Toolbox
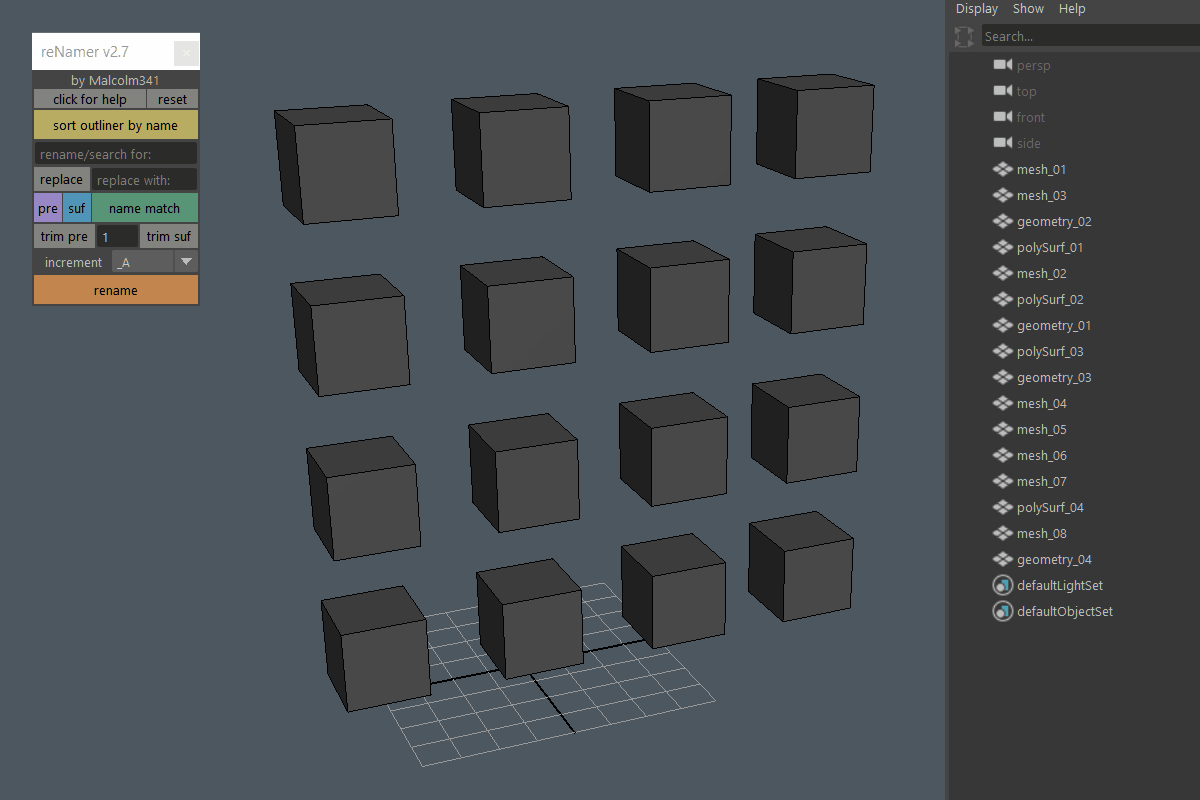
Sorts selected objects alphabetically in the Outliner, if nothing's selected the whole outliner is sorted alphabetically.
Stores the current name you want things renamed to, also acts as the search for field when you want to replace part of a name.
Replaces the characters in the upper text field with the characters in the lower text field on selected objects. To replace part of a name use the upper text field to search for, and the lower text field to replace with. For example, if you want to change poly_sphere_01 to poly_cube_01, type sphere in the upper field and cube in the lower field and press the replace button. If you want to remove part of a name, leave the upper text field blank, and type the part of the name you want removed in the lower text field. For example, if you want to change poly_sphere_01 to poly_01, type sphere in the upper field and nothing in the lower field and press the replace button.
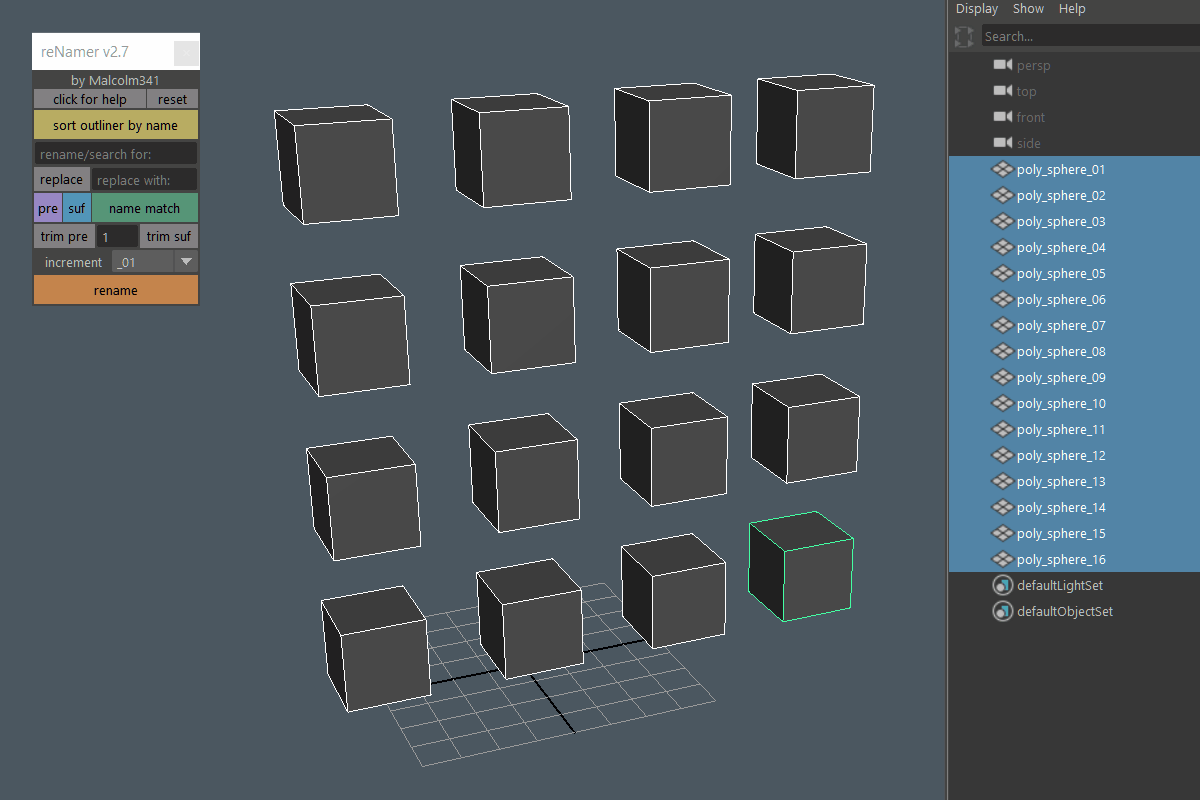
The pre button appends the characters in the upper text field to the beginning of the object name. The suf button appends the characters in the upper text field to the end of the object name. The name match button inserts the word _high or _low before the increment if the mesh is inside a group named high or low. This is helpful for renaming multiple meshes in one click if you're going to use the name matching feature of Marmoset Toolbag, Substance Painter, or another baking program. Create a group named high and a group named low using all lowercase letters. Put your high and low meshes into the corresponding groups, make sure the hierarchical order of the meshes is the same in both groups so the numbered increment corresponds to the correct mesh in each group. Type a base name into the upper text field if you want to rename all the meshes to the same name, this can save time if you don't care about names because everything will be name matched in the baking program. If you want to keep existing names, leave the upper text field blank and the name match button will keep your existing names up until the first underscore and replace everything after the first underscore with _high or _low and the increment. Hold Ctrl and click the first mesh inside the high group, then hold Shift and click the last mesh inside the high group to select everything, but the group. Do the same for the meshes in the low group, make sure your selection order is the same between both groups so the increment gets added correctly. Press the name match button. Meshes will be renamed to:
name_high_01, name_high_02, name_high_03, etc.
name_low_01, name_low_02, name_low_03, etc.
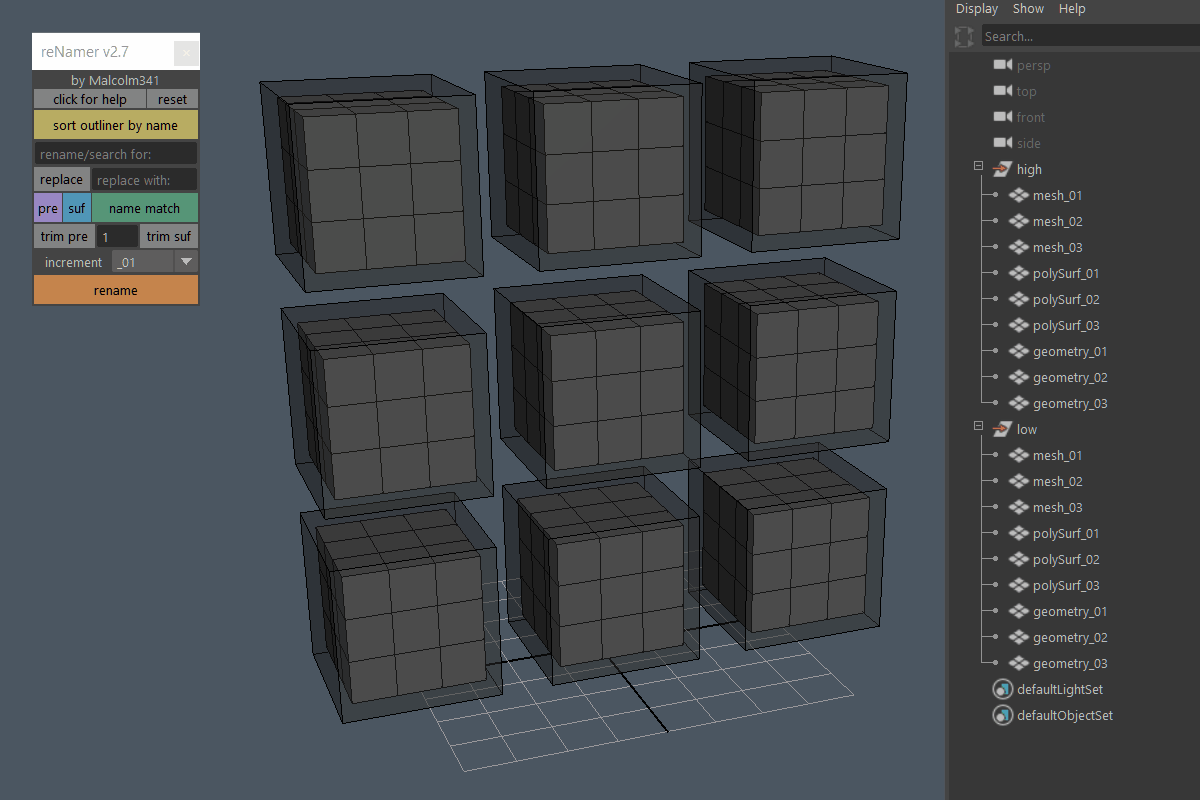
The trim pre button removes a specified number of characters from the beginning of the name, and the trim suf button removes a specified number of characters from the end of the name. The numeric input field is used to set how many characters will be removed when you press the trim pre or trim suf buttons.
Sets which increment style gets added to the end of the name when you press the rename or name match buttons. Choose from seven styles:
name_A, name_B, name_C, etc.
name1, name2, name3, etc.
name_1, name_2, name_3, etc.
name_01, name_02, name_03, etc.
name_001, name_002, name_003, etc.
name_0001, name_0002, name_0003, etc.
name_LOD_0, name_LOD_1, name_LOD_2, etc.
Renames selected objects to what you typed in the upper text field.
YouTube Video from 2020